Scratch Beginner 001.pdf - ScratchEd - MIT
Scratch Beginner 001.pdf - ScratchEd - MIT
Scratch Beginner 001.pdf - ScratchEd - MIT

Create successful ePaper yourself
Turn your PDF publications into a flip-book with our unique Google optimized e-Paper software.
Introduction:<br />
<strong>Scratch</strong> Lesson 1:<br />
Welcome to <strong>Scratch</strong><br />
Welcome to the first scratch lesson of this course. By now you should have the <strong>Scratch</strong> software<br />
installed on your laptop. If you do not it can be downloaded from the <strong>Scratch</strong> website here:<br />
http://scratch.mit.edu<br />
Each class will have a handout like this one. If you miss a class, you can still get the handout from me<br />
at a following class, or by asking either Mr. Beacham or Jeremy. If for some reason you forget your<br />
laptop, you can still attend. You can just listen or maybe someone will let you join in or look over<br />
their shoulder. You can still take the handout and do the work on your own laptop later, if you<br />
would like.<br />
Starting <strong>Scratch</strong>:<br />
<strong>Scratch</strong> can be started by double-clicking on your Desktop. If you do not have the icon, then it<br />
can be found by clicking and then clicking “All Programs”, “<strong>Scratch</strong>” and lastly clicking the<br />
<strong>Scratch</strong> icon. If you still can’t find it, you may need to have the software installed or re-installed.<br />
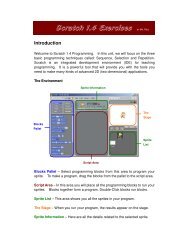
Using <strong>Scratch</strong>:<br />
When <strong>Scratch</strong> starts it begins by loading a default project that contains only a blank background and<br />
a single sprite, <strong>Scratch</strong> the kitten. This is the starting point for new projects. The kitten does not<br />
have to stay there and it can be removed if you want.<br />
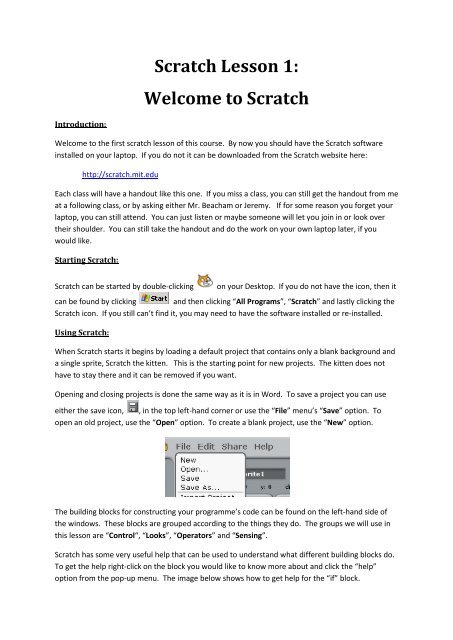
Opening and closing projects is done the same way as it is in Word. To save a project you can use<br />
either the save icon, , in the top left-hand corner or use the “File” menu’s “Save” option. To<br />
open an old project, use the “Open” option. To create a blank project, use the “New” option.<br />
The building blocks for constructing your programme’s code can be found on the left-hand side of<br />
the windows. These blocks are grouped according to the things they do. The groups we will use in<br />
this lesson are “Control“, “Looks”, “Operators” and “Sensing”.<br />
<strong>Scratch</strong> has some very useful help that can be used to understand what different building blocks do.<br />
To get the help right-click on the block you would like to know more about and click the “help”<br />
option from the pop-up menu. The image below shows how to get help for the “if” block.
The characters or actors in your programmes are called sprites. All the sprites in the programme<br />
are shown in the bottom right-hand side. You can create new sprites using the<br />
icons. The first will allow you to paint your own sprite. The second allows you to open a save sprite<br />
from your computer and the last one will pick a random sprite from the library and put it in your<br />
programme.<br />
Hello World (your first <strong>Scratch</strong> programme):<br />
Most programming language courses start with a very simple programme called “Hello, World”. It is<br />
a simple example that shows what a programme looks like and how to output a message. This is<br />
how we will start ours. After starting a new project drag the code blocks from the left into the<br />
“Script” panel in the centre to make the following:<br />
You can then click to start your script. You can even change “World” to be your own name and<br />
<strong>Scratch</strong>, the kitten, will say “Hello,” to you.<br />
Hello to Anybody:<br />
Now that you have made your first programme, it is time to build on it. At the moment your<br />
programme can either say ‘Hello World!” or “Hello” to you. Wouldn’t it be nice if it could ask you<br />
who what your name was and then say “Hello” to you?<br />
This can be done by first adding in an block. This block will cause <strong>Scratch</strong> to ask<br />
you a question and then wait for an answer. You could add to your first programme by dragging it<br />
on the “Script” panel and dropping it between the two blocks already there. Your programme would<br />
then look like this:
Now your programme asks you a question, but it doesn’t do anything with the answer. To use the<br />
answer we use the variable and the operator to build a string. The<br />
operator will take the first word and the second word and put them together to<br />
create a new word. We can use this in your programme to make <strong>Scratch</strong> answer you, like this:<br />
Can you get <strong>Scratch</strong> to answer “Hello . How are you?” So, if you answered “Mr. Flibble”<br />
the answer would read:<br />
Glossary:<br />
As we go through the course you will learn new computer terms and the glossary is where they will<br />
be explained.<br />
Concatenate: Means to join to strings. For example, concatenating the string “Hello “ to the<br />
string “World” would give me “Hello World”.<br />
String: A string is a group of characters. These characters can be anything you can type in<br />
on your keyboard. Sometimes they make up words, sometimes they don’t. “I went to the<br />
shop” is a string and so is “fj234090345;;>>”.<br />
Variable: A variable is a place to store information. In the programmes in this lesson the<br />
variable is and it contains the answer to <strong>Scratch</strong>’s question.