
7 Top Tips for Editing Macro Photos
You’ve done the hard part! You’ve captured a great macro or close-up image, overcoming several technical challenges in the process. For example, depth of field and natural light are limited at higher magnifications, and getting within picture taking distance of miniature things, like butterflies and grasshoppers, is rarely a straightforward task.
Hopefully our tutorials have helped you avoid some common macro mistakes. However, the job isn’t complete yet.


Assuming your camera is set up to capture raw (which is recommended, given that raw files boast more information, better dynamic range, and a wider colour gamut), your pictures will need at least some degree of post-production to bring them to life.
Leave your shots untouched and they will never fulfil their potential. But if, like me, you don’t really enjoy post-processing, the good news is that most close-up photos don’t need a great deal of tweaking.
Often all that is required is several small, subtle, adjustments that seem insignificant individually, but collectively make the image pop.
Personally, I like to keep things simple and try to get the hard work done in-camera. I rarely spend more than a couple of minutes processing my raw files. The exception, of course, is focus stacking– a popular technique among macro photographers where you capture multiple shots, each at different focal depths, and then combine them to create a file with extended depth of field.
This technique relies on post-production (although some cameras do create the stack in-camera), and often the use of dedicated stacking software. I’ll talk about this in a little more detail later. Otherwise, standard photo editing software is more than adequate for close-up enthusiasts.
Personally, I use Adobe Lightroom Classic, but if you favour a different raw converter (for example, Affinity Photo or Capture One), do not worry- the following tips are just as relevant to you.
Tip 1: Select your file
Having imported your raw files from your camera into your preferred raw converter, first browse your shots and select the file you wish to process. With close-up photography, you will often take a series of shots using subtly different settings, and will therefore end up with several similar photos.
Sometimes one image will immediately stand out as the best shot, but you may need to compare files side-by-side to decide which image out of a sequence is best.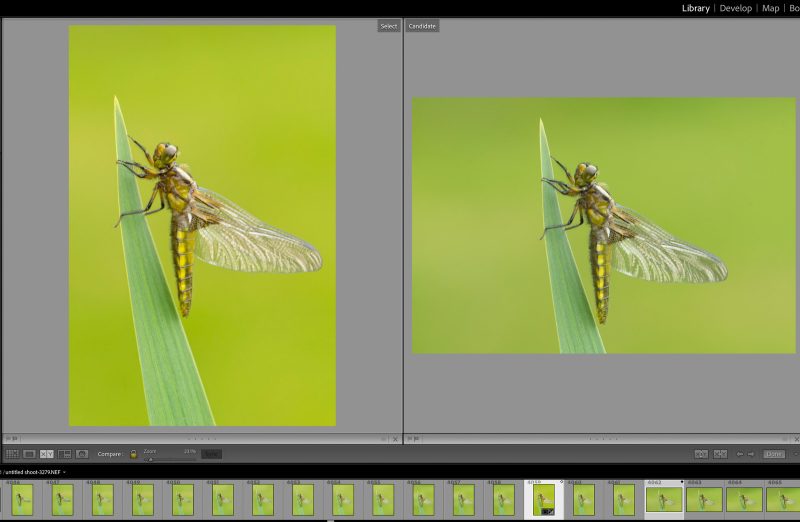
In Lightroom, do this in the Library Module. Click the ‘Compare View’ icon in the toolbar and choose ‘View > Compare’. Select an image by clicking on it and then use the arrow keys to scroll through different candidate images.
You can zoom in and out of both files simultaneously to compare critical sharpness. If required, use the rating stars, colour labels, or the ‘pick’ and ‘rejected’ flags to help refine your selection. Once you have selected a file, you are ready to begin editing.
Read more: How to Choose Your Best Images After a Shoot
Tip 2: Adjust exposure
Achieving the right exposure is key to any image. In Lightroom, exposure can be refined using ‘Tone’ settings found under the Basic Panel. Here you can quickly make powerful adjustments to overall exposure, contrast, highlights, shadows, whites, and blacks.
While you can also adjust exposure using the ‘Tone Curve’, most photographers will find the sliders under the ‘Tone’ tab more intuitive to alter. For most close-up images, you will want a full range of tones.
To do this, you should first set your black and white points. You can do this in several ways.
Using the histogram to guide you, drag the black and white sliders in turn to adjust contrast. You will see a small, triangular clipping marker in the top right and left corners of the histogram. Click on both alerts to enable them. They will then light up if you push the sliders too aggressively, and clip either the blacks or whites.
If this happens, just drag the relevant slider back until the marker isn’t illuminated. For added precision, you can hold down the Alt (or Option) key while dragging either slider. This will give you a masked view of the image, clearly showing any clipped pixels.
Alternatively, hold down the Shift key and double click on the whites or blacks slider, to set the points automatically.
However, do so with care, as you won’t always want a full range of contrast. Some subjects suit low contrast and, personally, I prefer to adjust exposure and contrast intuitively, looking at the photo and making slight tweaks until I am satisfied with the result.
It is worth noting that close-up photographers will rarely practise ‘Exposing To The Right’ (ETTR), as the technique lengthens exposure. This is rarely practical when photographing nature.
Instead, macro shooters will normally wish to achieve a ‘correct’ exposure in-camera. Therefore, don’t be surprised if adjustments to exposure are minimal in some instances.
With the black and white points set, you may then wish to adjust shadow and highlight detail using the relevant sliders, or adjust the image’s overall brightness using the ‘Exposure’ slider. Avoid the temptation to get too carried away.
Too much shadow or highlight recovery can create artificial, HDR-looking results, which rarely suit close-ups of flowers or invertebrates.
Unfortunately, there is no magic formula as to how much or little you should adjust exposure. While most raw converters have an auto setting for adjusting exposure (which can do a surprisingly good job), software can’t predict the effect or look you wish to achieve.
Only you can answer that- so give each image individual treatment. As with composition, intuition plays a big part in post-production.
Tip 3: Adjust colour
I set my camera’s white balance to either auto or daylight, safe in the knowledge that I can adjust and refine colour temperature with impunity when I process my raw file. Auto white balance is often very reliable, but it can be deceived by subjects containing lots of the same colour.
For example, if you photograph an insect against a background of out-of-focus foliage, your camera may perceive all those dominant green tones as a colour cast, and try to neutralise it by selecting an incorrect colour temperature. Or if you fill the frame with a yellow flower, the same problem may occur.
For this reason, I often shoot in daylight white balance when shooting close-ups. I know it provides a constant value. However, in the rare instance when auto white balance is deceived, shooting in raw makes it quick and easy to remedy.
The simplest way to alter white balance using Lightroom is via the dropdown menu in the ‘White Balance’ panel. This will give you nine options: as shot, auto, daylight, cloudy, shade, tungsten, fluorescent, flash, and custom – designed to mimic your camera’s white balance settings.
Try clicking on each in turn to preview their effect. You’ll notice the values for ‘Temperature’ and ‘Tint’ change as you do so. You may well find that one of the preset values provides just the result and tone you want.
However, a more precise (and potentially creative) way to achieve the colour you want is to manually adjust the Temperature and Tint sliders, found directly below White Balance. The Temperature slider globally adjusts the colour temperature of the image. Sliding it to the right will warm up the image, while dragging it left will cool it down.
The Tint slider can be used to compensate for either a magenta or green tint. Often adjustments only need to be small, but for some close-ups a larger colour shift can prove effective. For example, a silhouetted subject might look visually better against a much warmer or cooler backdrop.
For ultimate accuracy, you can adjust colour temperature using the ‘Eyedropper’ tool. However, this is something I rarely do. While doing so will help you achieve a neutral colour temperature, it will rarely produce one that is especially aesthetically pleasing.
To boost colour further, consider adding a touch of ‘Vibrance’ or ‘Saturation’. In Lightroom, these sliders are found under the ‘Presence’ tab. Vibrance and Saturation are similar to one another, with a subtle difference.
Saturation will globally saturate your photo (or desaturate, if you apply a negative value). In contrast, Vibrance is a little more sophisticated, identifying and then boosting the less saturated colours within your photo, faster than the already saturated tones. If you decide to use these sliders, do so carefully.
Apply only small values and typically just one or the other, depending on which slider suits the subject best. I rarely increase either slider beyond a value of +15, but adjust to taste.
You typically want your colours to pop, but they should remain authentic and faithful to the subject. You can also use a ‘Targeted Adjustment Tool’ to select and adjust specific colours within the photo. But while this has it uses, I rarely find I need to do this.
Read more: Lightroom Colour Correction – Hue, Saturation, and Luminance
Tip 4: Localised adjustments
Raw converters, like Lightroom, boast several advanced tools which enable photographers to make useful localised adjustments. While there isn’t room here to go into any great detail, I will highlight one tool I find helpful when processing my close-ups.
The Radial Gradient tool is found under ‘Masking’ and allows you to create elliptical masks. You can opt to either work within or outside the area you select. You can quickly adjust the size, shape, and orientation of your mask by clicking and dragging the four control handles.
By clicking on the centre button, you can move and place your selection. If you are using the latest version of Lightroom, the adjustments you make will be applied inside your selection by default. However, you can quickly reverse this by clicking ‘Invert’. With the latest update, any applied mask is automatically shown in red, to prevent any confusion over the area you are working on.
One of its main designs is to allow photographers to create off-centre vignettes, to highlight specific points in the photograph. However, close-up photographers are more likely to use it to select their main subject, and then apply changes either to the subject or its surroundings. I use this tool regularly, but subtly, and I mostly only adjust highlights or shadows.
However, you have several controls at your disposal, including exposure, contrast, clarity, saturation, dehaze, sharpness and noise sliders. To help blend in your changes, feather your selection by an amount of at least 50.
The Radial Tool can be used to simply ‘dodge and burn’ areas- relieving dark shadows or reducing the brightness of distracting highlights and hotspots. However, I will sometimes select my subject and apply negative clarity to the outside of my selection to soften the subject’s background. Or, I might apply a degree of clarity, sharpness, or saturation just to my subject, to help it pop.
For even greater accuracy, consider using the ‘Adjustment Brush’ to do this. You can apply multiple filters to the same image, but changes should be applied with a delicate touch – localised adjustments should not be obvious.

Have a play with the Radial Gradient Tool and you will soon recognise its usefulness for making localised tweaks to your close-up images.
Read more: Master the Graduated & Radial Filters in Lightroom
Tip 5: Cropping
Cropping can radically alter an image’s look and balance. You can remove distracting elements from the edge of the frame, or change the image’s aspect ratio, should your subject not suit the standard 3:2 ratio. For example, you might decide your photograph suits a square format better.
For close-up photographers, cropping an image is also a method to increase subject magnification- effectively making your subject larger in the image space. However, when you crop an image, it is important to remember that you are discarding pixels and, therefore, reducing the image’s resolution and quality. Only crop your image when necessary and beneficial.
Having said that, the quality and resolution of digital sensors is high today. For example, my present camera has a resolution of 46-megapixels. As a result, I could crop my images by 50%- effectively doubling the reproduction ratio- and still maintain a high-resolution file.
Although discarding so many pixels isn’t recommended, it is certainly an option to consider in situations when you can’t physically get any closer to your subject, due to the risk of disturbing it.
All image editing software, including raw converters, have a crop tool.
Having selected the tool, click and drag the selection handles to highlight the area you wish to retain. You can either make unconstrained adjustments to create your own custom aspect ratio, or choose from a choice of popular dimensions.
You can also create presets by entering the values you desire in the width and height boxes. Once done, click ‘Enter’ or ‘Return’ to apply your crop, and the area outside your selection will be discarded. Always keep an unaltered copy of the original image, just in case you later decide you don’t like the cropped version, or wish to crop the image differently.
Tip 6: Noise reduction
One of the final steps before exporting your processed image is to look for noise and, if required, apply a degree of noise reduction. To keep noise levels low, avoid underexposure and select the lowest practical ISO.
However, close-up photographers often rely on higher ISOs to generate a sufficiently fast shutter speed. Many of my close-ups are captured at ISOs upwards of 1600, so a degree of noise reduction at the conversion stage is often necessary.
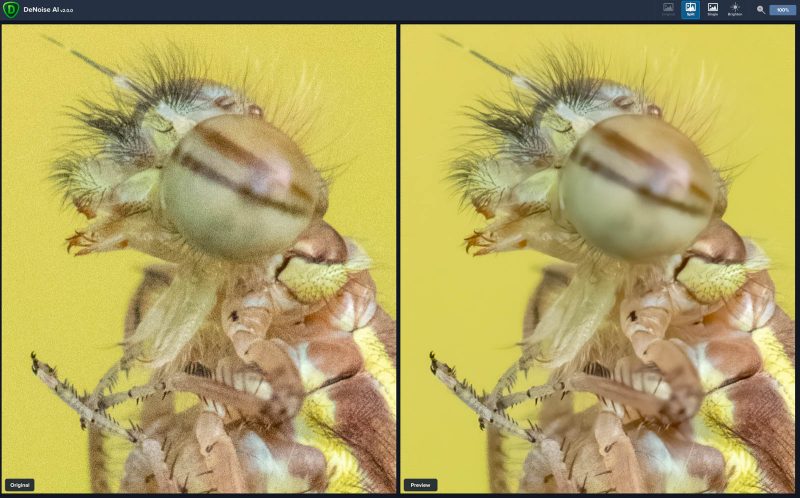
Noise reduction, typically built into raw packages, will usually suffice. In Lightroom, scroll down to the ‘Detail’ tab and adjust the noise reduction sliders.
However, for images taken at particularly high ISOs, I would recommend using dedicated programs, like Topaz Labs DeNoise AI.
Noise reduction is effectively obscuring and destroying fine detail, so apply the minimum amount required. A certain degree of luminance noise, resembling film grain, is generally acceptable to the eye, but colour noise is ugly. The amount of noise reduction you need to apply will depend on the individual image.
Read more: How to Reduce Noise in Photos in Lightroom
Tip 7: Focus stacking
Focus stacking is an image blending technique, designed to extend depth of field. Put simply, the photographer takes a sequence of images, each captured at different focal depths, and then merges them using software. It is not dissimilar in principle to High Dynamic Range (HDR) photography, only the idea of focus stacking is to extend back to front sharpness, rather than dynamic range.
Focus stacking is particularly useful for macro photography, where depth of field is often very restricted. At very high magnifications, it is rarely possible to achieve sufficient depth of field in one frame, even at small f/stops. Focus stacking is the answer.
Ideally, your subject will be static and your camera fixed on a tripod, but it is possible to stack macro photos in the field. The number of photographs required for your stack will depend on the subject, aperture in use, and the level of magnification. It is best to err on the side of capturing too many, rather than too few, images.
If you don’t capture a sufficient sharpness overlap between images, your composite will not be smooth and will contain ‘ghosting’ at the edges of detail. While none of the individual shots will record the subject entirely in focus, the sequence should contain all the data required to generate an image that is sharp throughout.
Having captured your sequence, you will require appropriate software to align and blend the images together. Most raw converters won’t do this.
It is possible to stack images in Photoshop, but there are also several very good, dedicated programmes to download online. CombineZM is one of the most popular free focus stacking programmes. Helicon Focus and Zerene offer more functionality, but you have to pay to download the full versions.
In conclusion
Obviously, post-processing is a huge and very involved subject. I appreciate that my handful of tips barely scratch the surface, but hopefully they can give you a starting point. Remember there is no fixed formula or format when processing your close-ups- each image will need different treatment.
Some shots will need little processing, others will need more work, but you will see the difference in the before and after.
Try to grow familiar and gain confidence with using all the key sliders and tools. However, the real skill is knowing when to apply each one. Don’t make adjustments for the sake of them, and always be sensitive to your original vision.
With a little practice, you will find the process becomes quick and intuitive. And, you will discover useful keyboard shortcuts and other good tips along the way. Good luck!


