How to Use the Custom Sort Feature in Microsoft Excel

You can sort your data by more than alphabetical order. Check out the custom sort in Excel to sort by multiple columns or using colors.
Microsoft Excel provides you with helpful tools for analyzing and reviewing your data. You can use filters to find data quickly and conditional formatting to make specific data pop. Another handy tool is the sort feature built into Excel.
You can sort data alphabetically with a simple click. But if you want to sort using a value, color, or multiple columns, check out the custom sort.
Open the Custom Sort in Excel
The custom sort tool is available in the desktop version of Excel on Windows and Mac. And it was added to Excel for the web in mid-2021. It works the same way, no matter which version you’re using. So, open your spreadsheet in Excel, and let’s get started.
- Select the data you want to sort.
- Go to the Home tab and click Sort & Filter in the Editing section of the ribbon.
- Pick Custom Sort from the drop-down list.
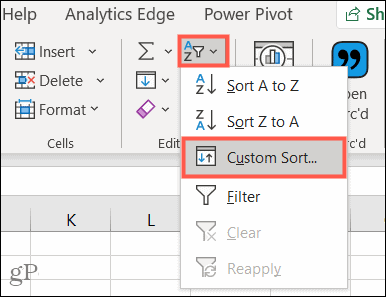

This displays the Sort box where you set up the options you want to use.
Use the Custom Sort in Excel
We’ll start with a simple custom sort using just one level.
- Check the box on the top right if your data range has headers. This then displays those headers in the Column sorting options.


- Choose the column you want to Sort By. Remember that all data in your selection will be sorted, not just that column.
- Select what you want to Sort On. You can choose from Cell Values, Cell Color, Font Color, or Conditional Formatting icons.
- Pick the Order for the sort. This drop-down list will adjust depending on the Sort On option you select. For instance, if you pick Cell Values, you can choose A to Z, Z to A, or a Custom List. But if you choose a Cell or Font Color, you’ll pick the color and display those at the top or bottom.

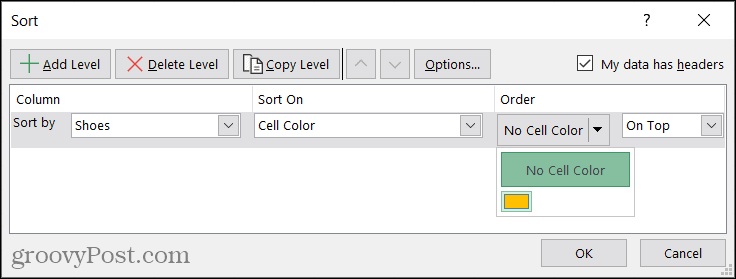
- When you finish, click OK to apply the sort to your data.
As you can see here, we sorted our Shoes column by Cell Color and decided to display those cells at the top.


Use Additional Custom Sort Options
You’ll notice additional options for your custom sort at the top of the Sort window. If you want to perform a detailed sort, these are the tools you’ll want to use.
Multiple Levels
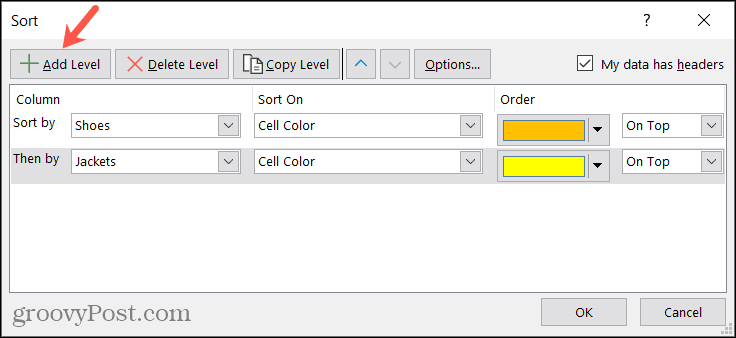
To sort using more than one column, complete the Sort By, Sort On, and Order sections. Then, click Add Level on the top left. Now you can add the same options for the next column you want to sort by.
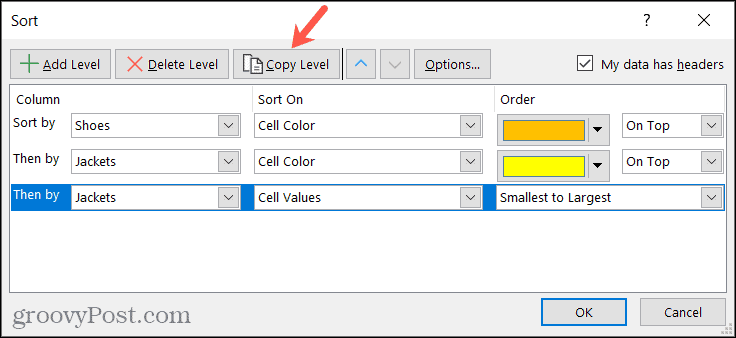
When you use a multilevel sort, Excel sorts the data according to the levels you set up in the window. For example, in our setup, Excel will sort by Shoes and then Jackets using a Cell Color for both.

If you continue to add more levels to the sort, you may want to change the order of the levels. Select a level and use the Move Up and Move Down arrows to arrange the sort levels.
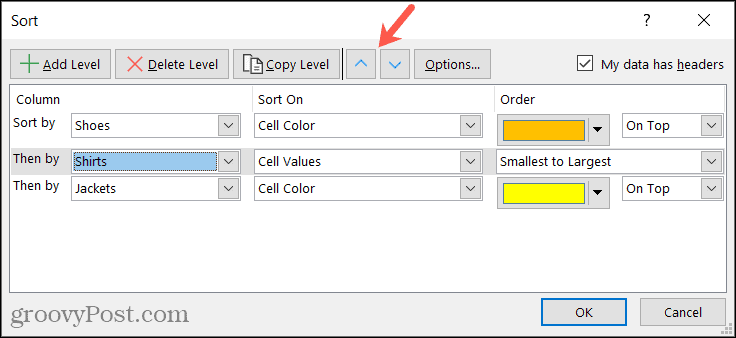

To remove a level from the custom sort, select it and click Delete Level.
Another option is to copy an existing level and then slightly adjust it. Select the level and click Copy Level. Here, we copied our Jackets level and sorted by Cell Values.

More Options
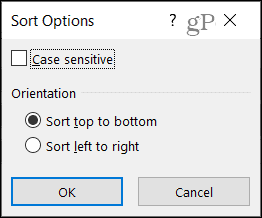
Another way to use the custom sort is to adjust case sensitivity and orientation. Click the Options button in the toolbar. You can then check the box for Case sensitive and choose between Sort top to bottom or Sort left to right. Click OK to apply the options to the custom sort.

Sort to Spot Your Data in Excel
By sorting your data, you’ll spot the exact data you’re looking for more easily. And you may want to provide this sorted view to others reviewing your spreadsheet.
For more, take a look at these helpful Microsoft Excel tips.
Leave a Reply
Leave a Reply
