
SHHHHH! Four Ways To Quiet Down Noisy Guitars and Basses
Lane Sparber
So…your guitar feels great, plays well, and sounds fantastic. However, when you’re not playing, there’s buzz, hum, a whining sound (that’s NOT coming from your road manager this time) or a howl. Sometimes the sections of the strings behind the nut and after the bridge ring out obnoxiously, making it all the way to the amp. All of these symptoms are indicative of some larger issues, and in this article I’ll outline for you some ways of dealing with instruments that just won’t shut up when you need them to.
Before we delve in, I’d like to make one thing clear: None of these tips and tricks will silence a true single-coil pickup. They have inherent 60 cycle hum that’s not really correctable by external means. However, we can deal with the incidental and RF-induced noises that can make that hum seem to be even worse. With that caveat firmly in mind, let’s dig in!
1. LOSING GROUND
The first and most basic item we want to check in a noisy guitar is the quality of the circuit grounds. All grounding points should be solid, and all of the instrument’s solder joints should be nice, firm, and SHINY. If any solder connections are sloppy (or broken), they can induce a LOT of noise and hum into your instruments. If they look bad, it never hurts to re-flow them with some new solder (or re-do them entirely by removing the old solder and starting fresh). If the solder joints look good, they can still be bad. You can test the quality of your grounds by setting any standard electronic multi-meter to its lowest “ohm” setting. Some meters even have a function wherein you can touch the leads together first and “zero out” the actual resistance of the leads themselves. If your meter has this function, use it before proceeding. Then, touch (or clip) one meter lead (polarity doesn’t matter here) to the sleeve connection at the jack. Touch the other lead to any solder joint inside the guitar that’s a grounding point – the backs of pots, the grounded side of the volume pots, etc. If your meter reads more than 2 or 3 ohms of resistance, then that grounding point is suspect. Redo it until you read 0 (infinity) or 1 ohm – that’s what we’re looking for. Once all circuit grounding points are solid and fully conductive, we can more on to the other tricks to get rid of noise gremlins.

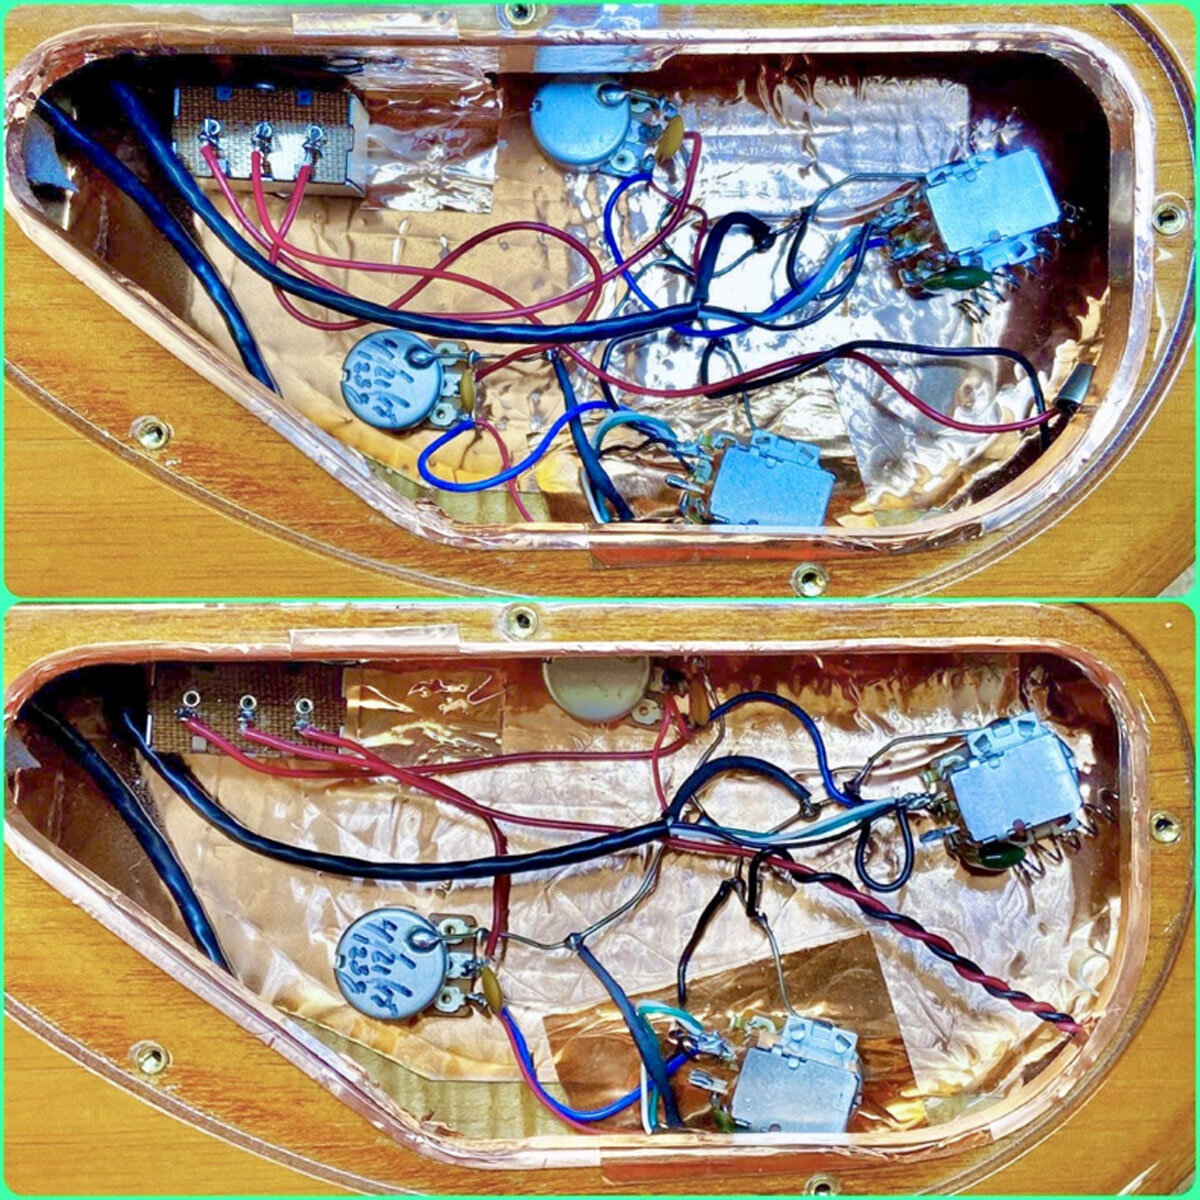
Here I’m metering the resistance between the jack ground (sleeve) of this Telecaster wiring harness and the casing of the TBX tone pot. .3 Ohms – really good!
2. SHIELDS UP!
One of the most common “bread and butter” jobs I do in my shop involves shielding noisy instruments to cut down on incidental noise and buzz. What does shielding do? In effect, when we shield a guitar we are forming a “Faraday cage” around the guitar’s electronics. This means that we are completely surrounding the instrument’s circuit with a conductive material connected to ground. This forms a barrier (or “shield”) that RF noise can’t penetrate. A well-shielded instrument is usually immune to the “sizzle” sound that happens when you’re not touching the strings, as well as the slight noise that comes and goes as you re-orient the guitar in space (when you pivot left or right whilst holding the guitar). There are two main methods for shielding guitar and bass electronics, and I’ll outline both for you below. Please note that no matter which of the following methods you use, the first step is that ALL of the electronics need to be de-soldered and removed completely from the instrument and set temporarily aside. This includes all pots, pickups, and pickup selector switches.
The most common way of creating shielding is by applying electrically conductive foil tape (usually made of sticky-backed copper) to the insides of your control cavities and the underside of all of the plastic cavity covers (you can find this at most online guitar shops, such as www.stewmac.com). Then a wire is run from the foil to ground. Some of the more obsessive installers will also run a thin line of solder along all of the adjoining pieces of tape to ensure a good electrical connection between them. The pros of this method are that it’s a fool-proof, non-invasive and reversible way to get your guitar shielded. The cons are that it takes a good long time to cut the pieces of tape to fit the cavity, and if you’re going to solder all of the joints between the overlapping pieces of tape, that takes even longer. In addition, I’ve seen this tape come loose from the walls of the control cavities more than once, and when they do, they will short out and kill any signal-bearing joint they touch, so you have to make absolutely sure that the tape is going to REALLY stick to the wood in there.
This is a “Before and After” rewiring I did on a Carvin guitar. Note the foil shielding tape coating the inside of the cavity.
The other common method of shielding instruments is to actually paint the insides of your control cavities with an electrically conductive paint (this paint can be found multiple places online, but again I use www.stewmac.com, because their paint works and comes in a convenient pint-sized canister). The pros with this method are that painting the cavities is FAR easier and less fussy than cutting multiple pieces of foil tape to fit the cavities, and it can’t come loose and short out any internal components like the foil can. If you get really good paint, it also can provide a more uniform electronic barrier than tape sometimes will. The drawbacks are that this method is NOT reversible; once the cavities are painted, they’re painted. You can’t easily remove it. So, maybe you don’t want to use this method on that 1959 sunburst Les Paul. In addition, this paint is admittedly expensive, but most commercially available containers have enough paint to shield several instruments, and will thus pay for themselves over time. Finally, keep in mind that all electronic cavities need 2-3 coats of paint, and each coat needs to dry overnight, so this isn’t a one-day procedure (even though the actual application of each coat is far quicker than the tape).

This Fender Strat’s control cavity is about to get it’s first coat of shielding paint.

Here the first coat of paint is drying.
In wrapping up this section, I’d like to point out that if you have more than one control/pickup cavity, you need to run wires from the new shielding paint/foil tape to a soldered grounding point in the main cavity (the back of a control pot, for example) to make sure that the tape/paint is actually electronically active. If you don’t, then the ungrounded shielding in your pickup cavities, (and pickup selector cavities in Les Pauls, etc.) can actually act as an antenna and INDUCE noise – the polar opposite of what we’re trying to do here. Sometimes, I will use thin slivers of the foil tape to connect the cavities to a shielded pickguard – that way you don’t have to drill holes for additional screws in the cavities, but this isn’t always feasible. So please be advised on that (see pics below).

Here’s the same Strat from the above pics. You can see the two pieces of foil tape (red arrows) that will connect the shielding paint to the pickguard’s grounded foil shield when it’s all reassembled.

Conversely, this guitar has no pickguard, so I’ve used SHORT screws (don’t want to go through the back of the guitar!) to fasten solder lugs to each cavity. These lugs are then daisy-chained together and run to the main control cavity, where they attach to ground.
I myself use a combination of these methods when I shield an instrument. All cavities get multiple coats of shielding paint, and I save the foil tape itself for plastic parts, such as the underside of control cavity covers and pickguards. This way, I get the best of both worlds, and the end result is pretty much bullet proof. That said, in your case, do whatever works for you.
3. WAXING POETIC
Up to now, we’ve covered ways to eliminate atmospheric hiss and buzz caused by poor grounding/lack of shielding. However, if your guitar emits a shrieking, ear-piercing high-pitched SCREECH whenever you mute the strings or are not playing it, then that’s most likely a microphonic pickup. What’s that? Well, in essence, most guitar pickups are simply a long coil of wire around a magnet. If the individual coil windings are loose (or if they can move at all – even microscopically), they THEMSELVES will vibrate when sound waves from your amp penetrate the pickup. This is what’s known as microphonic feedback – and it’s not the GOOD kind of controllable, sustained feedback that rock and metal beasts (such as myself) crave. This kind of noise is completely undesirable, and it happens usually in higher gain applications whenever there’s even the slightest rest or mute in the music. Effective wax potting will often eliminate this phenomenon entirely.
Wax potting, in the simplest terms, involves immersing the pickup in warm wax. Once the pickup heats up to the temperature of the wax, the wax will saturate the ENTIRE pickup coil. Then, when the wax dries, it “fixes” the coil windings in place, keeping them from vibrating and eliminating that dreaded banshee wail. It’s VITALLY important that you use wax with a low melting temperature so that you don’t melt the pickup itself in the process (ask me how I know this…better yet, please don’t!). I’ve found that the best pickup potting medium is a mixture of paraffin (about 70%) and beeswax (about 30%), although these proportions do not need to be exact. The melting point of this mixture will be around 100-100 degrees Fahrenheit, which won’t harm the pickup itself. NO CANDLE WAX should be used, unless you fancy Salvador Dali-style deformed pickups.
To safely perform this procedure, I use a wax warmer designed for nail salons. It keeps everything at a nice, safe, low temperature. I use a meat or candy thermometer in the wax to monitor the true temperature before immersing the pickup(s) to be potted. I also line the bottom of the wax container with marbles so that the pickup never actually touches the bottom of the enclosure, which is the warmest part.
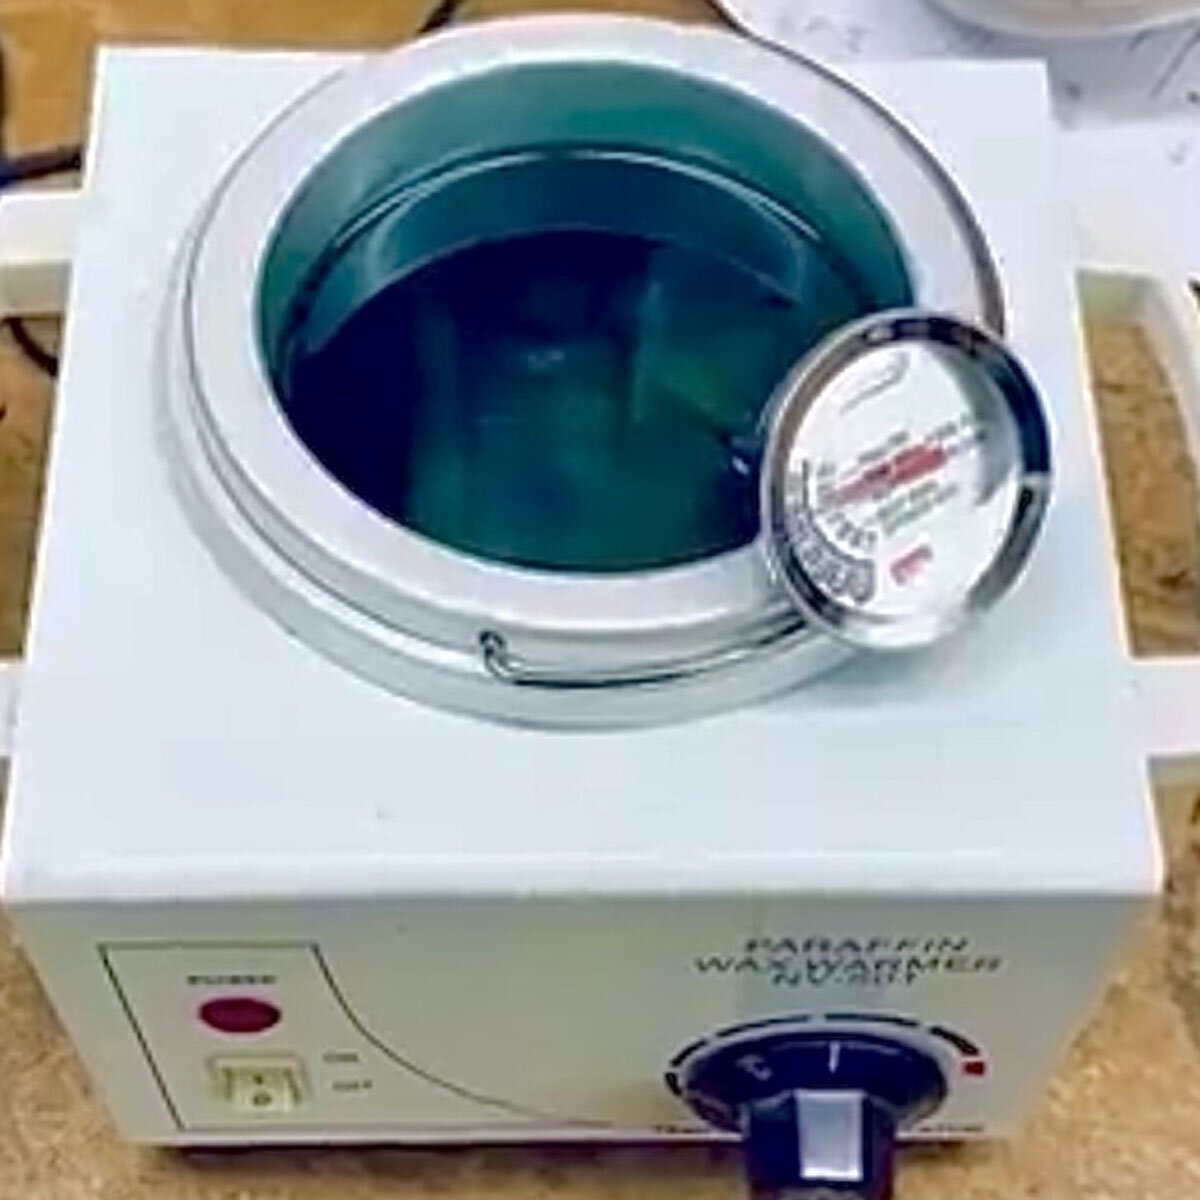
Here’s my own paraffin warmer with the paraffin/beeswax combo all melted and ready to go. Note the meat thermometer in the mixture so I can constantly monitor the temperature.
Once the wax is warm enough, I immerse the entire pickup. Immediately, air bubbles will start to emerge from the pickup. This is the wax beginning to penetrate the pickup and it’s coils, which displaces the air there. These bubbles will continue slowly as the pickup heats up and the wax gets further and further towards the center of the pickup coils. To help speed things along, every couple of minutes I’ll take a chopstick and GENTLY agitate the pickup a little bit to free up any trapped air inside.

Pickups being potted. The red arrows denote air bubbles emerging from the pickups.
After about 10-15 minutes in the wax, the air bubbles should stop. When you can prod the pickup and no more air bubbles emerge, it’s done and the wax has fully saturated the pickup’s coils. At that point, carefully lift it out of the wax with a small pair of pliers (or the pickup’s leads if they’re sturdy), and let the excess wax drip back into the pot. When the drips slow down (after about 15 seconds or so), use paper towels to wipe all excess wax off of the front and back of the pickup. Once it’s been cleaned off, set it on a paper towel to cool and dry for an hour or two. Then it’s safe to reinstall it.

Here’s a single coil pickup drying out on a paper towel. After an hour or so, it’ll be ready for reinstallation
If you’ve done your job well, your guitar will no longer emit blood curdling screams when you turn up the gain. Please note that most major manufacturers of pickups, including Gibson, Fender, Seymour Duncan, DiMarzio, Fralin (et al.) pot their pickups at the factory, and these shouldn’t need to be re-potted. However, some specific models from these makers may not be potted if they’re going for true vintage accuracy, so be advised. Sometimes the factory potting just doesn’t take for whatever reason, and these pickups WILL need to be re-potted (or returned to the manufacturer if they’re new and you don’t want to bother with any of this).
Finally, stay away from any pickup advertised as “epoxy potted.” Epoxy is NOT as thin as wax, and rarely (if ever) gets to the center of the pickups’ coils. Also, epoxy can’t be removed. It’s permanent. So, if down the line the pickup needs rewinding for whatever reason, it’s much more labor intensive and costly to get this done (and it may not even be possible). So, to be forewarned is to be four armed, or something like that.
4. FOAMING AT THE MOUTH
On the other hand, if your guitar emits a lower to mid pitched “woofing” or “howling” noise (even if it’s pickups have been potted), then the pickup itself as a whole might be unstable and vibrating. If this sounds familiar, try this test: With the guitar actually making the noise in front of your amp, use your fingers to stabilize the pickup. Apply pressure so it can’t move or wiggle. Does the noise stop? Then read on.
There are a few ways to combat this phenomenon, and of all of the sources of guitar noise, this one can be the trickiest to conquer. What I do most often is put a thick piece of foam underneath the pickups inside of their cavities. In many instances, this will stabilize and immobilize the pickup just enough to stop the howling. If not, you may need a second or even a third layer of foam. This is fine as long as all that foam is not pushing up on the pickup so much that you can’t adjust the height anymore.

The foam in this Telecaster bridge pickup’s route will stabilize the pickup and help stop it from vibrating in higher-gain situations.
However, foam isn’t the only way to accomplish immobilizing your pickups. For example, the legendary Dimebag Darrell seemed to use electrical tape on his neck pickup for just this purpose on his infamous “Dean From Hell.”

Here is the electrical tape on Dimebag’s “Dean From Hell” neck pickup.
Now, to be fair, this may or may not be why that tape is there on Dime’s guitar. However, I’ve seen other creative players do the same exact thing for this exact same purpose, so I’m willing to bet on it. In reality, simply putting tape on the face of the guitar won’t satisfy most of my clients, so I usually go with the foam.
As a final note on this phenomenon, if you have covered humbuckers, all the foam in the world MIGHT not solve the issue. What sometimes happens is that the cover itself vibrates independently of the rest of the pickup. This is hard to fix if the cover’s solder joints are strong. Unfortunately in these circumstances, the most surefire solution is to remove the metal covers entirely (yeah, I know…). Barring that, you can try potting the pickup (as described above) with the cover on, whilst taping over the cover’s holes with a strong, heat-resistant tape. That way, when the pickup is removed from the wax solution, the cover remains filled with said wax. This is tricky and difficult to achieve, but it’s worth a try if you have literally no other options.
STRINGS AND SPRINGS
Finally, there’s the noise pollution caused by sympathetic string vibration behind the nut (and sometimes below the bridge in Gibson-style or hollow bodied guitars), and by the tremolo springs themselves in guitars equipped with them.
These noises are relatively easy to combat. I often slip a thin piece the fuzzy side of a sliver of black Velcro behind the nut to combat ringing headstock strings. It’s non-invasive, reversible, and invisible to the audience in most instances. Works like a charm.

A thin sliver or fuzzy black Velcro behind the nut on this Les Paul keeps the strings behind the nut silent – it’s most noticeable when playing loud or with large amounts of gain.
If the strings are ringing behind the bridge on your Gibson or similar guitars, all you need do is to cut a narrow piece of Velcro (about 1/8” wide by about 2” long) and fasten it around the strings right next to the bridge. It may not be invisible, but it’s better and less ugly than threading a shoestring through them (no, really – I see that solution fairly often).

The thin sliver of Velcro mashed around the strings silences them between the bridge and stop bar of this Les Paul.
Finally, to silence the springs in a tremolo cavity, I use pretty much the same principle – I slide a thin piece of foam underneath the springs next to the tremolo claw. This also works like a charm.

The foam under the springs next to the tremolo claw keeps their “natural reverb” from polluting your signal when you crank the volume.
Conversely, if you keep the tremolo cavity cover on your guitar, it’s even easier to fix this issue. Just take it off, lay a thin piece of foam on top of the springs, and screw the plate back on. Done.
ALL’S NOW QUIET ON THE WESTERN FRONT
In wrapping this missive up, I know that there is a lot of info to digest here, but this article was meant to be more of a reference manual for whichever of these ailments may be plaguing your instruments, and not all of it applies to everyone (or even any one instrument). Some of it is personal taste, as well. For example, I know full well that some heathens actually LIKE tremolo spring reverberation, for example, and that’s okay. Sorta. Maybe. Probably not.
Anyway, it is my sincerest hope that you all find at least some of this useful and applicable to your needs so that we’re all ready to go when venues start opening back up and our musical lives resume (in a responsible and healthy manner, of course). May that day be SOON!

Lane Sparber is an amp / guitar / bass / pedal tech who lives and works in Fresh Meadows, Queens, New York. He started repairing gear in his mid-teens, and he’s 46 now, so you do the math. When not causing mayhem in his workshop, he can be found desperately trying to hide his latest orchid purchases from the rest of his family. You can find him on Instagram at @amptech74 or on Facebook at www.facebook.com/lane.sparber. Come say “Hello!”


