Essential Guide to Feather Quill Pens | Tutorial & Brief History
INTRODUCTION | Over the past year I’ve been steadily getting back into working with traditional nib and dip pens. I learned how to use them ages ago while taking a drawing class and somehow using them as a consistent part of my drawing practice got lost in all the crazy of the past few years. The reason being I finally picked back up the practice of keeping a written journal/sketchbook this year, again something I always loved doing while in school and just one of the things that keeps my mind sane.
It’s where I write down random thoughts from the day, keep notes on color palette experimentations, compositions, little sketches, recipes, notes from things I read and literally everything else in between. From the outside looking in it probably makes no sense, but I love having something to dump all of my thoughts into and look back on. It’s also brought my love of all things old school pens raging back.
Most people are either a little in awe of or terrified of working with these types of pens. In today’s fast paced digital world they seem so antiquated and foreign, They love the idea of them, but tend to shy away because they can be a little unpredictable - which is the reason they’re so amazing!
You see a regular ball point pen will always produce the same thickness and consistency of line, which makes it a very predictable choice, but a nib/dip pen has a lovely responsiveness to your hand and to the volume of ink that gives it a lot more variety and life. It gives other people a sense of how the tool was used to make the mark and immediately connects them with the process due to the inherent line sensitivity visible in the marks.
Imperfection is nothing to shy away from and is part of the reason I want others to understand how incredible working with these kind of pens can be, so over the next few weeks I’ll be posting guides to traditional quill, dip and nib pens. Each guide will talk about the essential components of each pen, how to make/use each one and provide some of the resources that have helped me along the way.
Since this is the first post in the series I figured I’d throw it waaaay back (as in the Middle Ages) and talk about quill pens, so read on to find out a little more on their history, uses and instructions on how to make your own out of a chicken or turkey feather…

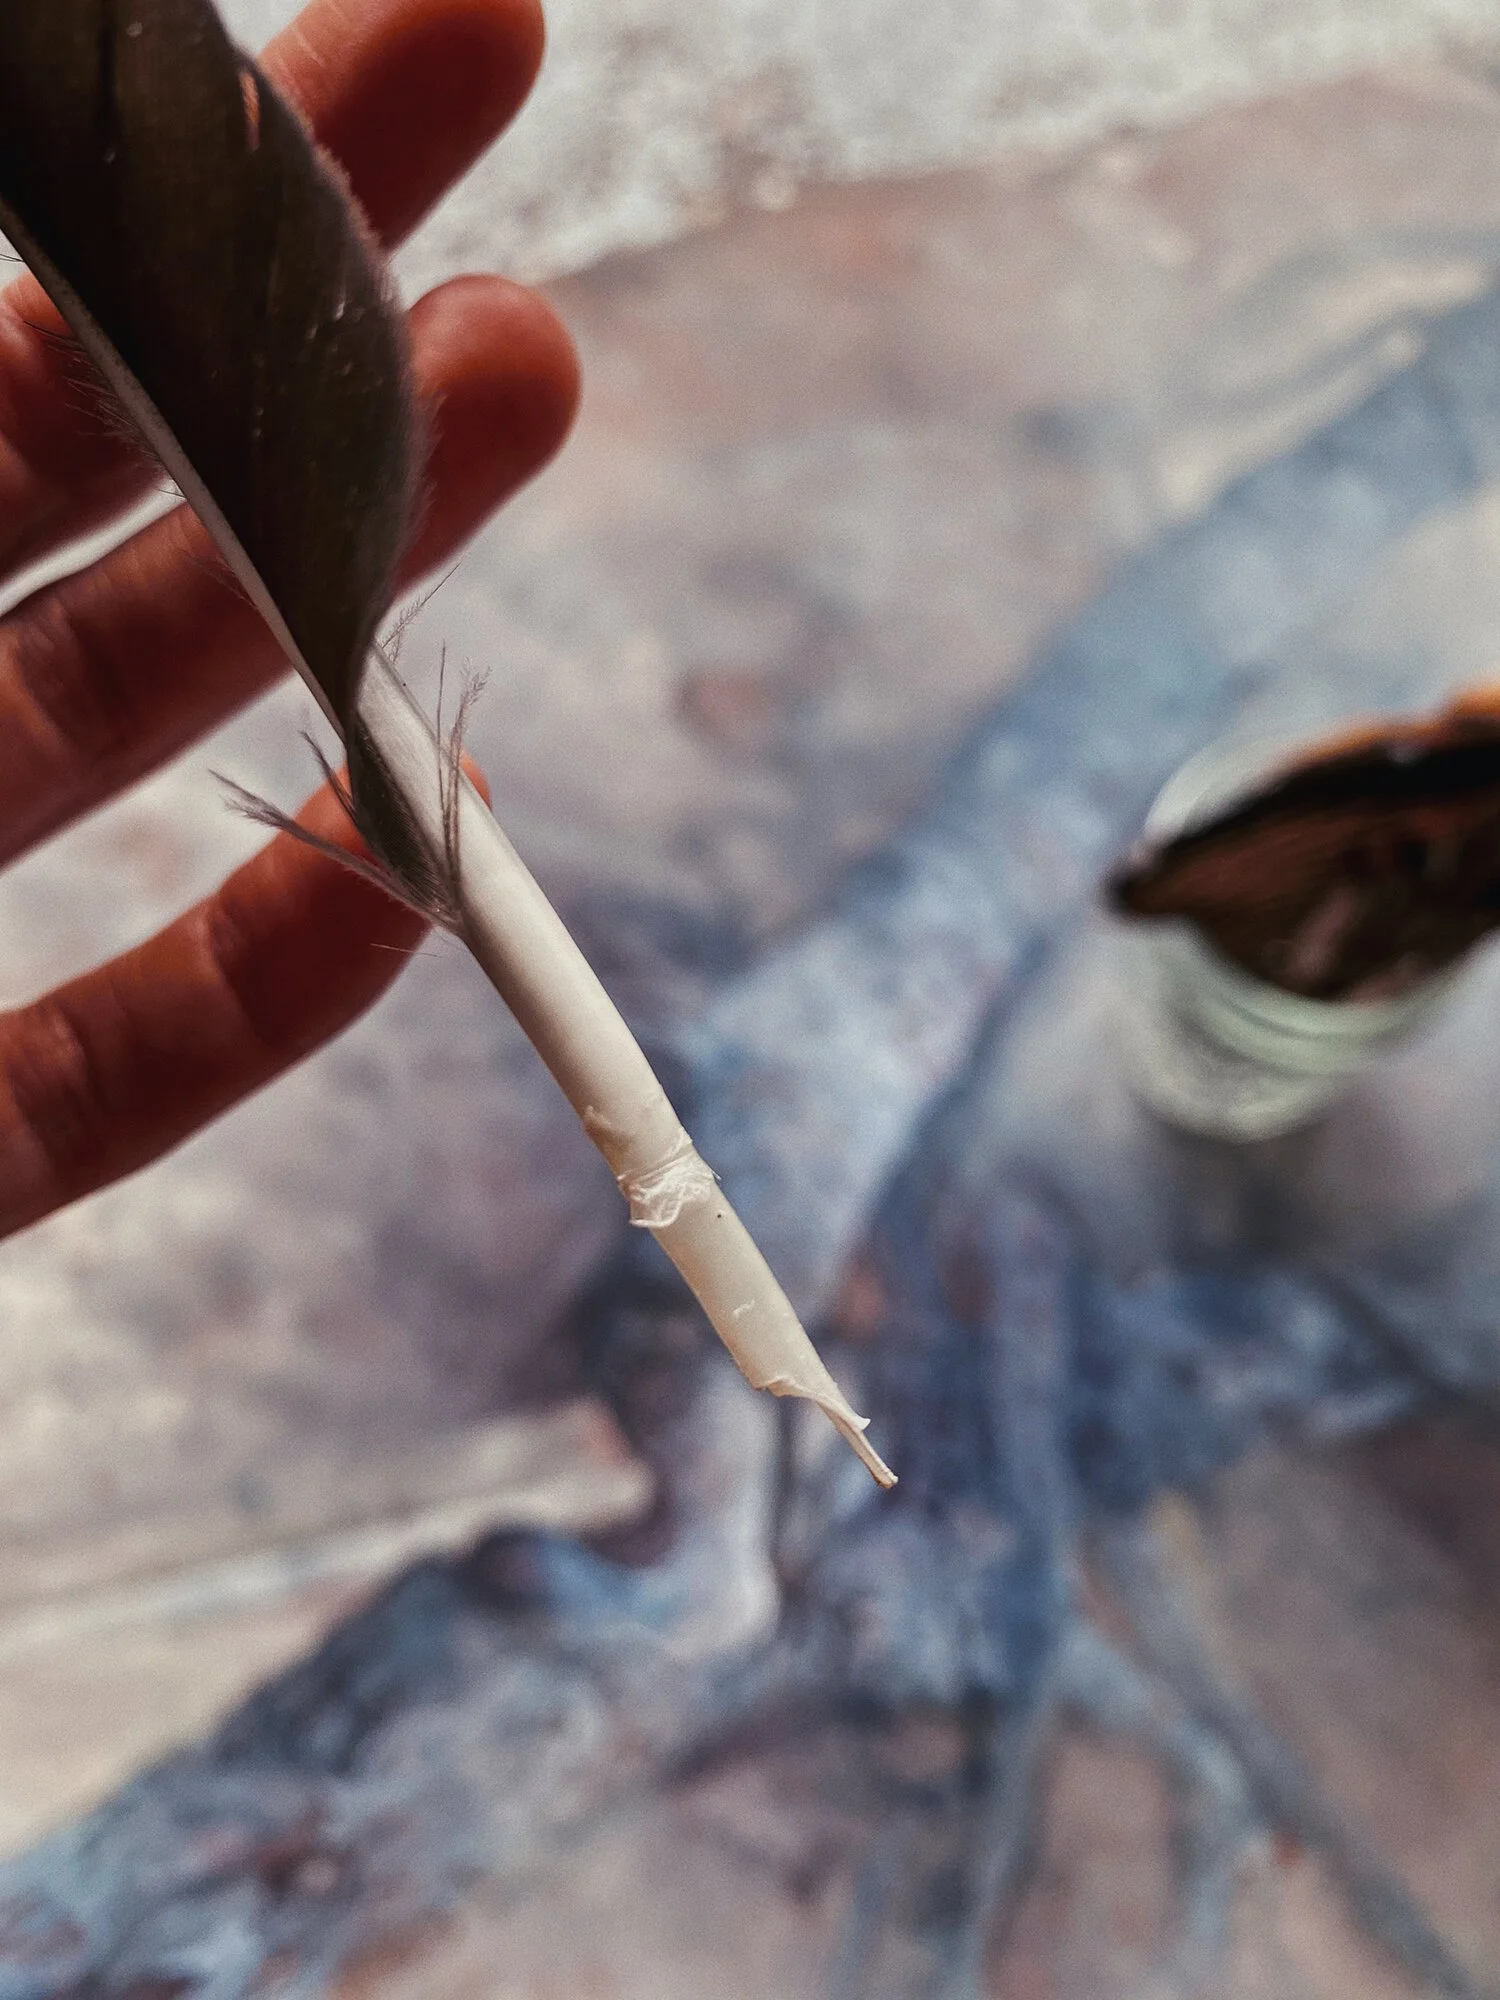
Here is a better look at the hollow tube of the feather that holds the ink.
QUILL PENS | HISTORY, ANATOMY + USES
HISTORY | Quill pens were invented sometime around the beginning of the Middle Ages. Prior to this the reed, bamboo or cane pens were the primary tool for writing, especially on papyrus. They did not hold their point for long, so the scribe had to have a keen knowledge on how to both make and maintain them to keep a sharp point. This made the invention of quill pens such a huge advancement as they were able to retain their shape for longer, requiring less frequent sharpening. Quill pens were used to write several important documents throughout history including the Declaration of Independence. Thomas Jefferson even had a flock of geese he kept at Monticello just to supply him with writing quills.
ANATOMY OF A QUILL PEN | Quill pens are traditionally made from goose or swan feathers with the consensus being that they are stronger and larger than other birds, but feathers from crows, hawks, turkeys and owls have also been used. Several sources say that the strongest quills are obtained from the outer feathers of living birds during their new growth period after molting in the spring. The end is typically cut to the shape of a traditional nib with a small slit that controls the flow of the ink out of the calamus, which is the hollow in the center of the feather. Quill pens work through capillary action, the phenomenon where a liquid automatically draws itself along a very thin tube, similar to the way water rises inside of a plant. This is why if you hold a quill pen upside down the ink doesn’t all come pouring straight out, the feed from the reservoir to the nib is narrow and the ink can’t escape (unless you aggressively shake the quill pen).
CHARACTERISTICS & USES | These can be quite unpredictable to write with and if you make your own even more so. Quill pens are very pressure sensitive (like most traditional writing tools) and making sure that your hand is not too aggressive or tense will make the writing experience go much smoother. Any type of bottled ink works really well with them, just be prepared for a learning curve as you get used to how it responds to both the paper surface and your drawing or writing style. Feather or wood nibs can also be made in the field by trimming the end of a feather or even small piece of reed/bamboo to a point with a small slit at the end to hold ink. Making quill pens is also a good activity to do with kids and if you have chickens like I do, you’re bound to find quite a few.
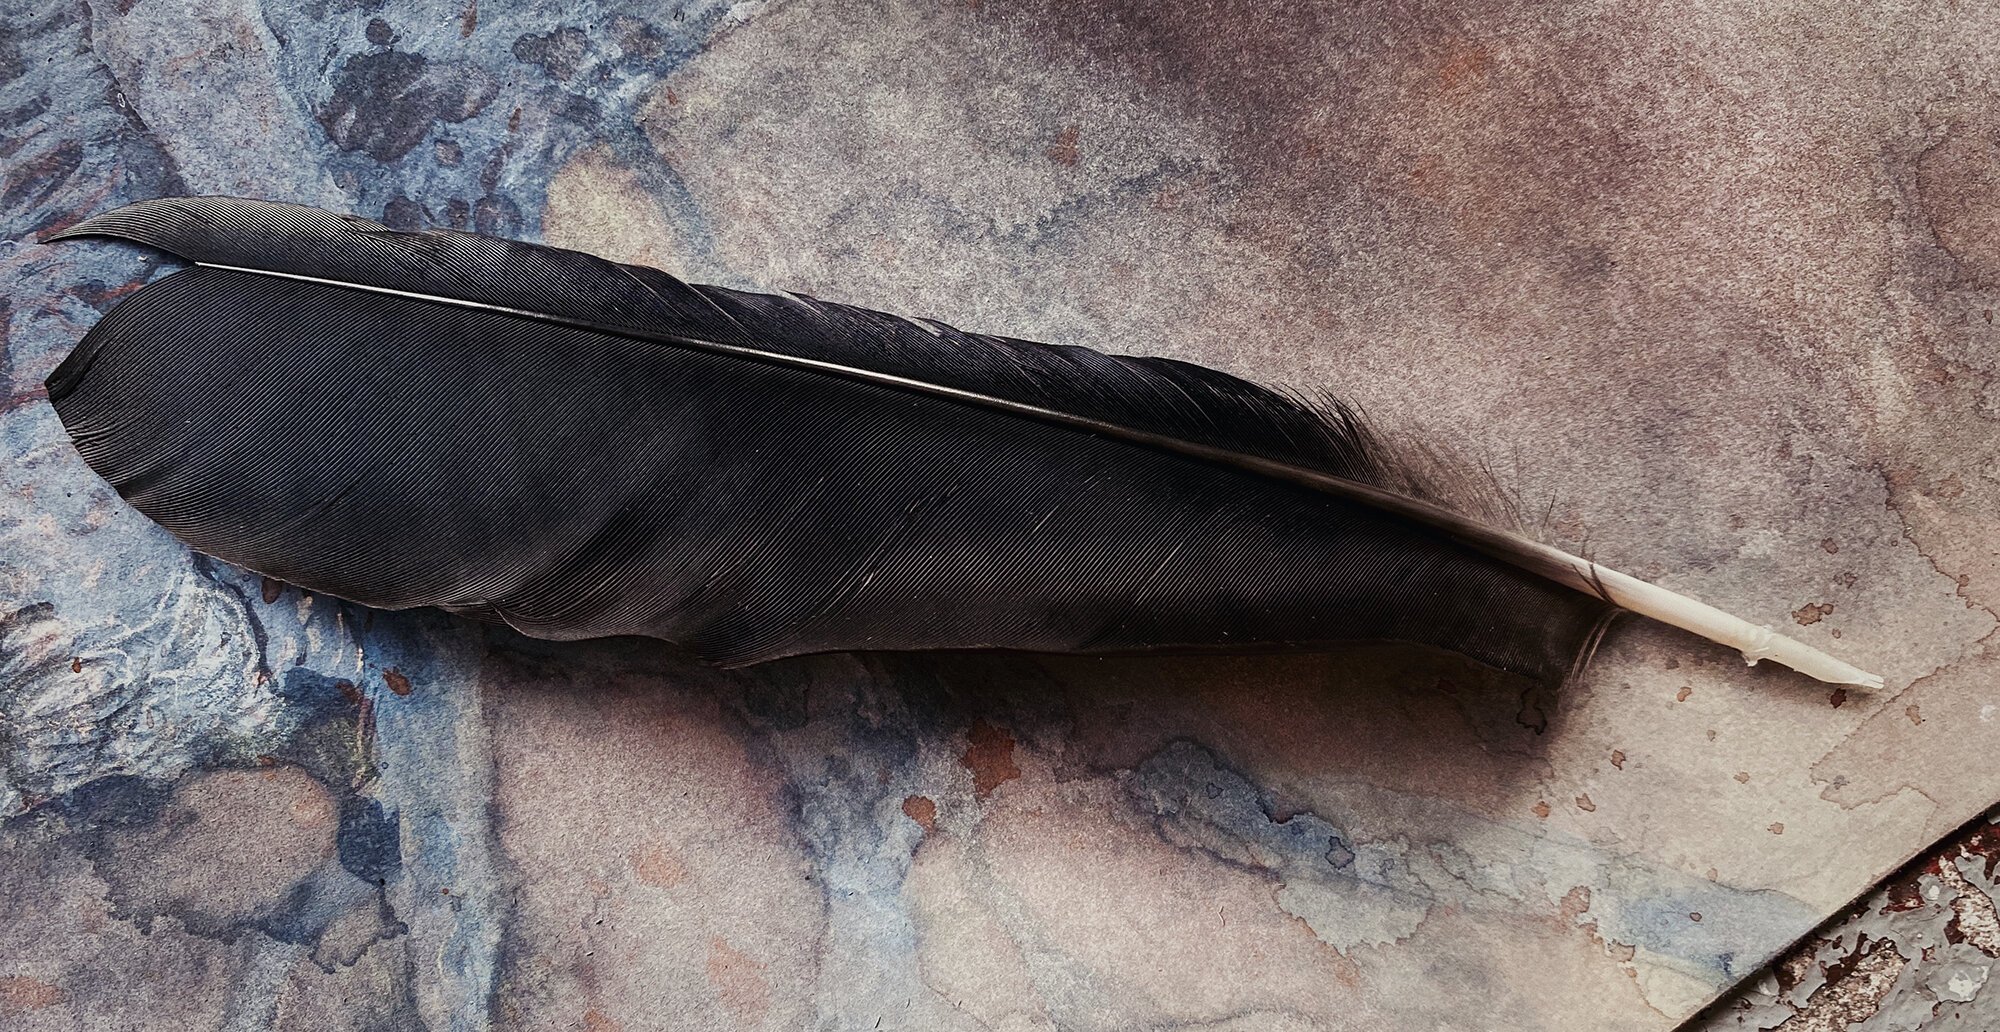
I’m using a found chicken feather from one of my Black Copper Marans. Chicken feathers have a soft coating on the outside of the feather that you have to shave off with your knife. Here you can also see the shape of the nib.

I’m using a found chicken feather from one of my Black Copper Marans. Chicken feathers have a soft coating on the outside of the feather that you have to shave off with your knife. Here you can also see the shape of the nib.
SOURCING MATERIALS | SUPPLY LIST
WHERE TO GET FEATHERS | You can either purchase higher quality goose or turkey/chicken feathers online or from a local farmer. Goose feathers are the strongest, which means they will last longer. The down side is that they are usually a little harder to find locally but are usually available on Etsy.
Since I have chickens it was hard to go out to the run and find a few feathers to practice on laying around, but I will say that the chicken feathers are much softer and have more spring than goose or turkey feathers do. If you know someone with chickens or turkeys you could probably get them local, but if not then once again check Etsy.
Honestly I’d recommend finding or purchasing feathers to create your own before spending money on some of the “quill” pens you see sold online (most of them have metal nibs applied which kinda defeats the purpose of writing with the quill itself) and you don’t get the satisfaction of playing with different angles/cuts on your nib.
NOTE | I would advise against using anything else as most fowl in the U.S. are protected under the Migratory Bird Treaty Act, which makes it unlawful to hunt, capture, possess or sell any part of migratory birds such as eagles, hawks or crows without a permit (read more about why here.)
BAMBOO DIP PEN ALTERNATIVE | Alternatively if you don’t have access to feathers but do have a large supply of bamboo shoots or reeds you can use the same process to create your own dip pens using the instructions below. Reed pens were actually in use before quill pens, but were superseded by feathers because they lasted longer.
BAMBOO DIP PEN SUPPLIES
Small Piece of Bamboo
X-acto Knife
Bottled Inks | See Resources for Brands
Bamboo Reed Pens | Buy on Amazon
FEATHER QUILL PEN SUPPLIES
Goose, Turkey or Chicken Feather
X-acto or Pocket Knife
Lighter
Bottled Inks | See Resources for Brands
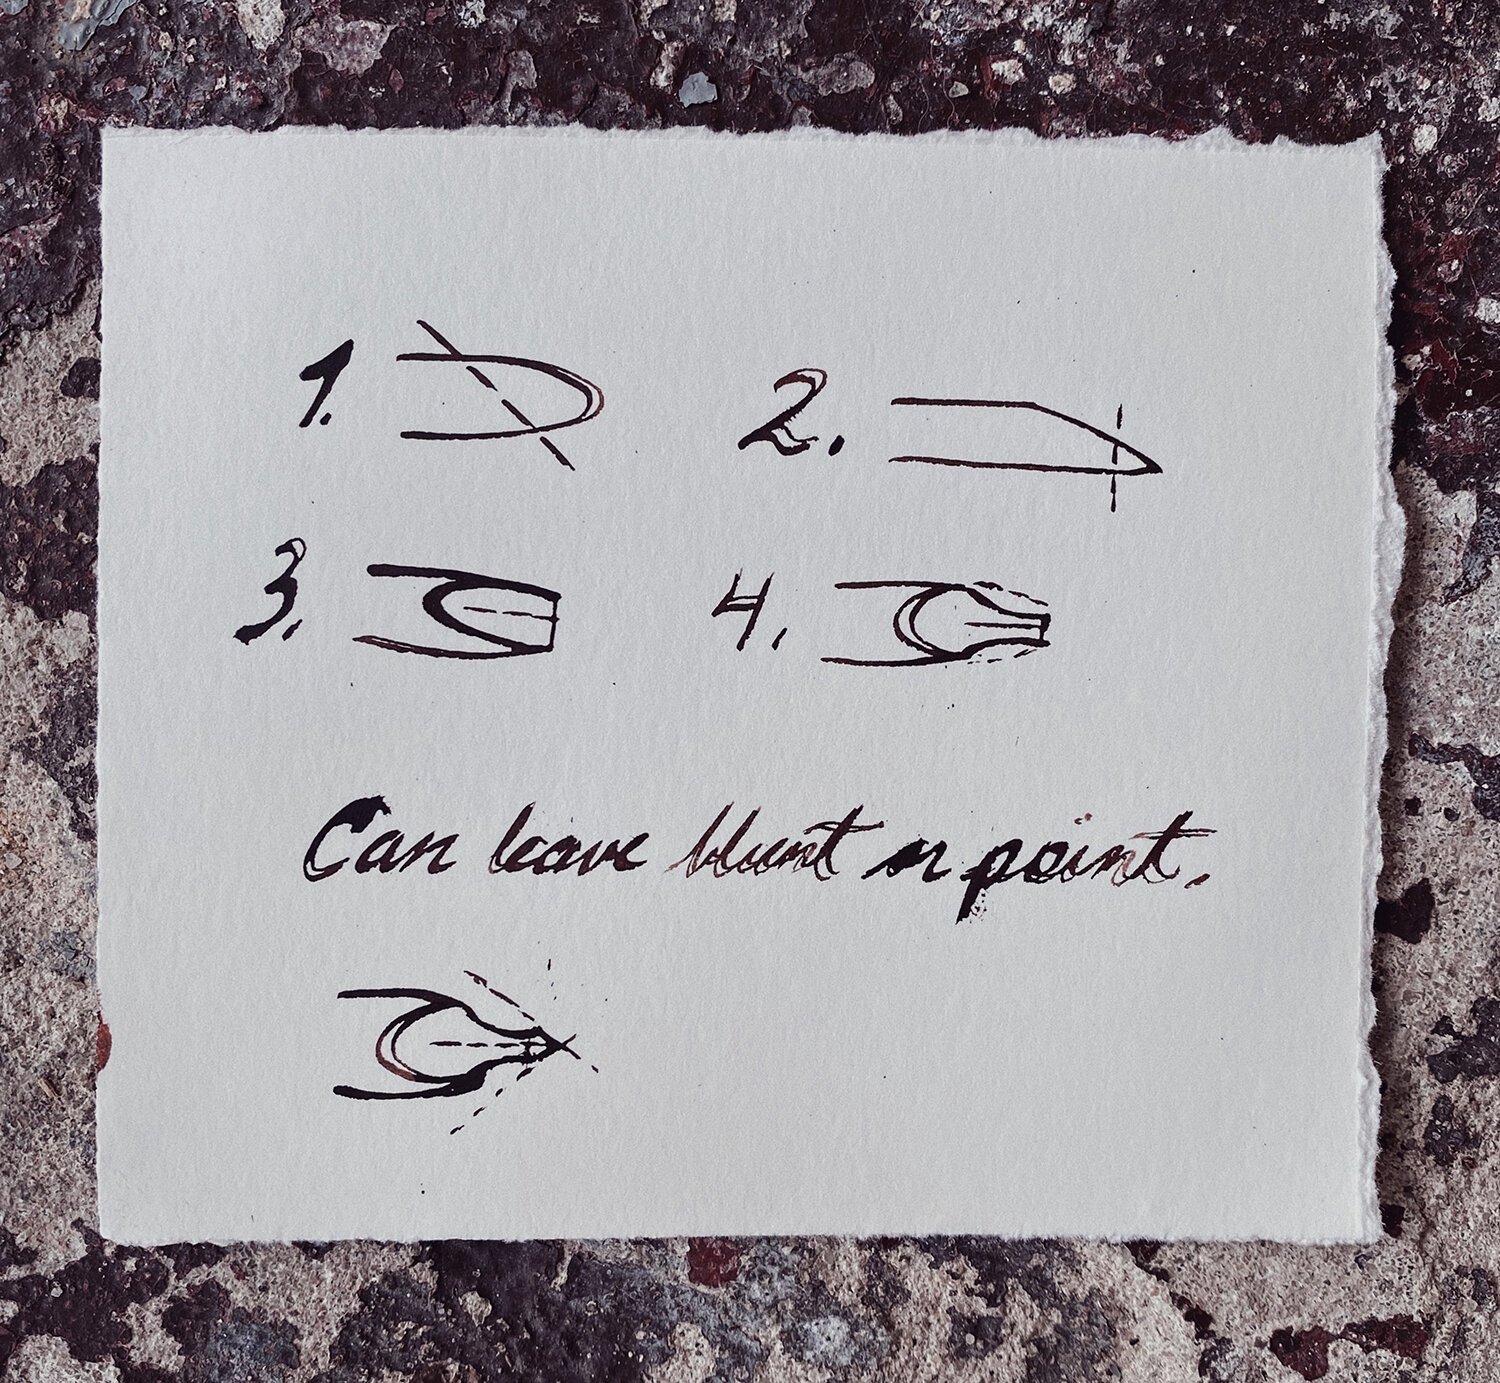
Cut list to carve the nib, drawn with a chicken feather quill pen.
INSTRUCTIONS | HOW TO MAKE A FEATHER QUILL PEN
WARNING | X-acto/pocket knives are extremely sharp and feathers are hard to cut, please be careful and closely watch any children under the age of 12 when using.
If you feathers haven’t been wash then wash them with a bit of dish soap to remove any foreign material (poop, parasites, etc).
Using a x-acto or pocket knife, remove any small hairs or other material from outside or inside the feather shaft and remove any barbs that are too close to the end.
Turn the feather on it’s side and cut across at an angle. Sometimes it is hard to get a cut started so you may need to “pierce” the feather at one point to give the blade something to bite into.
Next cut straight across the tip of the feather to create a blunt end.
Turn the feather so that you are looking at the back side of the nib and make a small slit in the middle.
Now is the fun part, you get to trim the end to your desired shape. Here you have the option to make it more pointed or leave it blunt for a more calligraphy style nib. This step is also good for just cleaning it up a bit.
If you want your nib to last a bit longer, you can quickly pass a lighter over the end of the quill to temper (harden) it. Some people will also put sand into a baking dish, heat it in the oven and place the end of the quill in it for a few minutes. (This step is optional.*)
. Now you’re ready to write, simply dip the pen into a bottle of ink or use a small brush to load it and go to town!
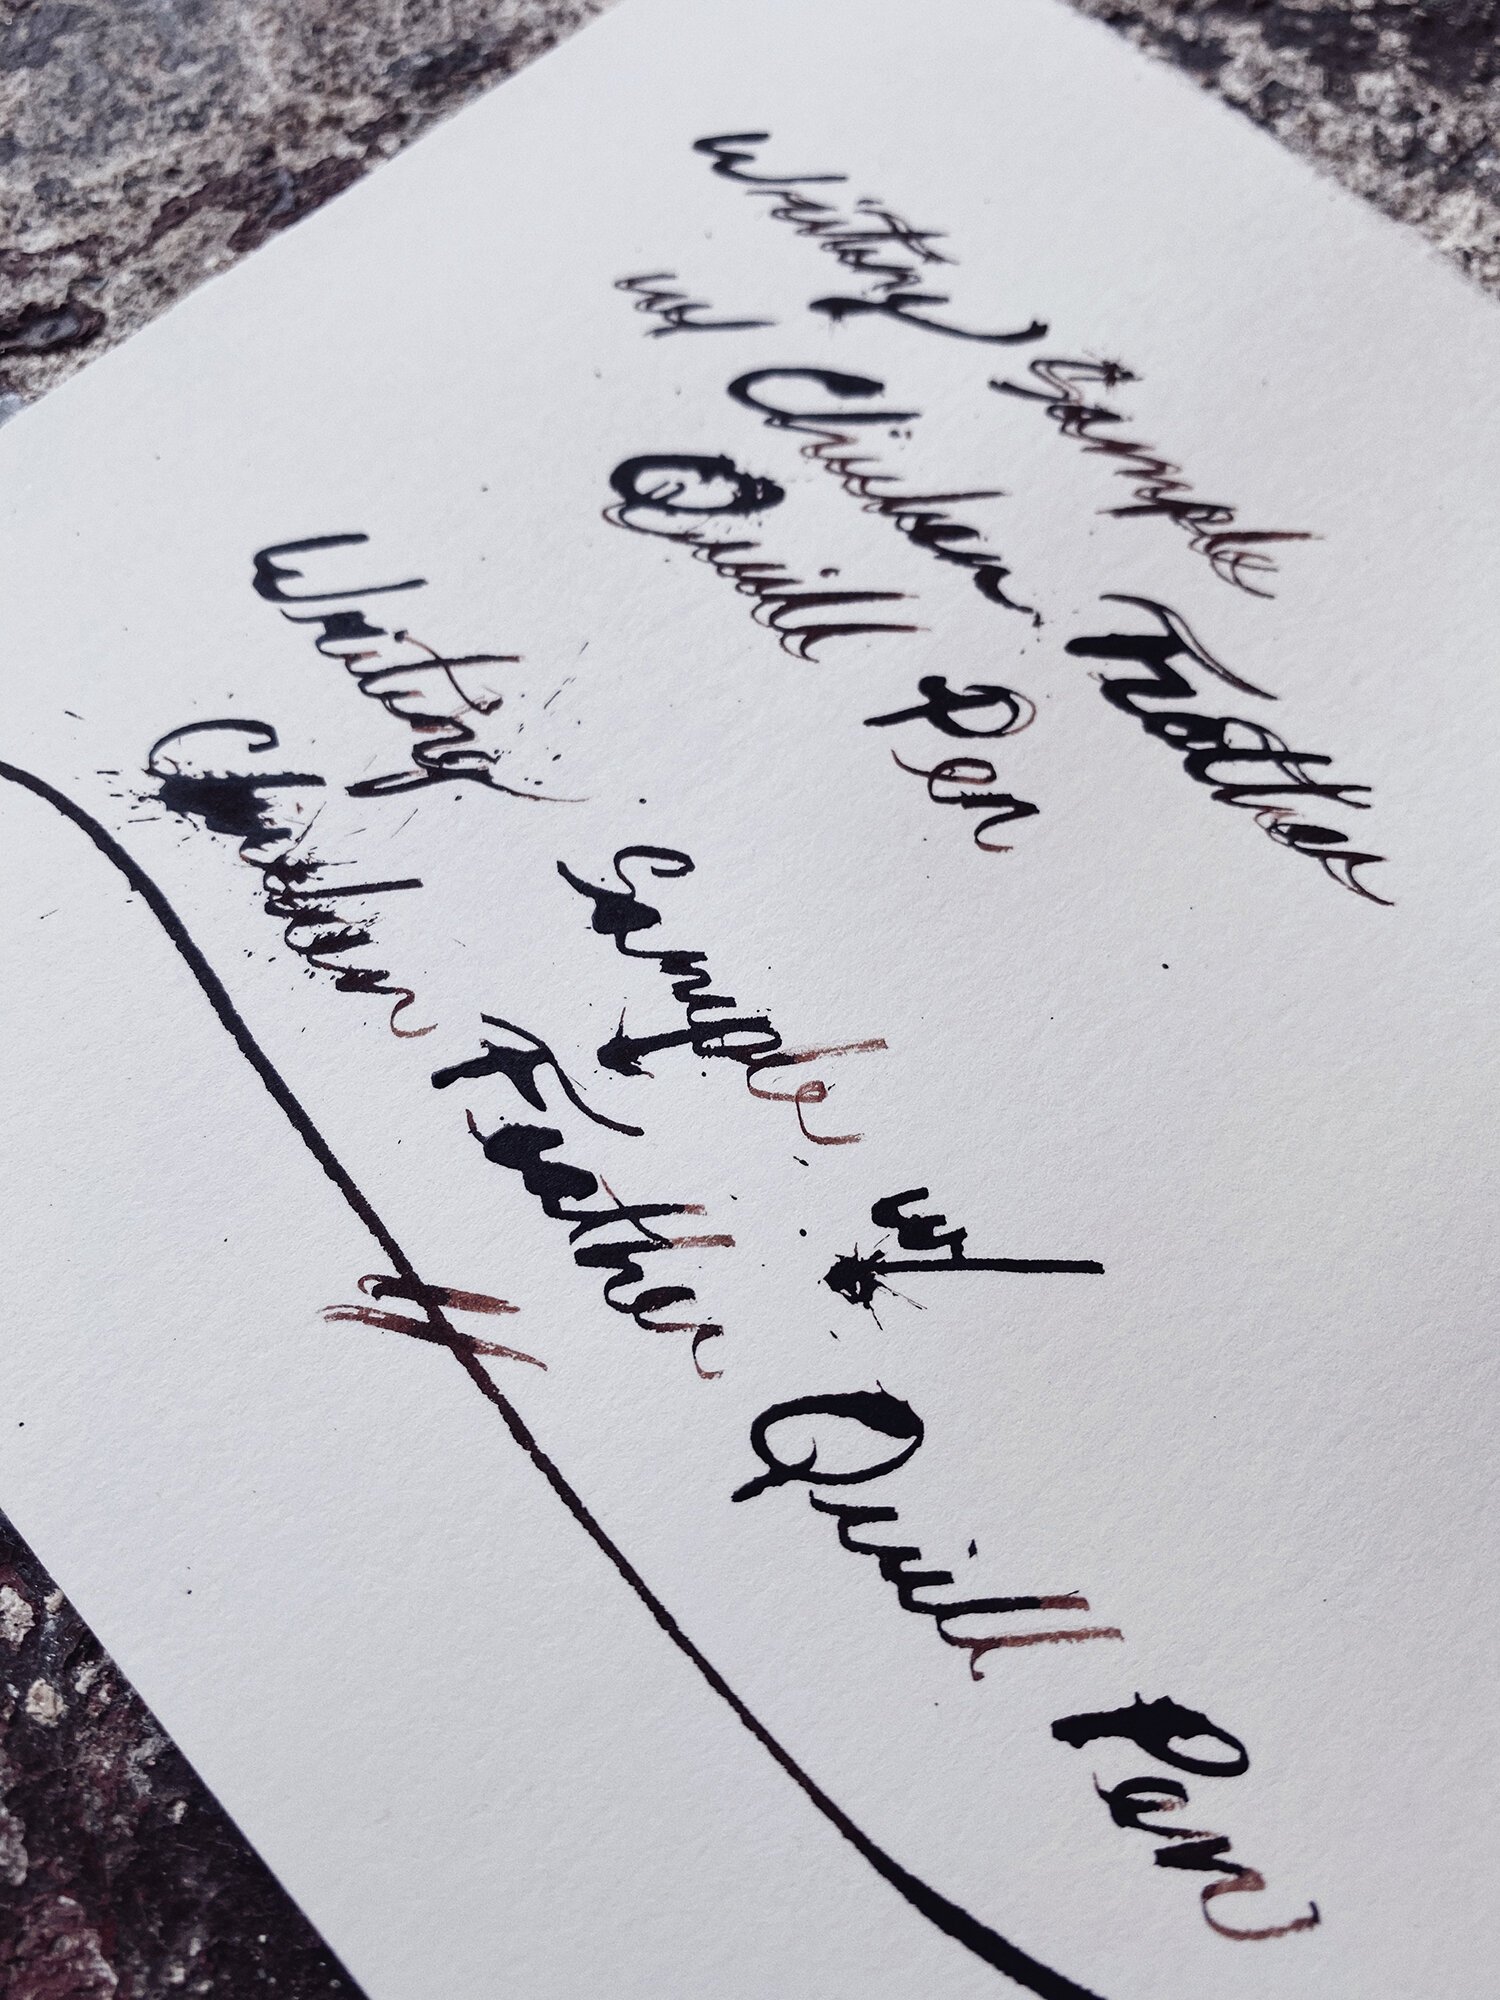
Writing sample with chicken feather quill pen and Monteverde USA Brown Sugar Ink.
TIP | Avoid using super cheap printer or notebook paper when writing with any sort of quill or metal nib, since they have a much higher ink load and flow rate that most ballpoint or felt tip pens you will get more bleeding. The nibs are also sharper and tend to tear or pill the paper, which can result in it clogging up the nib if you aren’t careful. Try using quality sketchbook or drawing paper to work on when using quill or metal nibs to avoid either of these problems.
CONCLUSION
Quill pens are tricky to work with due to a high learning curve and are more of a drawing novelty. They’re a fun project to do with kids and adults alike, although mastering them is definitely something that takes a lot of time and effort. When working with them you can’t be afraid of mistakes, so if you’re a bit of a control freak they’ll make you loosen up in the best kind of way and make you learn to embrace the “mistakes.”
If you enjoy this post and tried making your own let me know how it went via the comment section below! Also keep an eye out for the two follow up post in this series on nib and fountain pens over the next few weeks…
REFERENCES
Facts & History of Quill Pens | PensGuide
The Mighty Pen | Owen Thomas | Christian Science Monitor
How Fountain Pens Work | Explain That Stuff
Why Your Bird Feather Collection Might Be Illegal | Storage Room No. 2
How to Make a Turkey Feather Quill Pen | Greg Pryor Homestead
RESOURCES
Fabriano Watercolor Sketch Pad | Jerry’s Artarama
Monteverde Inks | Goulet Pens
Calligraphy Inks | Blick
Feathers | Etsy