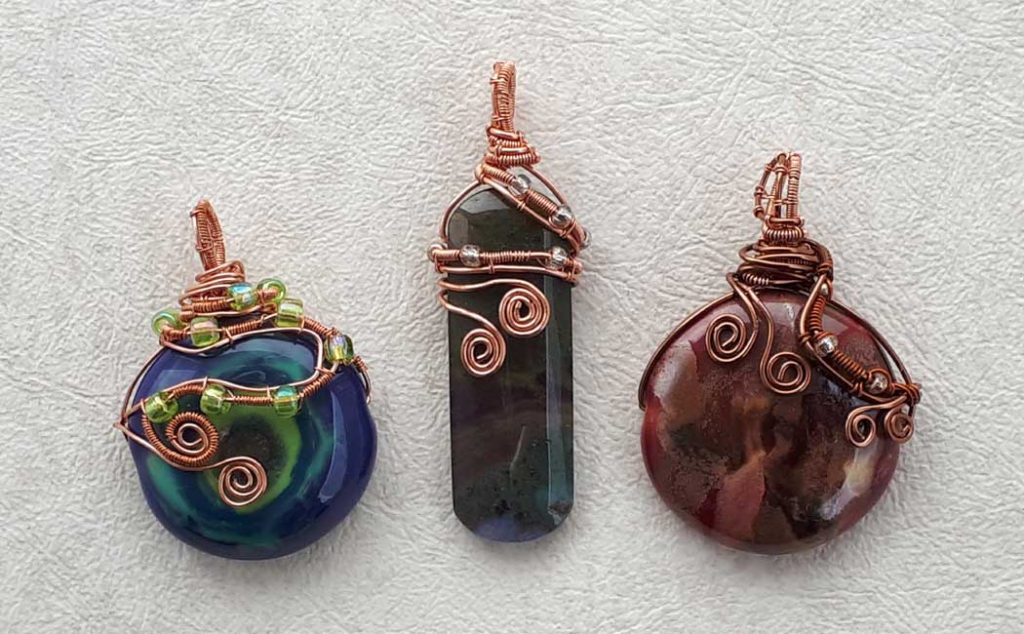
Learn how to wire wrap a side-drilled pendant in this step by step tutorial. This technique can be used with any pendant that is drilled through the middle of the bead. I had such a great response to the tutorial on how to wire wrap a stone with a cage technique, so I thought I would offer another style of wire wrapping!
While all the directions and the supply list are written in this post, I have also created a step-by-step video tutorial for your convenience! I apologize in advance for stumbling on my words from time to time..this happens sometimes because of an old concussion injury. I could have redone the voice over, but part of my process is letting go of perfection, so I decided to just let it be.
Some (but perhaps not all) of the links in this blog are affiliate links to Amazon. As an Amazon Associate, I earn from qualifying purchases. This page contains some affiliate links. Please see my policy page for details. I look for the best possible option for your convenience, however, I encourage you to support your local shops!
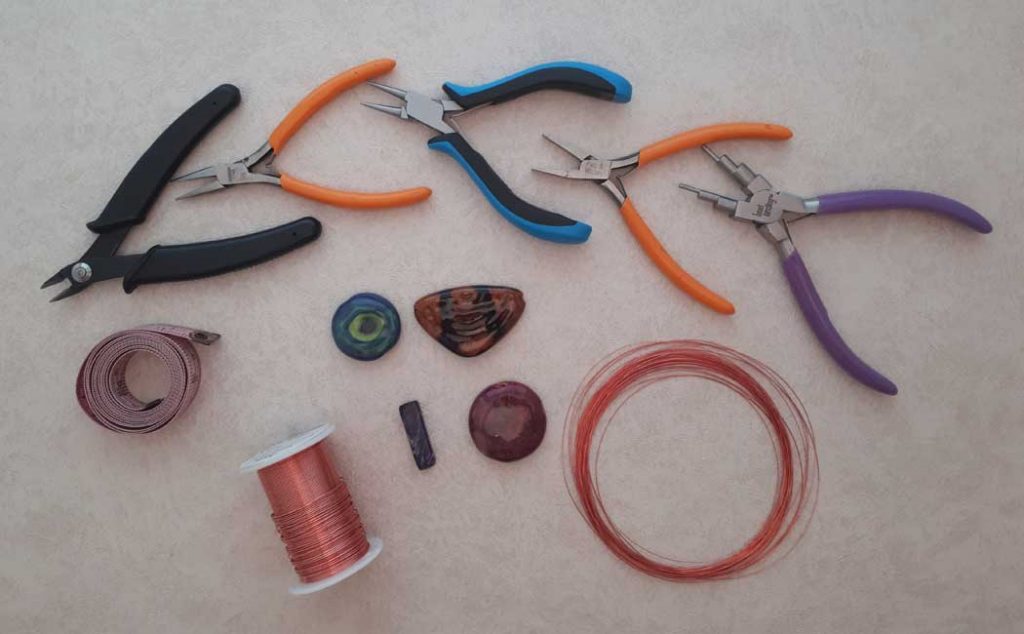
The supplies you will need for this project are:
- 20 or 22 gauge dead-soft or artistic copper wire
- 28 gauge dead-soft or artistic copper wire
- Side drilled bead
- Flat-nose pliers (optional)
- Chain-nose pliers
- Round-nose pliers
- Bail-making pliers (optional)
- Wire cutters
- Cloth tape measure
If you don’t have any pliers at all, then getting a kit would be more cost-effective. The kit includes a bent-chain-nose plier, but not the bail-making pliers.
For this project, I am using a 22 gauge dead soft copper wire for the main structure and 28 gauge to do the weaving designs. You can use a 20 gauge wire for the main structure and choose any type of craft, brass or silver wire.
To calculate how much wire you need for the main structure, measure the span of the bead where the hole passes through. Mine was 1.25 inches. Then measure around the top of the bead from one hole to the other, in the direction of your design. Mine was 2.25 inches which ended up being halfway around the bead. If you have a long narrow bead, that measurement may only be the top 25% of the bead.
Then you will need to figure out how long you want the woven piece to be. This is the decorative work that will be the bail and what is wrapped around your bead. If you have a long, narrow bead, you can allow about 7 to 8 inches. For a wider bead like the one I am using, you can allow about 8 to 10 inches. Then you want to double that length of wire.
I’m allowing 10 inches for my design, so my wire would be 1.25 + 2.25 + 20 inches (2 x 10), for a total of 23.5 inches. I just cut mine at 23 inches which ended up being lots. (The video explains this so much better).
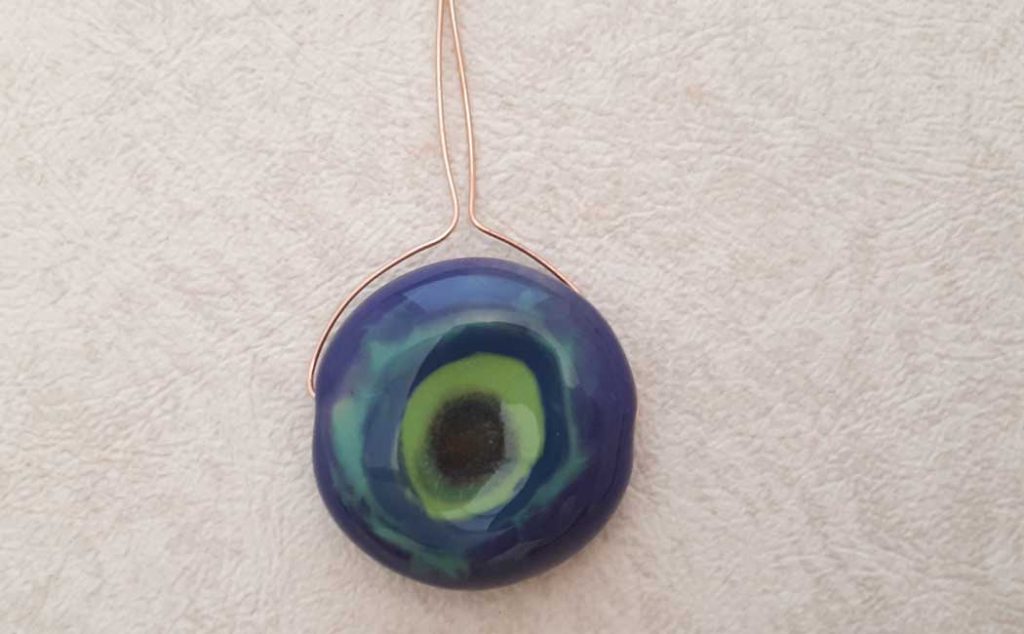
String the wire through the bead, center it and bend each side at a 90-degree angle at the top.
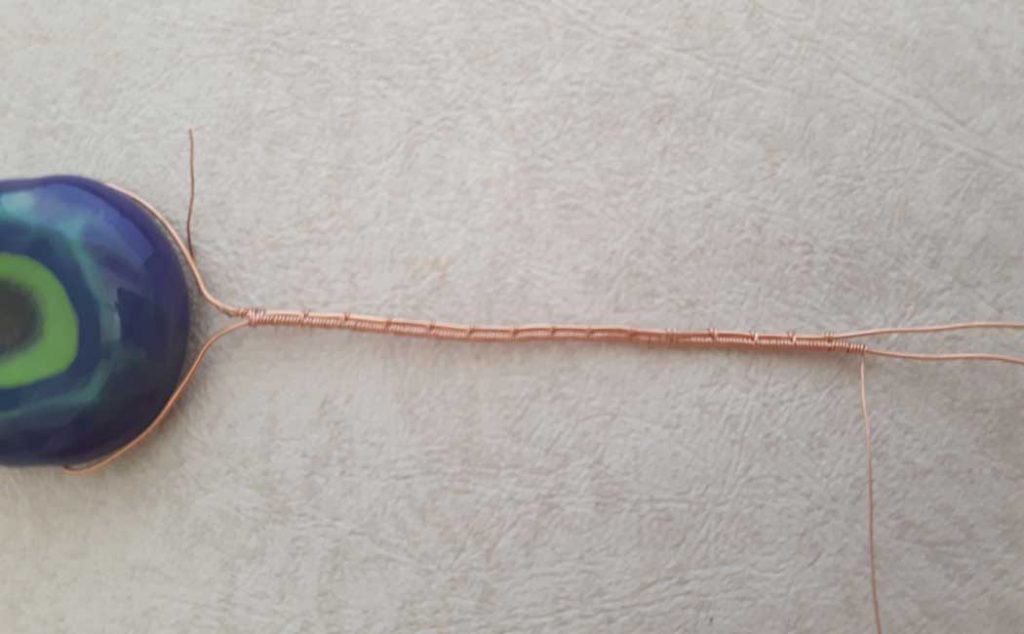
Cut a piece of 28 gauge wire for the weaving. A general rule of thumb is for each inch of weaving on a 20 gauge wire, you will use about 12 inches of 28 gauge wire. For the 22 gauge wire, you will use about 9 inches of the fine wire per inch.
I will refer to the strand of 22 gauge wire closest to you as wire A, the wire furthest from you will be wire B. Holding the two strands of heavier wire together, start your fine wire on wire B with 3 wraps. Then do 3 more wraps around both wires A and B to secure them at the top of the bead.
The weaving pattern is as follows: wrap 10 wraps around wire A, then do the eleventh wrap around both wires, do the twelfth wrap around wire B only, then bring the wire under both wires A and B, and begin the pattern again with 10 wraps on wire A. Repeat this pattern 14 times.
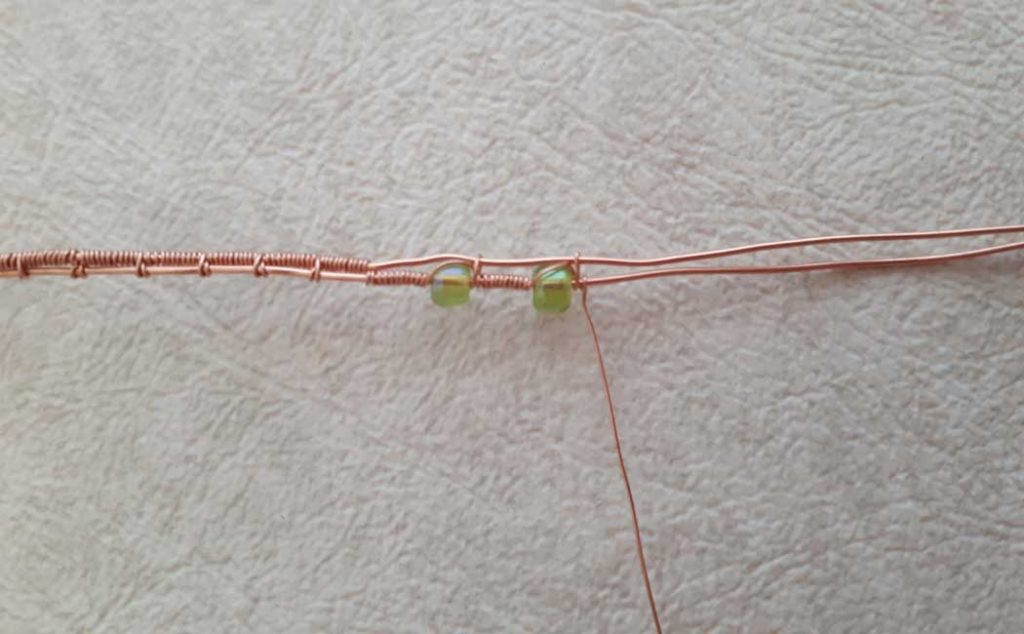
Once you’ve completed 14 pattern repeats, finish with 10 more wraps on wire A. Turn your work over so that wire B is now facing you. Bring the 28 gauge wire to this side and do 10 wraps on wire B.
String on a seed bead and do one wrap over the top of this bead, holding the wire in place with your thumb. Then do another wrap, bringing the fine wire over both wires B and A. Continue to wrap it underneath both wires. Now do 10 wraps on wire B (the wire closest to you). You have completed one pattern repeat. Wrap a total of 10 beads into your pattern. You may want to add more depending on your design, but 10 is a good amount to start with.
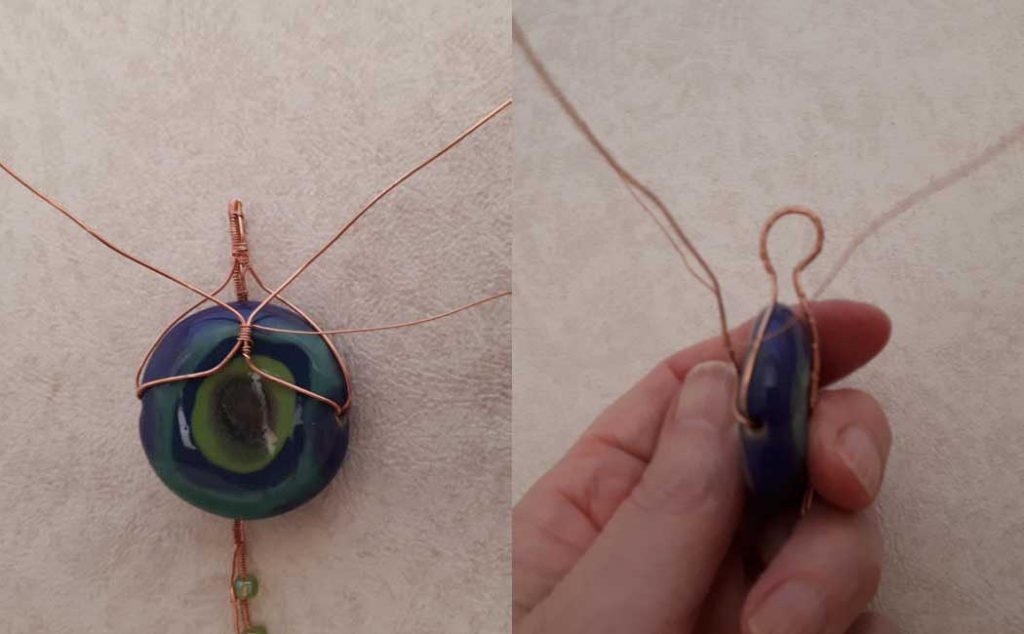
Once you have woven on all your beads, cut a piece of 22 gauge wire about 10 to 12 inches long. String this through the back of your bead and create a cage at the back by bending both sides of this wire at a 90-degree angle. Use some 28 gauge wire to secure the two sides together with 4 or 5 wraps.
Use a bail-making plier or round object to create a bail towards the front of your bead.
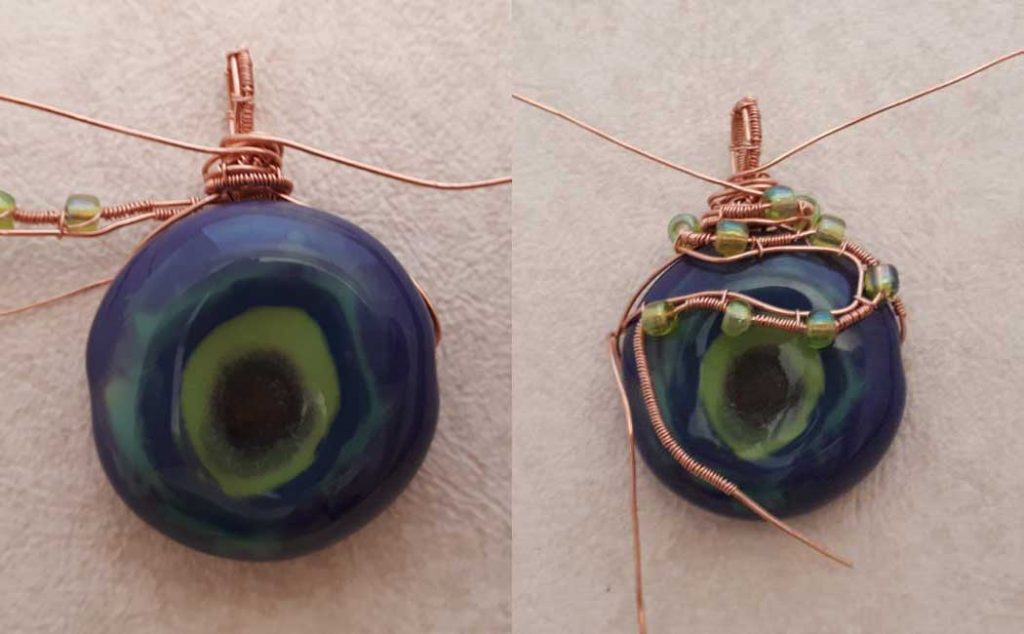
Wrap both the cage wires around the bail a couple of times. Then wrap the woven wire around the bail in a decorative fashion. There are no rules here, just be creative! Bring the decorative wire along the front of the bead in any design you desire. I secured the right side of the woven wire to the side wire with some 28 gauge wire. I then tucked the top wire on the left underneath the side wire (see below)
I continued wrapping the 28 gauge wire on the right wire (see above) for about one inch and then left about 3/4 of plain wire. I created a spiral towards the center of the piece with that wire. I then shaped the other wire around that spiral and left about 1.5 inches to coil this wire in the opposite direction.
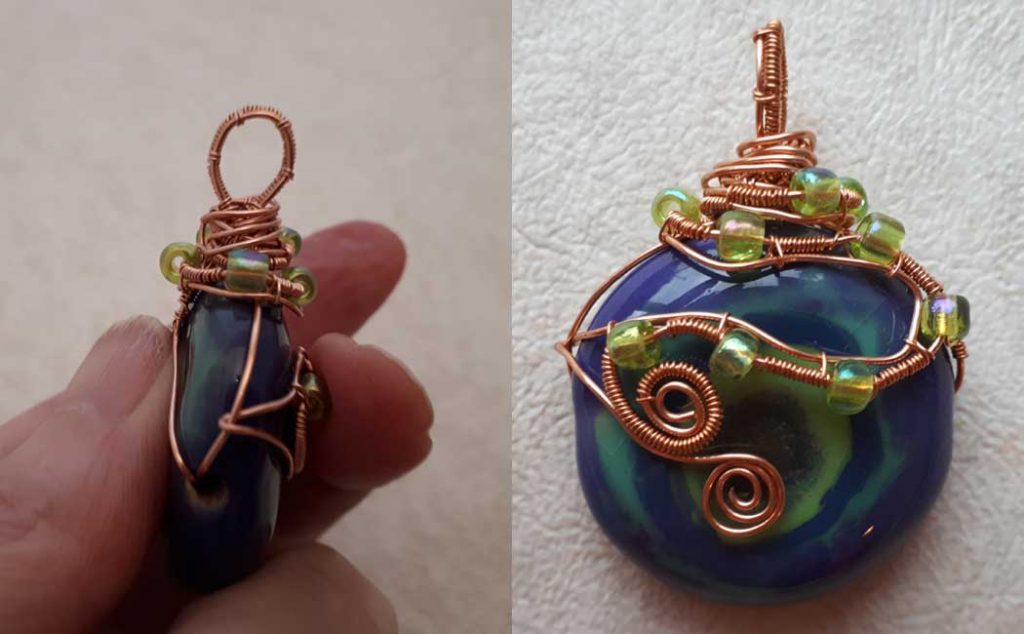
To finish everything off, I wrapped the two cage wires to the back, cut them and tucked the tails into the back of the bail. You could use these wires to make more spirals on the front or back. I was satisfied with my design so I just tucked them away.
So there you go! I hope you enjoyed this tutorial. Please share it on Pinterest or Facebook and with anyone you think might enjoy it! Have fun 🙂
You can check out my other wire wrapping tutorial here. This one uses a cage technique to wrap beads, semi-precious stones, rocks or sea glass that do not have a drilled hole.