How to Tap

This video by the Ontario Maple Syrup Producers Association gives an excellent overview:

  1. Carefully inspect the tree for a good spot to tap. See Where to Tap for more information.
  2. Drill 1.5 inches and no more than 2 inches deep into sapwood when tapping trees. An upward angle will create a slope to naturally drain sap and rainwater from the tap hole after the harvest season is finished.  Dry tap holes are less likely to develop wood decay.
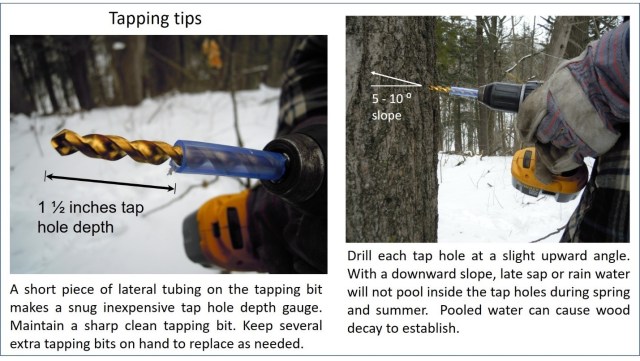
Tapping tips. Two images. The caption on the leftmost image shows a drill with a piece of blue lateral tubing covering half of it. The exposed part is labeled "1.5 inches tap hole depth". The caption says "A short piece of lateral tubing on the tapping big makes a snug inexpensive tap hole depth gauge. Maintain a sharp clean tapping bit. Keep several extra tapping bits on hand to replace as needed". The rightmost image shows someone drilling into a tree. The angle of the drill is at a 5-10 degree slope. The caption ssays "Drill each tap hole at a slight upward angle. With a downward slope, late sap or rain water will not pool inside the tap holes during spring and summer. Pooled water can cause wood decay to establish".
Tapping tips. There are 3 photos. The leftmost photo shows a drill with a piece of blue tubing covering part of it. The exposed part is buried in the tree. A label on the photo says "thawed sapwood >-5 degrees Celcius". The caption says "Hold the drill firmly with both hands. Drill in to the depth stop then pull it out following the same path. The sapwood should be thawed and not frozen". The second image shows a taphole. The caption says "A clean round tap hole, no oval shape to cause sap leaks". The third image is a drill bit with white wood shavings on it. The caption says "creamy white wood shavings means healthy sapwood and good sap flow".
A hand holding two small piles of wood shavings. the left pile is brown, the right a creamy white.
Wood shavings on the drill bit should be creamy or white in colour (right) which is healthy and conducts sap freely.  Darker or brown shavings (left) indicate that decayed wood or non-conducting stained wood has been hit, therefore a second tap hole will be needed to locate healthy sapwood.  Unfortunately, hitting stained wood causes additional injury to the tree due to multiple tap holes.

3. Install spiles gently. Avoid using excessive force with the tapping hammer, just enough to provide a snug firm seal in tap holes. Spouts can always be set a bit firmer during follow up inspections.

The first image is of someone using a small metal hammer to hammer a spile into a maple tree. The inset shows a proper tapping hammer, which is a rubber mallet. The second image shows the hammer tapping in a blue spout with a hook. The third image shows a blue bucket with a lid hanging from a tree. The caption says: "for healthy trees, 12 to 19 inches dbh = one tap/tree. 18 + inches dbh = two taps/tree (if desired). dbh = diameter at breast height. Gently tap the spile into the tap hole until it is firmly set to prevent sap leaks, but not overly tight. Soem producers hear the sound of the hammer change when the spile is seated just right. "Tap... tap... tick".

The written and graphic content in these pages was originally created by Todd Leuty (previous Agroforestry Specialist), and edited by Jenny Liu (Maple, Tree Nut, and Agroforestry Specialist).