THE Q & A SERIES
HOW TO DO A FULL BUST ADJUSTMENT
Hi there,
I really love the new Rennie dress pattern and I'm considering signing up for your Curated by ITF sewing subscription, but I have a full bust and I don't know if the pattern will fit me. Can you please help me figure this out?
Thanks for your time,
Deb
Hi Deb,
I'm so glad to hear that you love our latest Curated by ITF project, the Rennie dress! We're in love with it ourselves. In fact, I just finished making another one for myself, and can confirm that the beautiful finishes make it such an empowering sew! There's really nothing like the feeling you get after finishing a garment that looks as beautiful on the inside as on the outside.
When it comes to sewing your own clothes it's really important to understand that a pattern is really just a starting point. As I'm sure you can appreciate, it is impossible to make one pattern fit the myriad of wonderful body shapes and sizes in the world. So we're really proud at In the Folds to be able to provide extra resources to our customers to help you fit our patterns to YOUR particular body. And we can definitely help you figure out what you need to do if you have a full bust.
What is a full bust adjustment?
In sewing terms, an adjustment made to a pattern to accomodate a full or larger bust is called a Full Bust Adjustment (FBA).
HOW DO I KNOW IF I NEED A FULL BUST ADJUSTMENT?
You should always use the pattern fit measurements as your starting point when determining what pattern adjustments need to be made, and the same goes for a Full Bust Adustment. This will give you an understanding of how your body aligns with the sizes the pattern provides.
In The Folds patterns are drafted for a B cup bust for sizes A-J, and a D-cup bust for sizes G-P. If your bust cup size is larger than the pattern’s intended cup size you may need to do a Full Bust Adjustment or FBA.
You also need to consider the style of the pattern you're making, and how you would like the finished garment to fit. If a pattern has a lot of ease (ie. a loose or generous fit), you may choose not to adjust the pattern. If a pattern is designed to be fitted in the bust, it is more likely that you will need to make an FBA.
If you have already made a toile and everything fits nicely, but feels or looks tight across the bust you may need to make a FBA. This will also apply if there are diagonal lines radiating from the centre front or side seams towards your bust apex point.
Keep in mind that there are cases when your measurements may indicate that you need to do a FBA, but you actually need to alter another part of the pattern, such as the back width.
WORK OUT YOUR SEWING CUP SIZE
Cup sizes in sewing patterns are different to bra sizes and often don't correspond. Figuring out your sewing cup size should be your first step in determining if you need to make a pattern adjustment.

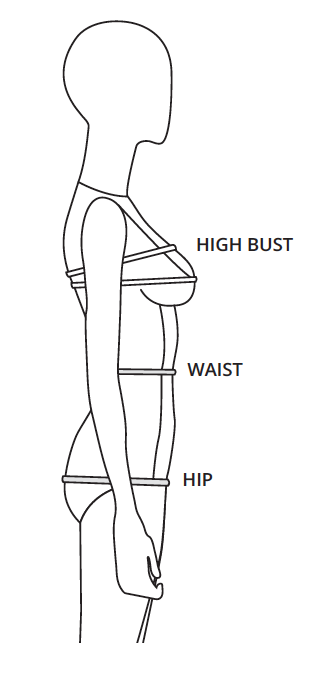
To figure out your sewing cup size, take your HIGH BUST MEASUREMENT (1) and BUST MEASUREMENT (2) and record them in the table above.
Work out the difference between your HIGH BUST MEASUREMENT (1) and BUST MEASUREMENT (2) and add it to the table (3).
If the difference between your HIGH BUST MEASUREMENT and your FULL BUST MEASUREMENT is 2.5cm (1") your bust is an A cup, 5cm (2") it's a B cup, 7.5cm (3") is a C cup, 10cm (4in) is a D cup and so on.
You can remove the dart all together by removing the full difference between the high bust and bust measurement of the pattern.
Record your bust cup size in the chart (4).
If your cup size is smaller than the pattern’s cup size you may need to do a Small Bust Adjustment (SBA) - you can find a tutorial here.
If your cup size is the same or similar to the pattern’s cup size, it’s likely you can leave it as it is.
If your cup size is bigger than the pattern’s cup size, you may need to do an FBA.
Many In The Folds patterns include a lot of design ease, so you may choose not to make the alteration for some styles (for example, I have an A cup size bust and don't bother with an SBA for the Collins top or the Rushcutter dress, but I do for the Acton dress, as it is more fitted).
FIGURE OUT HOW MUCH TO ADD
To make a correct adjustment you now need to work out how much you to add to the pattern to fit your bust cup size.
If you have a C cup bust cup size and your pattern is a B cup, then you will need to add 1 cup size (i.e. 2.5cm / 1in). If you have a D cup bust cup size, you will need to add 2 cup sizes (i.e. 5cm / 2in) and so on. Record the amount you need to add in the table above (5).
This number is the total amount you need to add to the pattern.
The FRONT [1] piece of a pattern is usually cut on the fold or as a pair so you will need to add half of your measurement at (5) to each side of the pattern. Divide (5) from the table by 2 and record it in the table above (6). This is the amount you will be adding to the pattern.
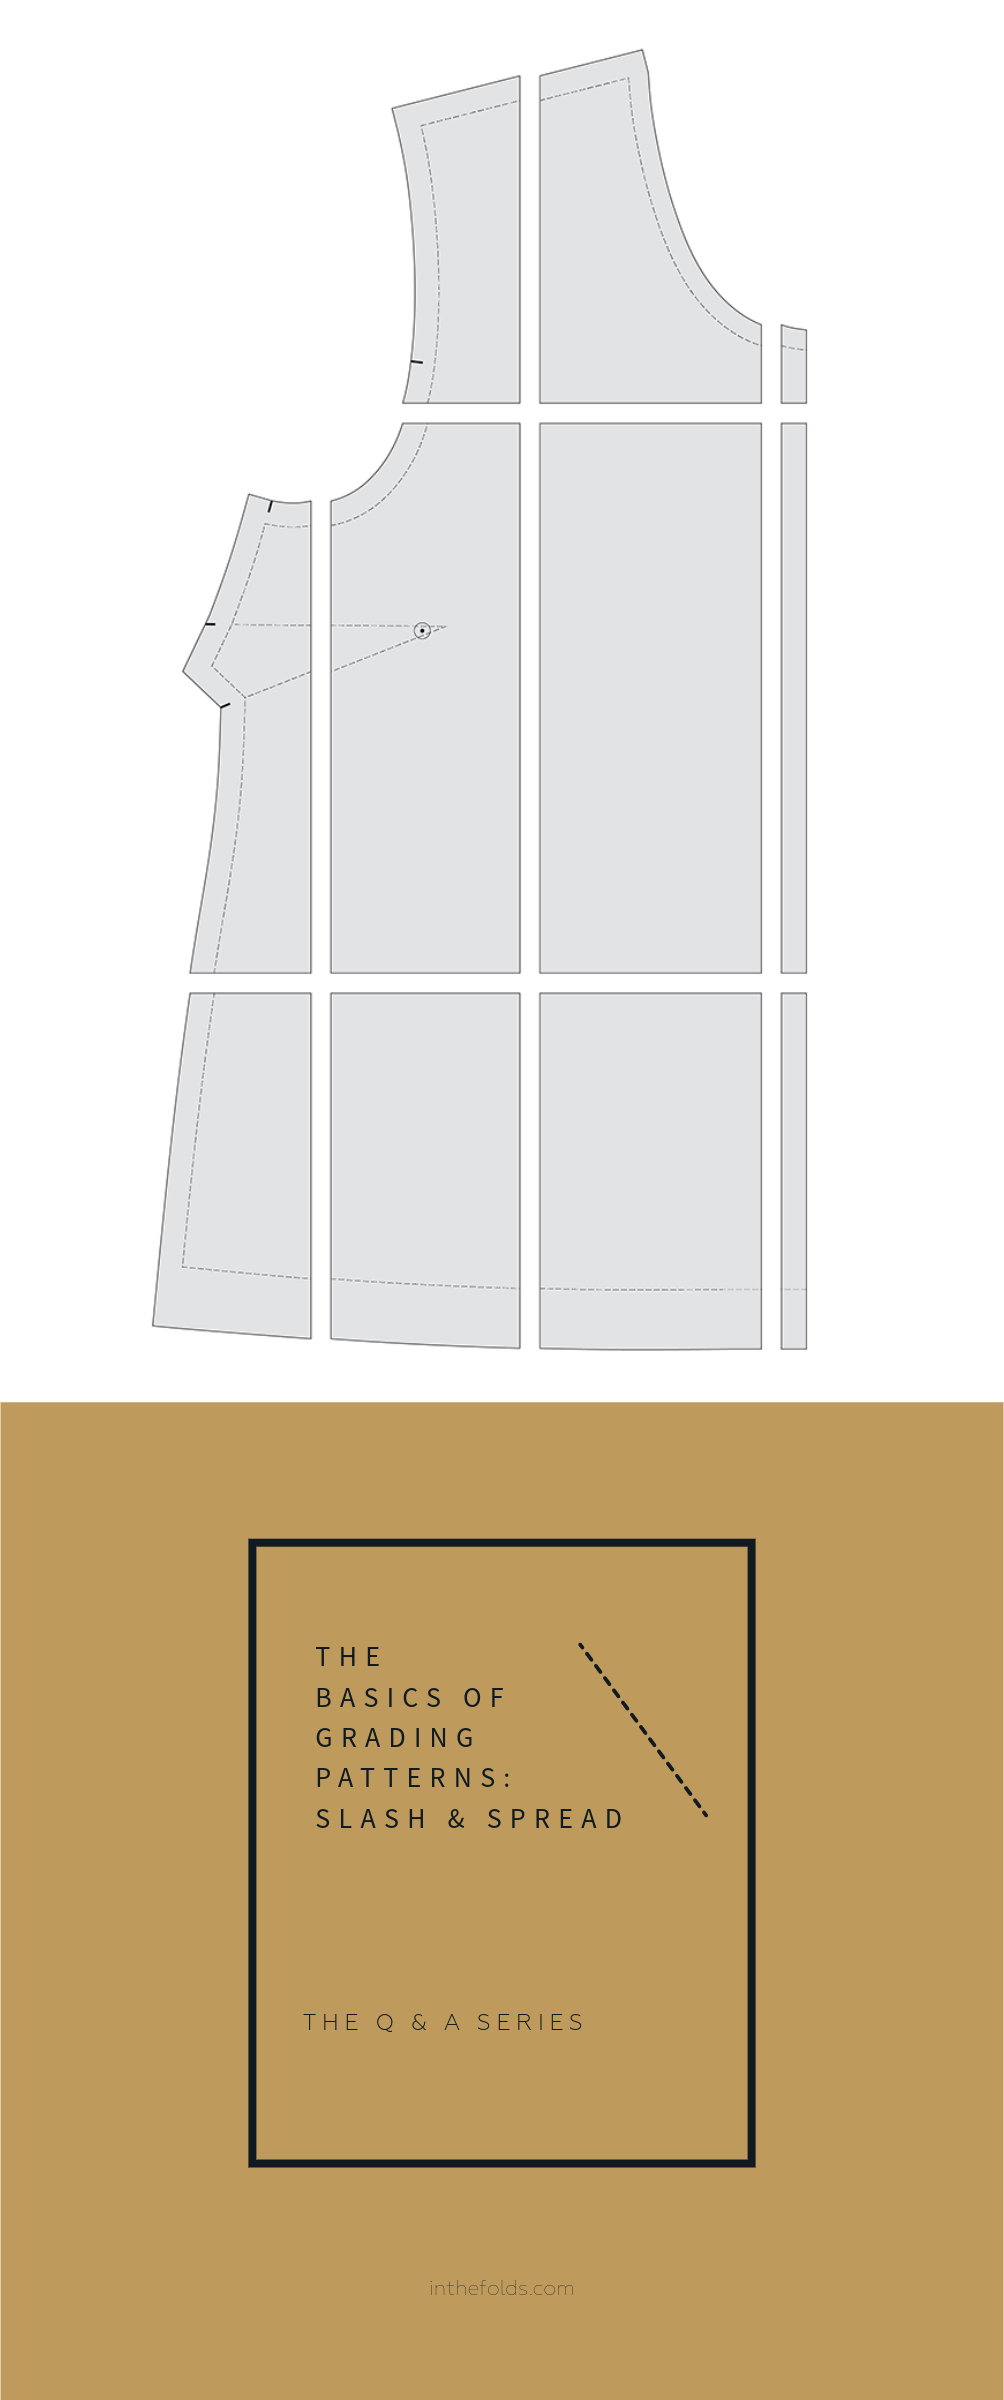
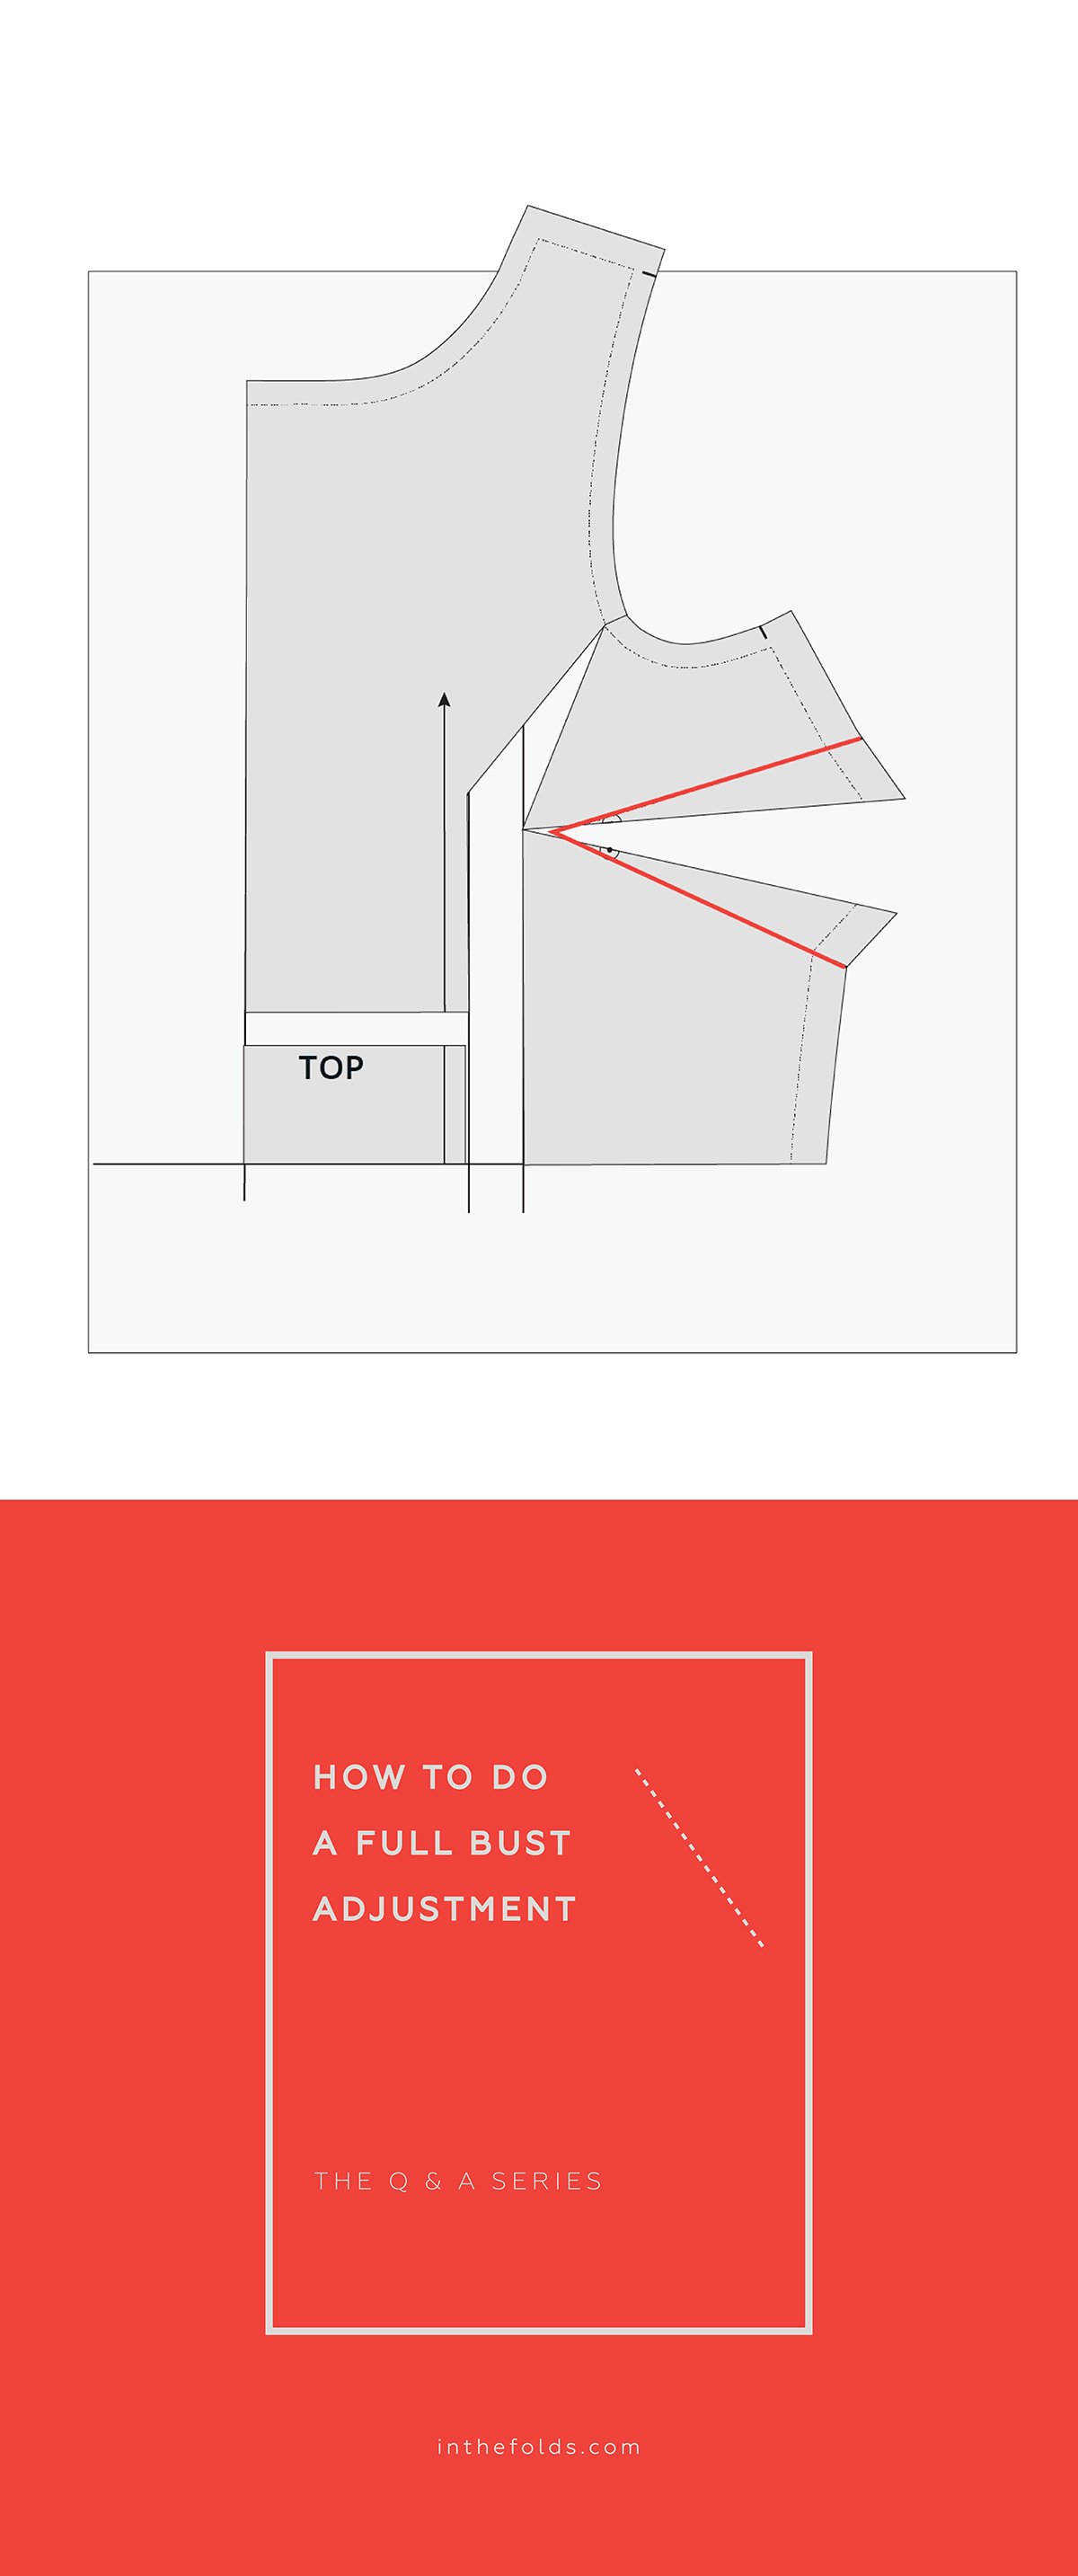
HOW TO DO A FULL BUST ADJUSTMENT
We will use the example of changing a pattern from a B cup to a D cup.
This means we will be adding 5cm (2in) or 2 cup sizes in total. Therefore, half of this - 2.5cm (1in) should be added to the FRONT [1] pattern piece, so that when the piece is cut as a pair or on the fold, the full amount required will be added.
To begin, trace a copy of the FRONT [1] pattern piece. (We suggest you use a copy so that if you make a mistake you always have the original to go back to.) Be sure to include all pattern markings, including grainline, notches and drill hole. It is also important trace off the stitching line (the grey line on the pattern).
Note: If your pattern is a jumpsuit or has design panels/features below the waistline then you may have to cut through the waist section of the pattern.
In the example of a jumpsuit, you will have the bodice and pant sections as two independent pieces. In this case, we would alter the bodice section and then join the other pieces back together.

Step 1
Take a ruler and draw a line through the centre of the dart. Extend the line beyond the tip of the dart.
This line will be referred to as line A.
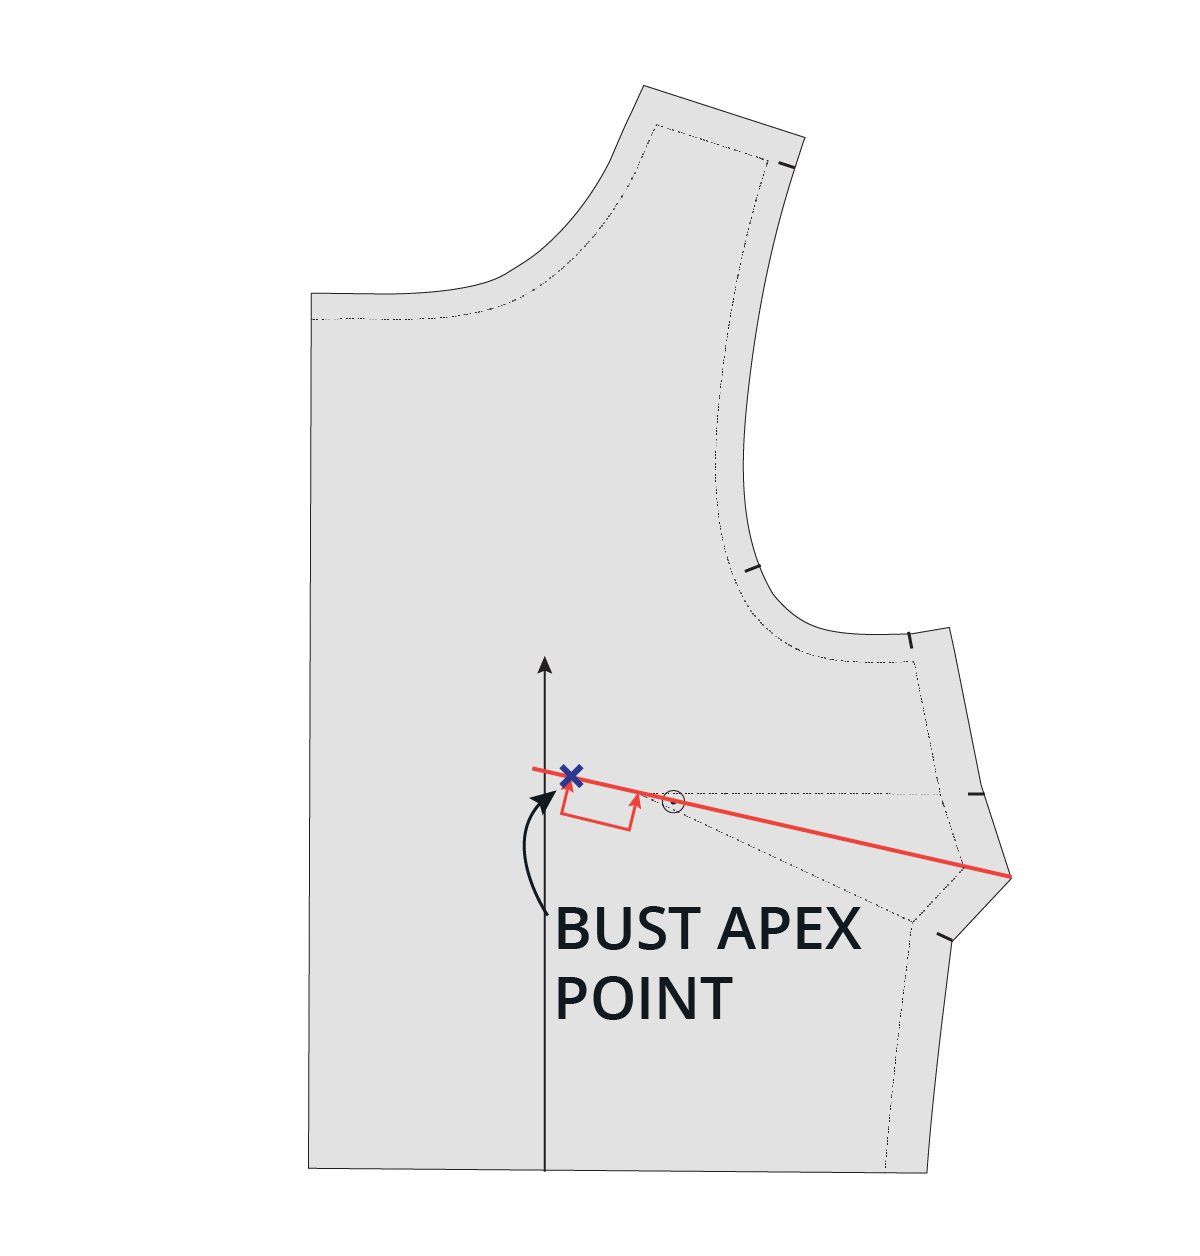
Step 2
Mark the apex point on the line. (The BUST APEX POINT is the peak of your bust). On In The Folds B-cup patterns this is normally 2.5cm (1in) beyond the tip of the dart point. On In The Folds D-cup patterns this is normally 5cm (2in) beyond the tip of the dart point.
If you have already found your actual BUST APEX POINT in relation to the pattern, mark this point, rather than the point indicated.

Step 3
Draw a line straight down from the BUST APEX POINT, parallel to the grainline. Extend to the WAIST LINE.
This line will be referred to as line B.
Step 4
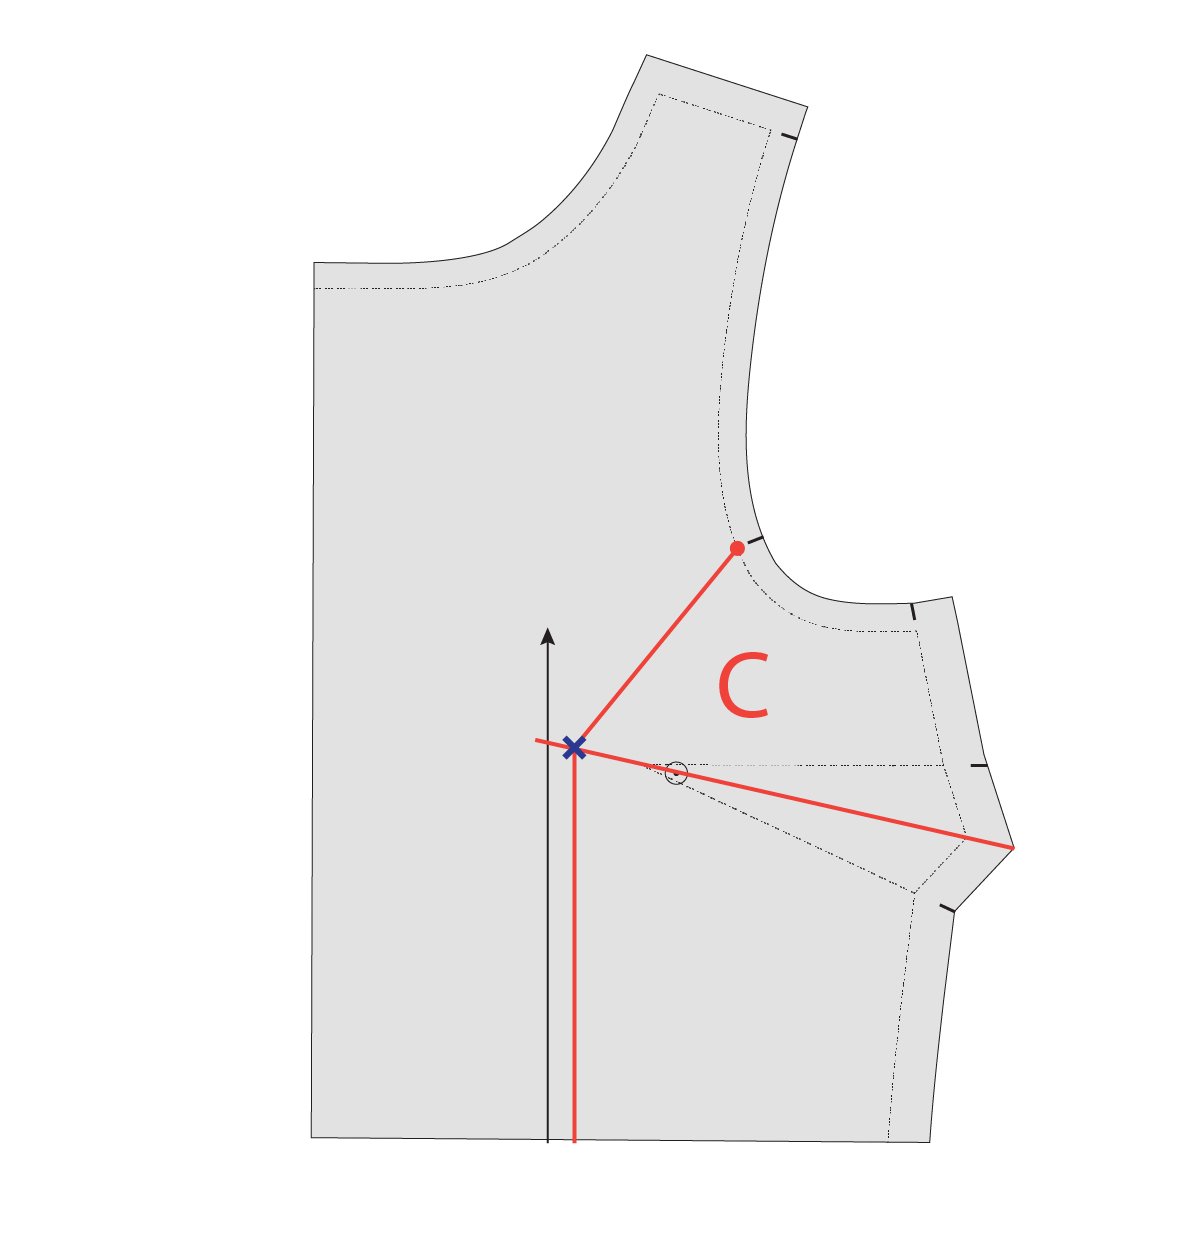
Draw a line from the BUST APEX POINT through to the notch on the armhole.
This line will be referred to as line C.

Step 5
From the LENGTHEN/SHORTEN LINE, cut up line B. When you get to the BUST APEX POINT, turn and cut along line C.
Slow down as you approach the STITCH LINE. Stop about 1mm from the STITCH LINE.
Cut in from the seam allowance on the armhole towards the point you stopped cutting on line C. Don’t cut through to the point - leave a small 1-2mm ‘hinge’ of paper that keeps the two parts of the pattern piece intact.

Step 6
Cut along line A from the side seam. Leave a small paper hinge at the BUST APEX POINT.
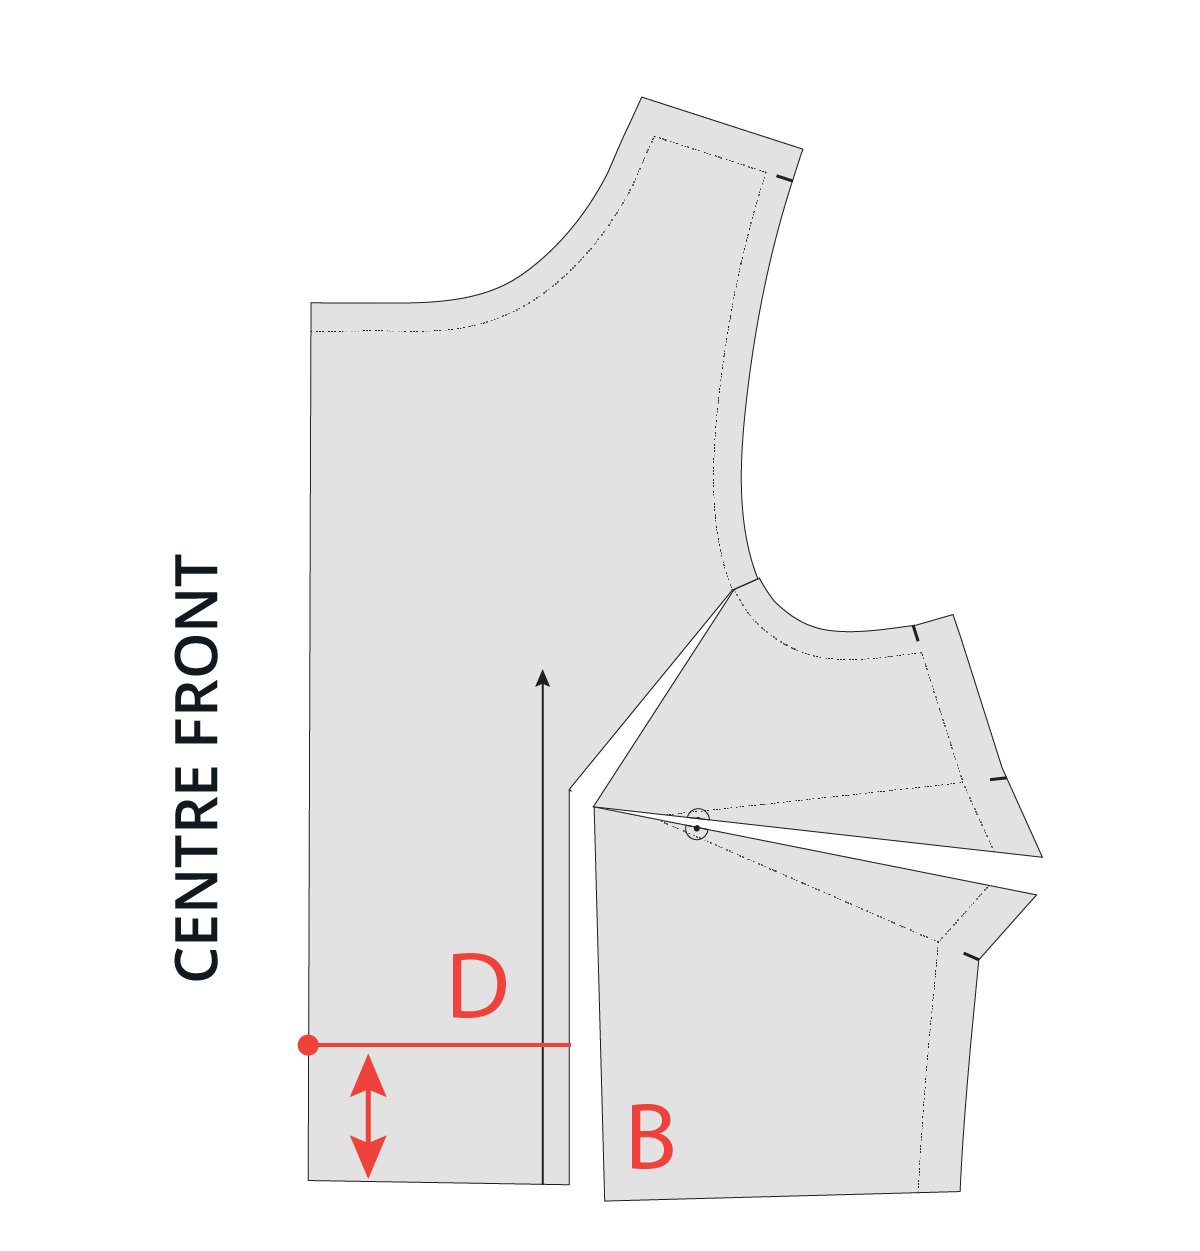
Step 7
The alteration so far is preparing the pattern to add width to the bust line. You will also need to add some length to the bust. This is because we need more fabric across the bust horizontally, as well as vertically.
Mark a line 5cm (2in) from the bottom (parallel to the LENGTHEN/SHORTEN LINE) from line B to the CENTRE FRONT.
We will refer to this as line D.
Step 8
Cut along line D. Mark the top of the piece that you remove so that you don't get confused when you put the pieces back together.

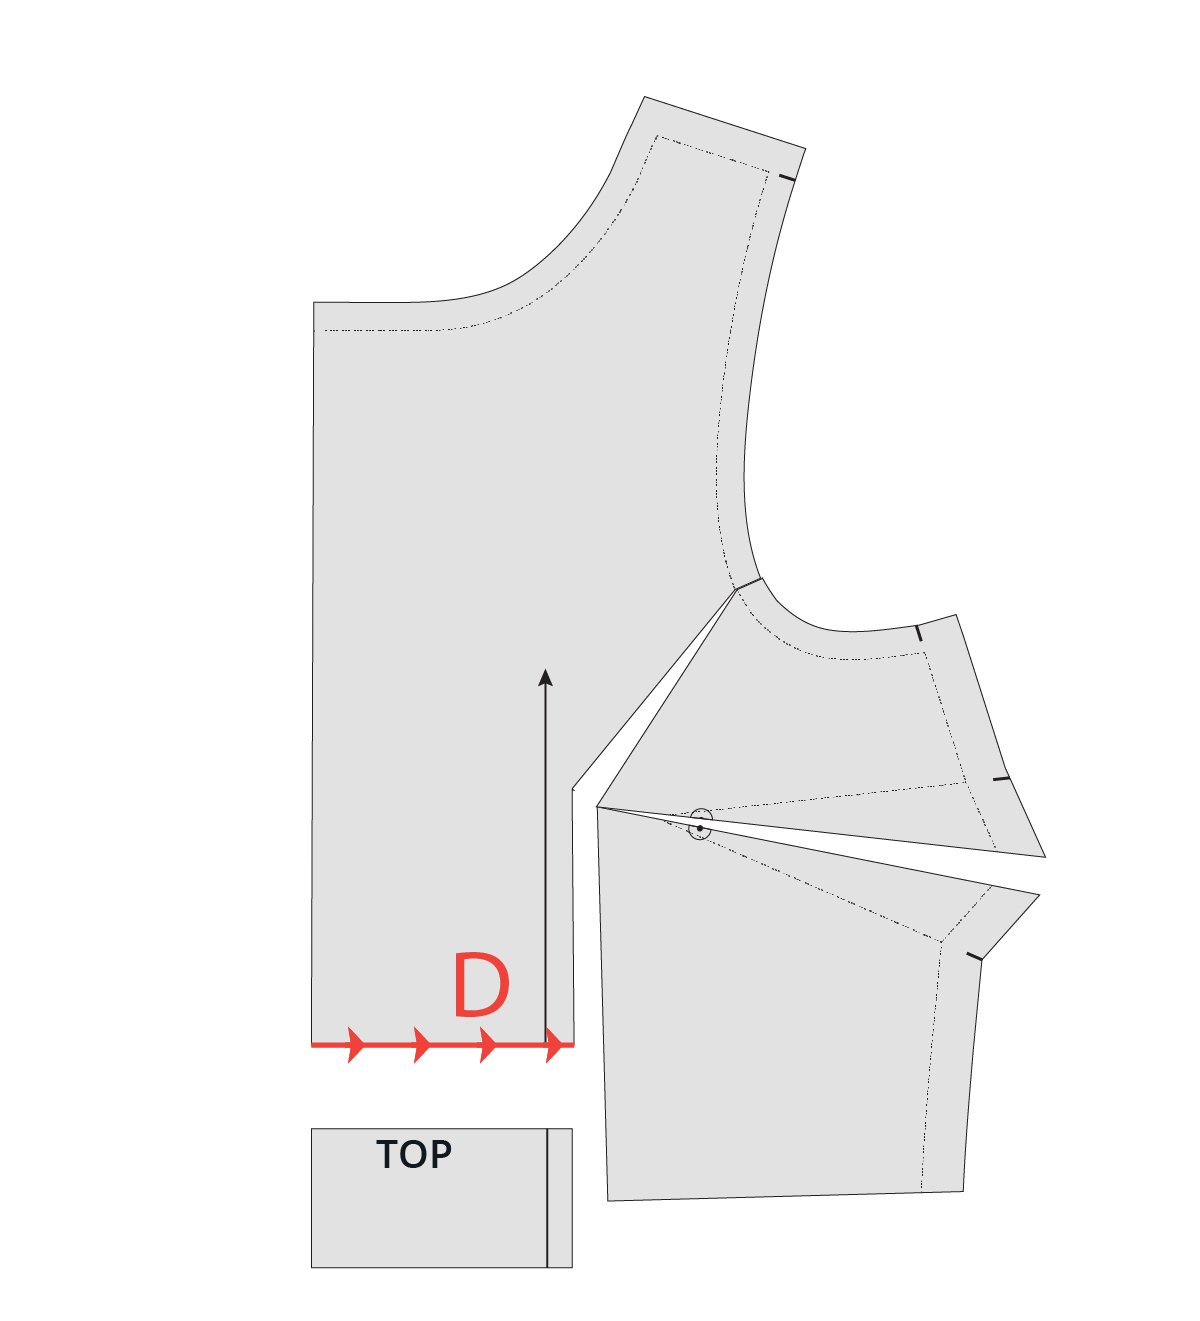
Step 9
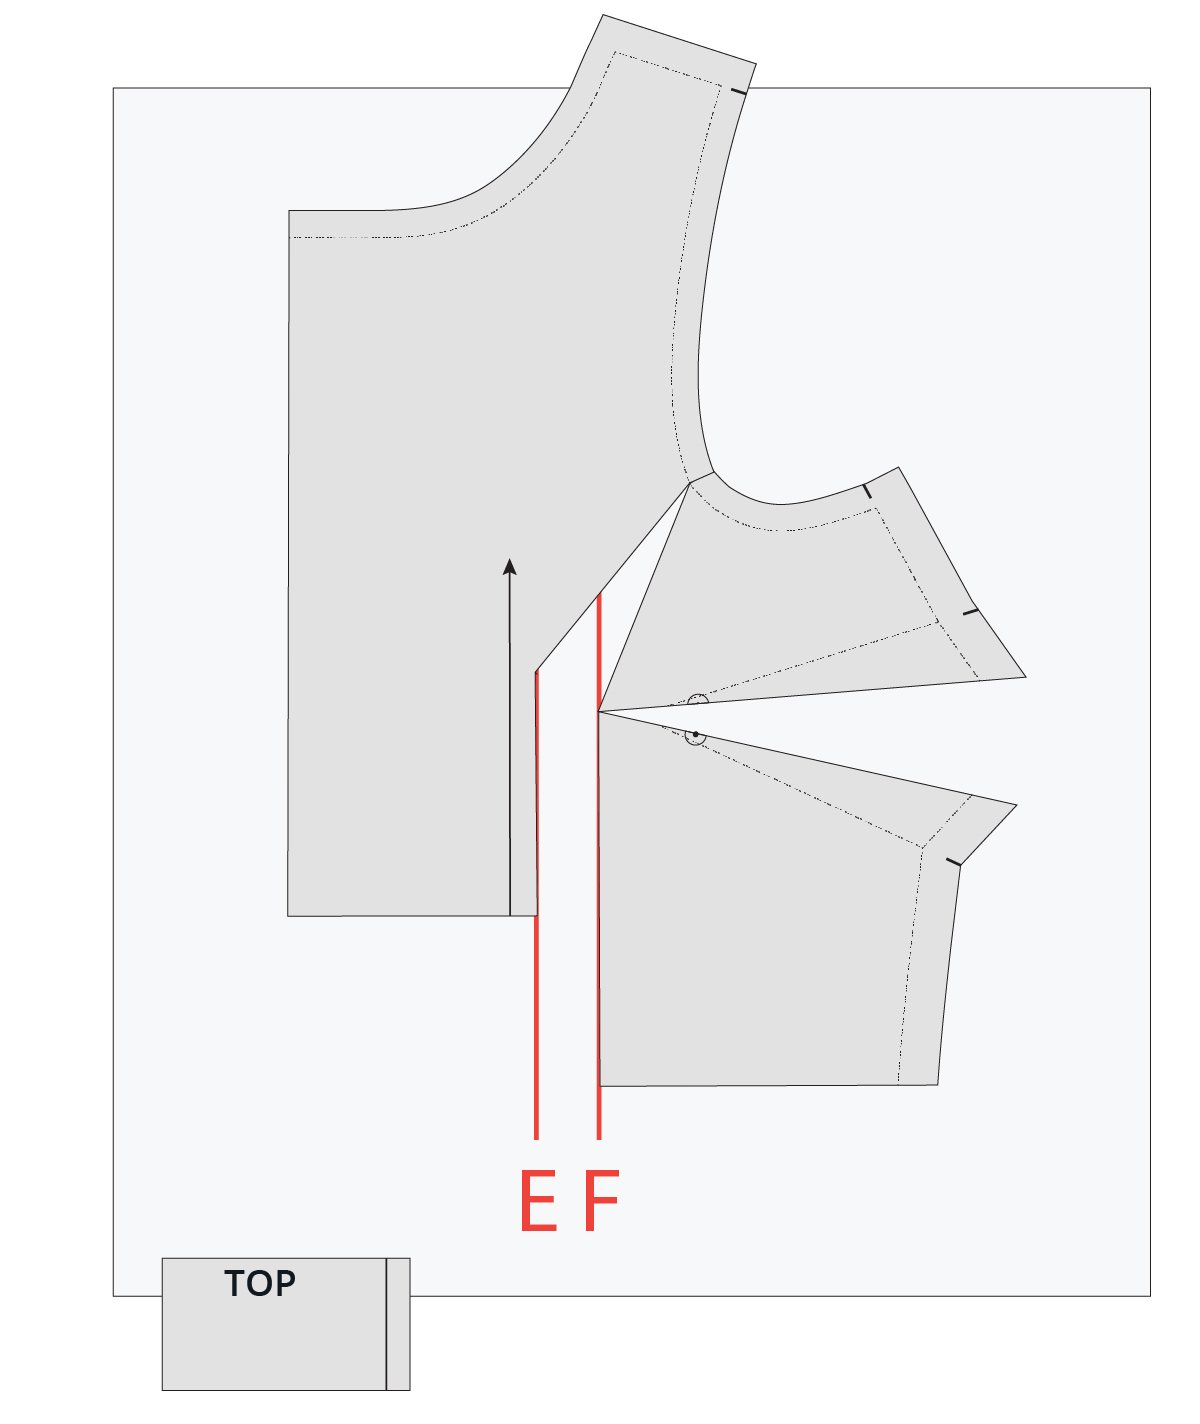
Take a piece of pattern paper that is larger than the bodice section. Draw a vertical line in roughly the centre of the paper. We will refer to this as line E.
By this stage you should know how much width you need to add to the bust (if you don't, refer to the measurements you recorded in the table above). Draw a second line, parallel to the first, the distance you need to add away from the first line. For example, if you need to add a total of 5cm (2in) to the bust, you will draw the line 2.5cm (1in) away from the first line.
This will be line F.
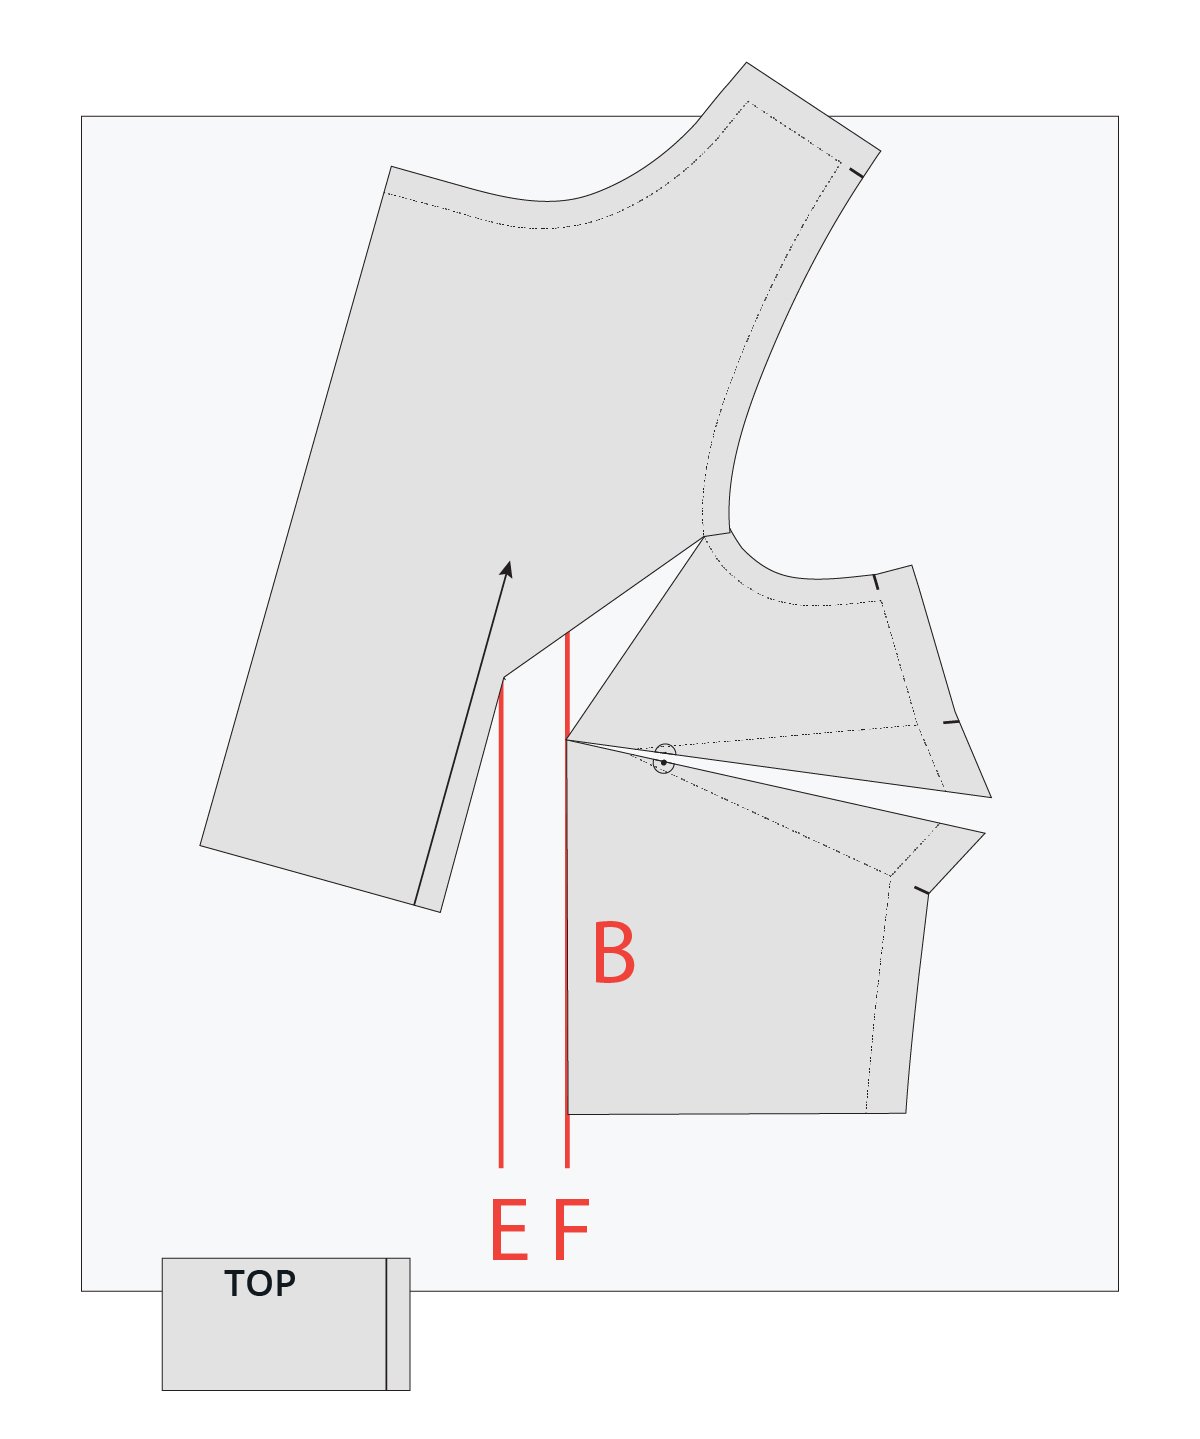
Step 10
Now that you have cut through the lines on the pattern, you will be able to manoeuvre the pattern to add the extra width you need at the bust.
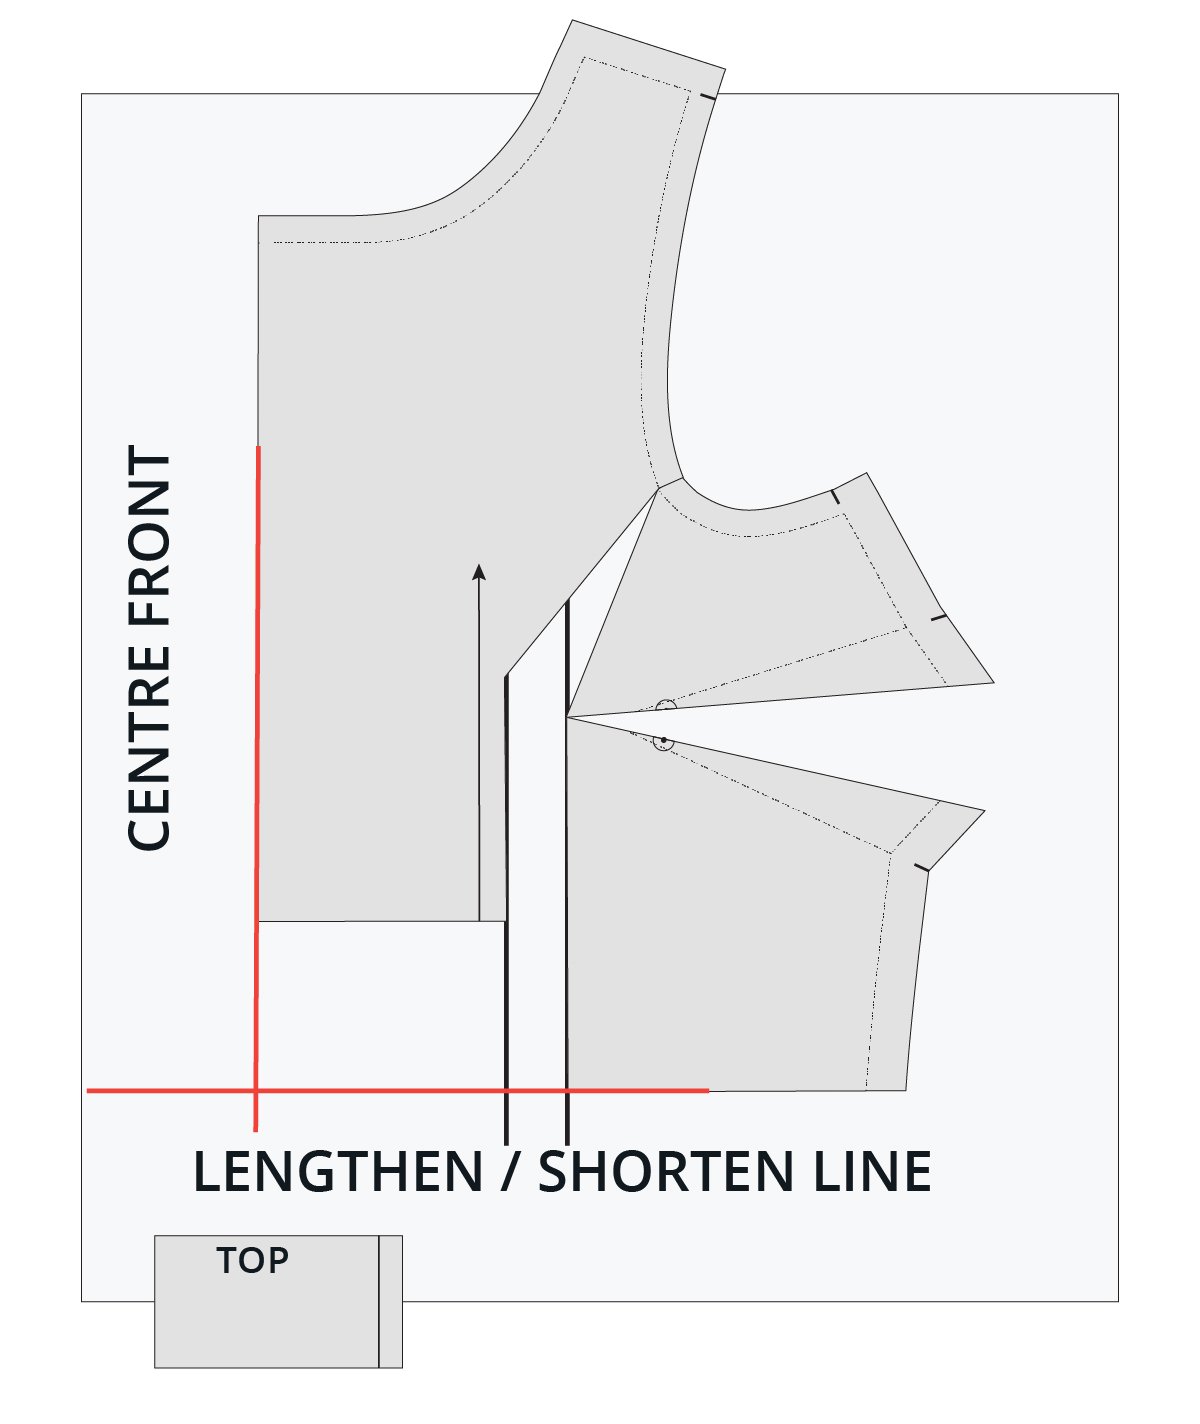
Carefully place the pattern onto the guidelines you drew in the previous step. To start, align line B on the pattern (the side of line B that is on the dart side) with line F.
Tape or glue in place (this section of the pattern only).
Step 11
Carefully move the other side of the pattern piece until the other side of line B (closest to the CENTRE FRONT) lines up with line E. When everything is lined up, tape this section of the pattern in place.
Step 12
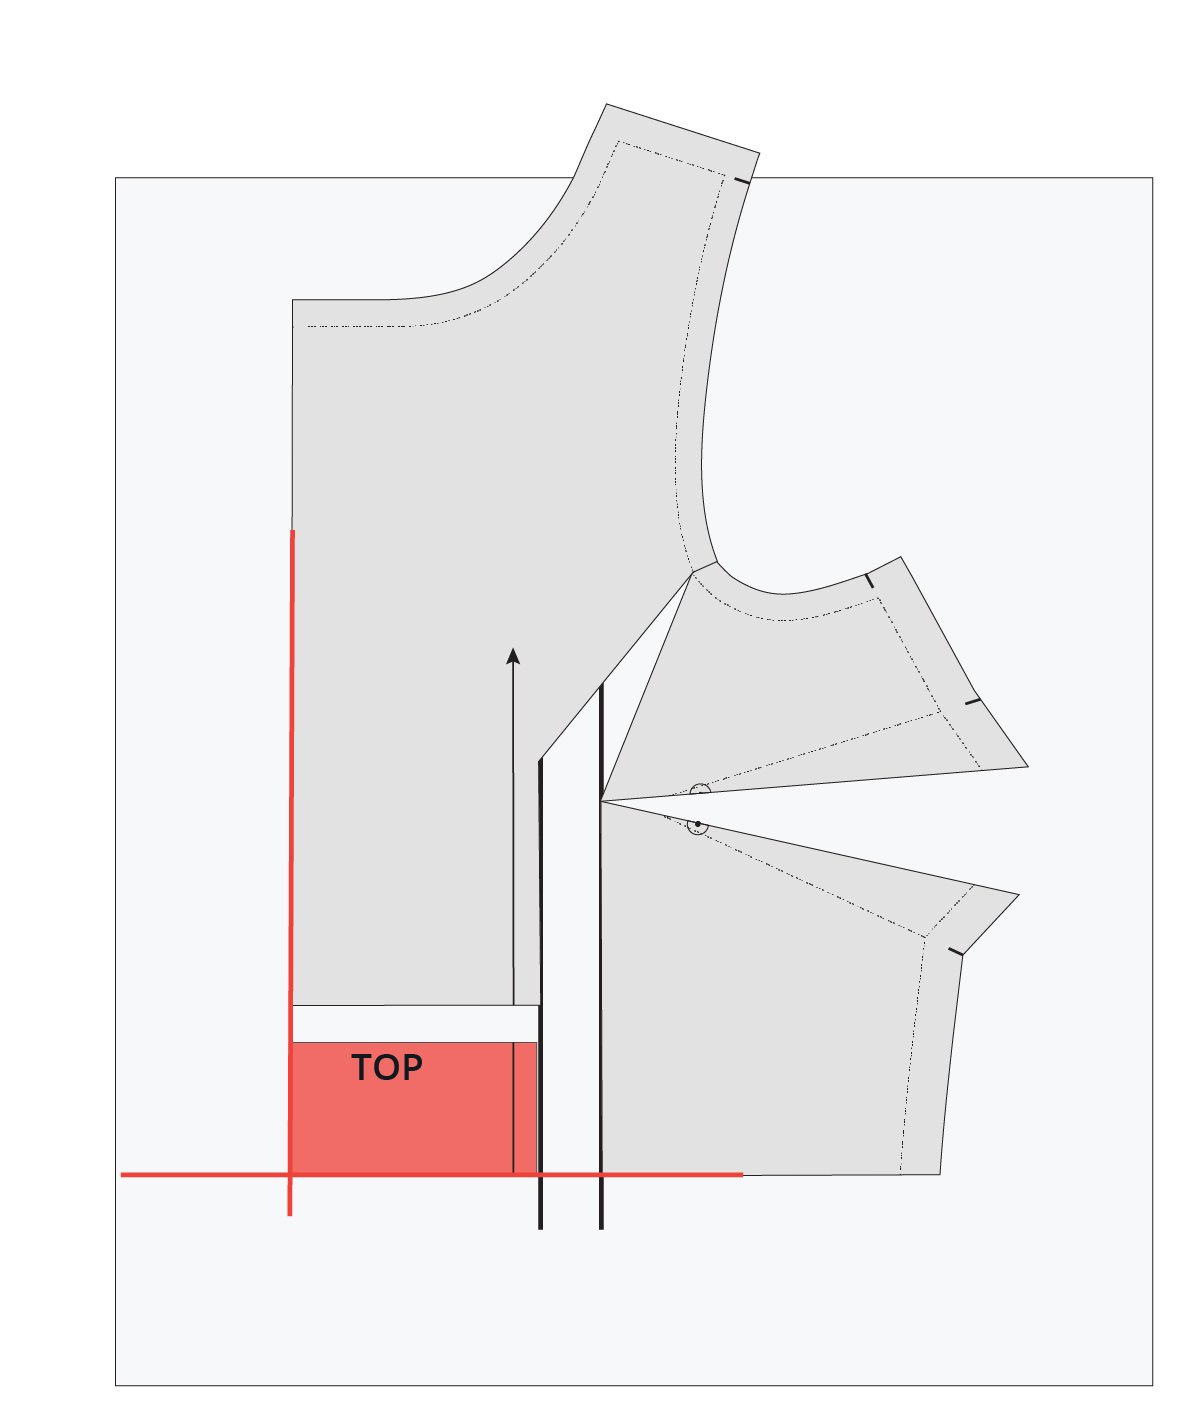
Take a ruler and extend the CENTRE FRONT line (along the CUT LINE) onto the paper underneath. Do the same for the LENGTHEN/SHORTEN line at the waist. The two lines will intersect.
Step 13
Take the section of the pattern you cut off in Step 8 and line up the corner with the lines marked in Step 12. When it’s in place, tape or glue in place.
Step 14
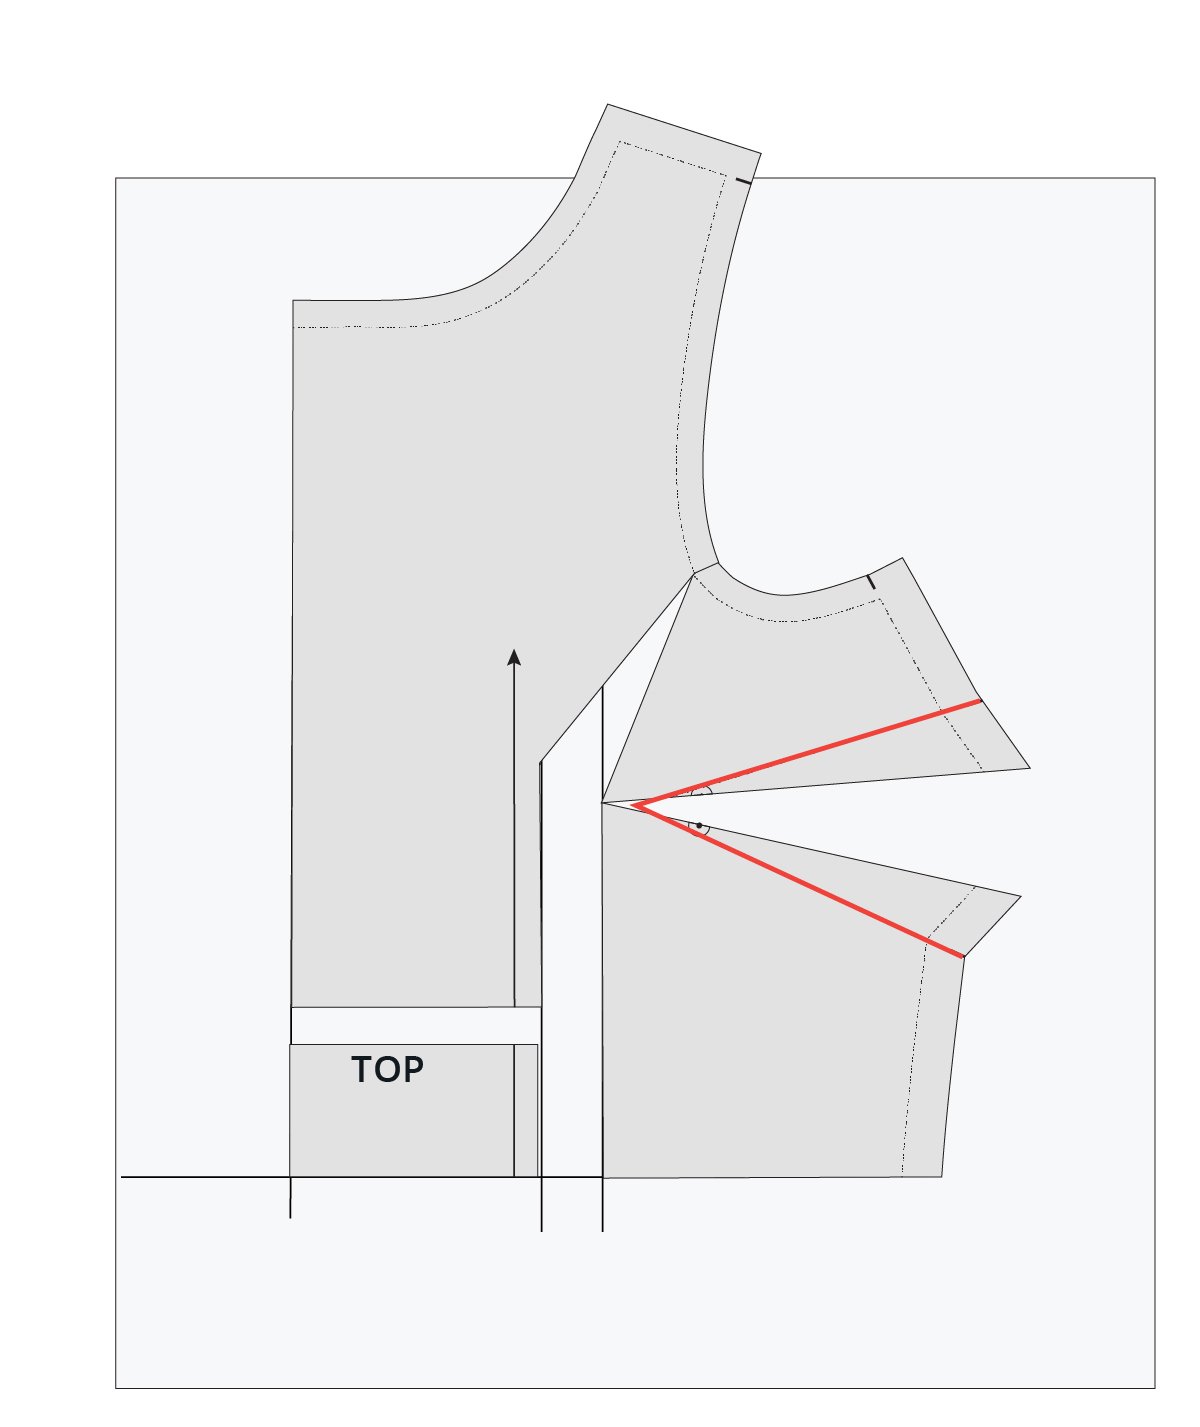
Draw in the dart arms by joining the dart notches to the original dart point and extending the lines until they intersect.
Check that this is the correct dart point positioning for your body. Do this by measuring your body and checking the pattern, or by creating a toile. Here’s a video resource from Made to sew on how to measure your bust apex.
Due to the FBA, you may end up with a very large dart and as a result it can be difficult to achieve the shaping you need for the bust. Consider rotating part of the dart to become a second dart. We would suggest a French dart. See this article for more info on rotating darts.
Reattach the lower section of the pattern if applicable. You will notice the waist measurement has increased. Adjust the bodice to match the lower section.
Making clothes to fit your own body is another very empowering aspect of learning to sew. I hope this tutorial helps you on your sewing adventures, Deb!
Happy sewing!
Emily
RESOURCES MENTIONED IN THIS ISSUE
Rennie dress pattern is currently only available as part of our Curated by ITF sewing subscription. It will be released as a standalone pattern in 2023. More information about Curated by ITF can be found here.
Small Bust Adjustment - tutorial here.
Collins top - pattern here.
Rushcutter dress - pattern here.
Acton dress - pattern here.
How to measure your bust apex - tutorial here.
How to rotate darts - tutorial here.
For more issues of the Q & A series, you can check out the archive here.
WHAT YOU’VE BEEN MAKING

Peppermint Playsuit made by @lamwik

Barkly skirt pattern made by @tonahangen