
I’ve written about using Stable Diffusion after the fact to create images of characters, and shared samples of my results, but did not detail my specific workflow or process, so I thought I’d share a little about it. I like to let the computer churn out possible images while I’m working on writing or other things. Depending on how many images I’m running in a batch, reviewing the results can be a nice break and reminder to stand up and stretch.
What is Stable Diffusion?
Stable diffusion both a term of art and a reference to a specific software used to generate images. As a term of art, it is a concept in mathematics and physics that describes how certain systems evolve over time in a smooth and predictable manner. Imagine a calm river where the flow of water remains steady and uniform. In stable-diffusion, a similar principle applies to various processes, where changes occur gradually and smoothly without sudden disruptions. This concept is often used in fields like statistical mechanics and finance to model the gradual spread or diffusion of quantities such as heat, information, or financial assets. In simpler terms, stable-diffusion helps us understand how things spread or change in a stable and continuous way, much like the steady flow of a tranquil river.
In the context of generating images refers to a method used in machine learning and artificial intelligence to produce high-quality and coherent images. Imagine starting with a vague and blurry image and gradually refining it, step by step, like slowly bringing an out-of-focus picture into clear focus. This technique ensures a smooth and stable transformation of the image, avoiding sudden and jarring changes. In the process, details are added progressively, resulting in realistic and visually appealing images. Stable-diffusion is particularly valuable in image generation tasks as it enables the generation of complex and intricate visual content in a controlled and gradual manner.
For the rest of this blog entry, I will used Stable Diffusion to be the software used to generate images. The software is developed and maintainted by stability.ai . You can see the git code repository here.
Introduction to my set-up
I’m running Stable Difussion 1.5 on a Mac Pro with a M2 processor. I started on an older Intel based Mac, but still followed the same install journey discussed here. This article covers the installation of the Automatic1111 GUI for use via a browser to manage the generation of images. The mac specific instructions for installation can be found here. (As of this writing, I’m running version: v1.6.1 • python: 3.10.13 • torch: 2.0.1 • xformers: N/A • gradio: 3.41.2 • checkpoint: 7a4dbba12f).
Using the GUI allows additional tools and customizations to be added into the process, such as an Image browser to see all of your recently generated work, ControlNet which gives you control over the posing of the characters in the image, and add-ins to provide finer control of lighting and contrast to make more realistic images. The full range of what can be done with the tools and add-ins is beyond the scope of this write-up. There are also several ways to run image generation online, but I prefer to have my tools and processes locally to give me greater control. More infomration on online tools is only an internet search away.
Models
Stable Diffusion provides the framework and system to generate images, but needs a trained model to actually perform the work. There are a wide variety of models across the internet that can be used. Civitai.com is a great place to start exploring the world of possible. You do have to register for a free account to use Civitai, but they appear to be responsible and don’t generate spam. Huggingface.com is a good alternative if Civitai is not your cup of tea.
Please note that your model is the biggest variable in whether you will see Not Safe For Work (NSFW) images in the generation process. This can be controlled with your prompts, but if you pick a model trained with porn, you’re more likely to see NSFW images.
Many of the models are geared to fantasy realms, animae and other fictional settings, but there are a fair number of high-quality models focused on creating photorealistic images. Depending on the genre you want to create characters for, pick an appropriate model. To illustrate, here are three character images created from the same inputs, but using three different models.


Common prompt: photograph of a young woman standing before a huge dragon, Seed: 2988225084, Sample steps: 30, CFG: 7
The first model is v1-5-pruned-emaonly and is essentially the default model most tutorials tell you to install while getting set up.
The second model is Ghostmix_v2, and can provide good images for a wide range of content.
The final model is CyberRealistic_v33, and seems to do well for me when generating photorealistic content and pictures.
My go-to model currently is the last, CyberRealistic_v33. Unless I state otherwise, that is the model I’ll used for the remainder of this article.
There are several other settings within the UI that can have a large impact on your images. These include the number of sample steps used (30 in all these examples), the CFG Scale (I’m using 7 in this article). You can also select your sampling method and upscaler used. My defaults are DPM++ 2M Karras for sampling method and R-ESRGAN 4x+ for upscaler.
Prompts
A prompt is the natural language input used to generate the image. Generally speaking, you want to keep your prompts as simple as possible. Depending on the model you use, the “as possible” can still result in a long prompt. Prompt length will also affect how quickly your images are generated. Additionally, there are both positve prompts (what you want to see) and negative prompts (things you don’t want). For negative prompts, I have an add-on the is specific for my preferred model called CyberRealistic_negative. I can put this in my negative prompt input box and avoid a lot of extra typing.
For the first examples, I kept the prompt very simple “photograph of a young woman standing before a huge dragon”, with no negative prompt. Now I want to be more character-image specific.
If you want to have a consistent face as you iterate on other settings, you need to ’trick’ the model by having a common descriptor in your prompt. Some creators use a name: “photgraph of young woman[ingrid] standing under a tree”. Others suggest using a nationally in the prompt, such as: “photograph of a young Norwegian woman standing under a tree”.
I prefer to have a bit more control over the facial features of the character, so I like to use real people so I can have an expectation of facial features, but I always blend two people to give a unique, but consistent look. For example, “photograph of a young woman[Joanna Krupa:Summer Glau:0.5] standing under a tree”.
Using this approach has a few of benefits for me. Firstly, I get consitent facial feaures and structure across multipe runs and many image settings. Secondly, since I’m making character images, it generally produces faces that are easily visible in the frame of the image. I can also blend the mix of features by adjusting the number part of the prompt. Using 0.5 means it will shift between the two faces 50% of the way though the image generation. I can easily change that to 30% [:0.3] or 70% [:0.7] by adjusting the prompt. Finally, I get natural hair and eye colors without adding anything to the prompt. I’ll show you how to override that in a moment.
Let’s see what this approach give us.

Not bad. I like the overall pose and compostion for now, so copy the seed (4115103065) so I can focus on the details of the character and not worry about the composition changing too much. One thing to be aware of is that a lot of the models have a bias to asian norms for the people they generate. To help make this a little less asian, I’m going to add the Asian-Less-Neg add-in to my negative prompt. Just this simple change in the prompt has a noticeable impact on the image.

For this character, I want her hair lighter and I want her to have blue eyes, so I modify the prompt to: “photograph of a young woman[Joanna Krupa:Summer Glau:0.5] standing under a tree, platinum blonde hair, big blue eyes.“

Notice that her dress changed colors to match her eyes, which I did not want, so I’ll tweak the prompt again. “photograph of a young woman[Joanna Krupa:Summer Glau:0.5] standing under a tree, platinum blonde hair, big blue eyes, wearing red dress”.

That did not change as expected, so let’s increase the strength of the prompt here. Enclosing a term in parentheses will increase the weight of the element by 10%, so “(red)” will make the color prompt stornger. The alternative syntax is “(red:1.1)” which I prefer because it gives me greater control. I can put “(red:1.5)” to make the weighting 50% greater instead of trying to figure out nested parenthases. That seems to do the trick. “photograph of a young woman[Joanna Krupa:Summer Glau:0.5] standing under a tree, platinum blonde hair, big blue eyes, wearing (red:1.5) dress”.

I can now iterate and add details until I get close to the image I want. I can also move back to a random seed if I want some alternative compositions to consider, or use the “extras” feature to create variations of an image.
Here are some of the variations I reviewed before selecting a favorite:
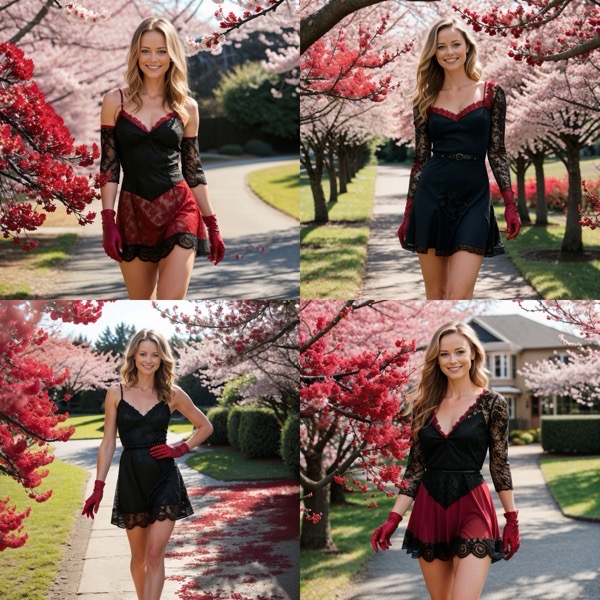

Here is my final result and the prompt that created it.

Prompt: (full body) photograph of a young woman[Joanna Krupa:Summer Glau:0.6] standing under a blossoming cherry tree, stream flowing in background, athletic build, fit, slender waist, narrow hips, platinum blonde hair, french-twist hairstyle, big blue eyes, smiling, (wearing a short (red:1.5) beaded cocktail dress with black details), (black lace gloves), rim lighting, sunset, twilight, soft focus, dof,
Negative prompt: CyberRealistic_Negative-neg, Asian-Less-Neg,
Steps: 30, Sampler: DPM++ 2M Karras, CFG scale: 7, Seed: 1017757063, Face restoration: CodeFormer, Size: 512×512, Model hash: 7a4dbba12f, Model: cyberrealistic_v33, Variation seed: 2310841748, Variation seed strength: 0.31, Denoising strength: 0.65, Hires upscale: 2, Hires upscaler: R-ESRGAN 4x+, Version: v1.6.1
Notice that the lace gloves fell out of the image, even though I boosted the weight of the prompt slightly to include them. If I had to have that detail, there are other ways to re-work that part of the image or reinforce the prompt even more, but that would make this post much too long.
Additional Prompt Considerations
As mentioned above, some models have been trained using porn images. If you want to minimize generation of questionable content, you may want the add “SFW” to the begining of your prompt. Of course, if explicit images are your thing, you can apply it in the negative prompt instead.
You can also adjust the number of sampling steps the process uses. Generally speaking, more steps give you images closer to your prompt, but sometimes you will reach a point of diminishing returns.
Finally, you can change the medium you want the image created in. Here is the same basic prompt, but using a water color medium and mimicking a specific artist’s style.

Prompt: ( watercolor \(medium\), IrisCompiet:1.2), <lora:IrisCompietStyle:0.9>, painting of a young woman[Joanna Krupa:Summer Glau:0.6] standing under a blossoming cherry tree, stream flowing in background, athletic build, fit, slender waist, narrow hips, platinum blonde hair, french-twist hairstyle, big blue eyes, smiling, (wearing a short (red:1.5) beaded cocktail dress with black details),
Other add-ons
In addition to the default capabilities of Stable-Diffusion and Automatic1111, you can extend your workflow and tailor how images are generated using extensions. The most common are LORA’s and Textual Inversions. The negative prompts referenced above are actually Textual Inversions. The extension used to make the water color image in the style of Iris Compiet is a LORA in action.
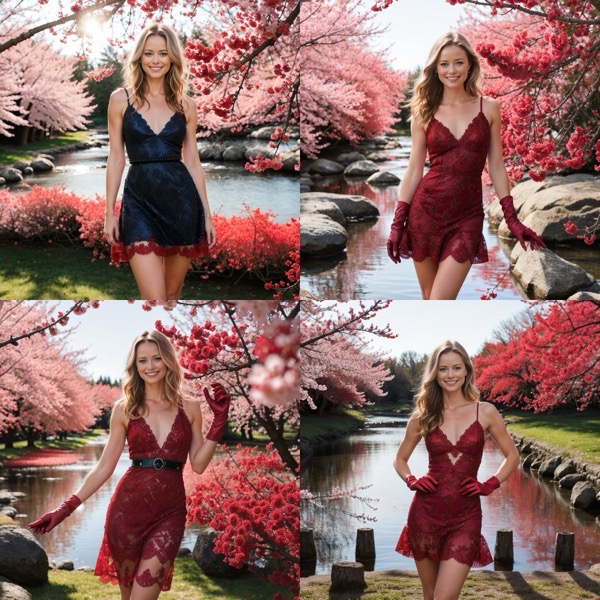
It is also not uncommon to use a Dynamic Thresholding Fix (also called a CFG Scale Fix) to allow more dynamic range in the output images and make them look more realistic. I use several of these on a normal basis. For this post, here is the final image I selected and the full prompt and settings used to generate it.

Prompt: (full body) photograph of a young woman[Joanna Krupa:Summer Glau:0.6] standing under a blossoming cherry tree, stream flowing in background, athletic build, fit, slender waist, narrow hips, platinum blonde hair, french-twist hairstyle, big blue eyes, smiling, (wearing a short (red:1.5) beaded cocktail dress with black details), rim lighting, sunset, twilight, soft focus, dof, <lora:epi_noiseoffset2:0.75>, <lora:LowRA:0.4>, (low key), <lora:add_detail:1>, <lora:lora_perfecteyes_v1_from_v1_160:1>, (perfecteyes blue eyes),
Negative prompt: CyberRealistic_Negative-neg, Asian-Less-Neg,
Steps: 70, Sampler: DPM++ 2M Karras, CFG scale: 25.5, Seed: 1017757063, Face restoration: CodeFormer, Size: 512×512, Model hash: 7a4dbba12f, Model: cyberrealistic_v33, Variation seed: 2310841748, Variation seed strength: 0.31, Denoising strength: 0.65, Hires upscale: 2, Hires upscaler: R-ESRGAN 4x+, Lora hashes: “epi_noiseoffset2: d1131f7207d6, LowRA: 0dfc93870ba3, add_detail: 7c6bad76eb54, lora_perfecteyes_v1_from_v1_160: a20338fde571”, Dynamic thresholding enabled: True, Mimic scale: 6.5, Separate Feature Channels: True, Scaling Startpoint: MEAN, Variability Measure: AD, Interpolate Phi: 0.95, Threshold percentile: 98.3, Mimic mode: Half Cosine Up, Mimic scale minimum: 4, CFG mode: Half Cosine Up, CFG scale minimum: 3.5, TI hashes: “CyberRealistic_Negative-neg: 65f3ea567c04, Asian-Less-Neg: 22d2f003e76f”, Version: v1.6.1
Final Thoughts
This has been a quick overview of how I approach making some character images. I don’t want to even pretend this is the only way. I prefer photorealisit images, but could just as eaisly generate pencil drawings, water color images, and much more. Hoepfullly this will help some other person wanting to explore image generation via AI. Like the post and follow if you want more this type of content.
You can see additional samples of my character images at https://www.charliefoxtrotwriter.com/character-images/

2 thoughts on “Creating Character Images with Stable Diffusion”