Motorising the Orient Express
Posted by Huw,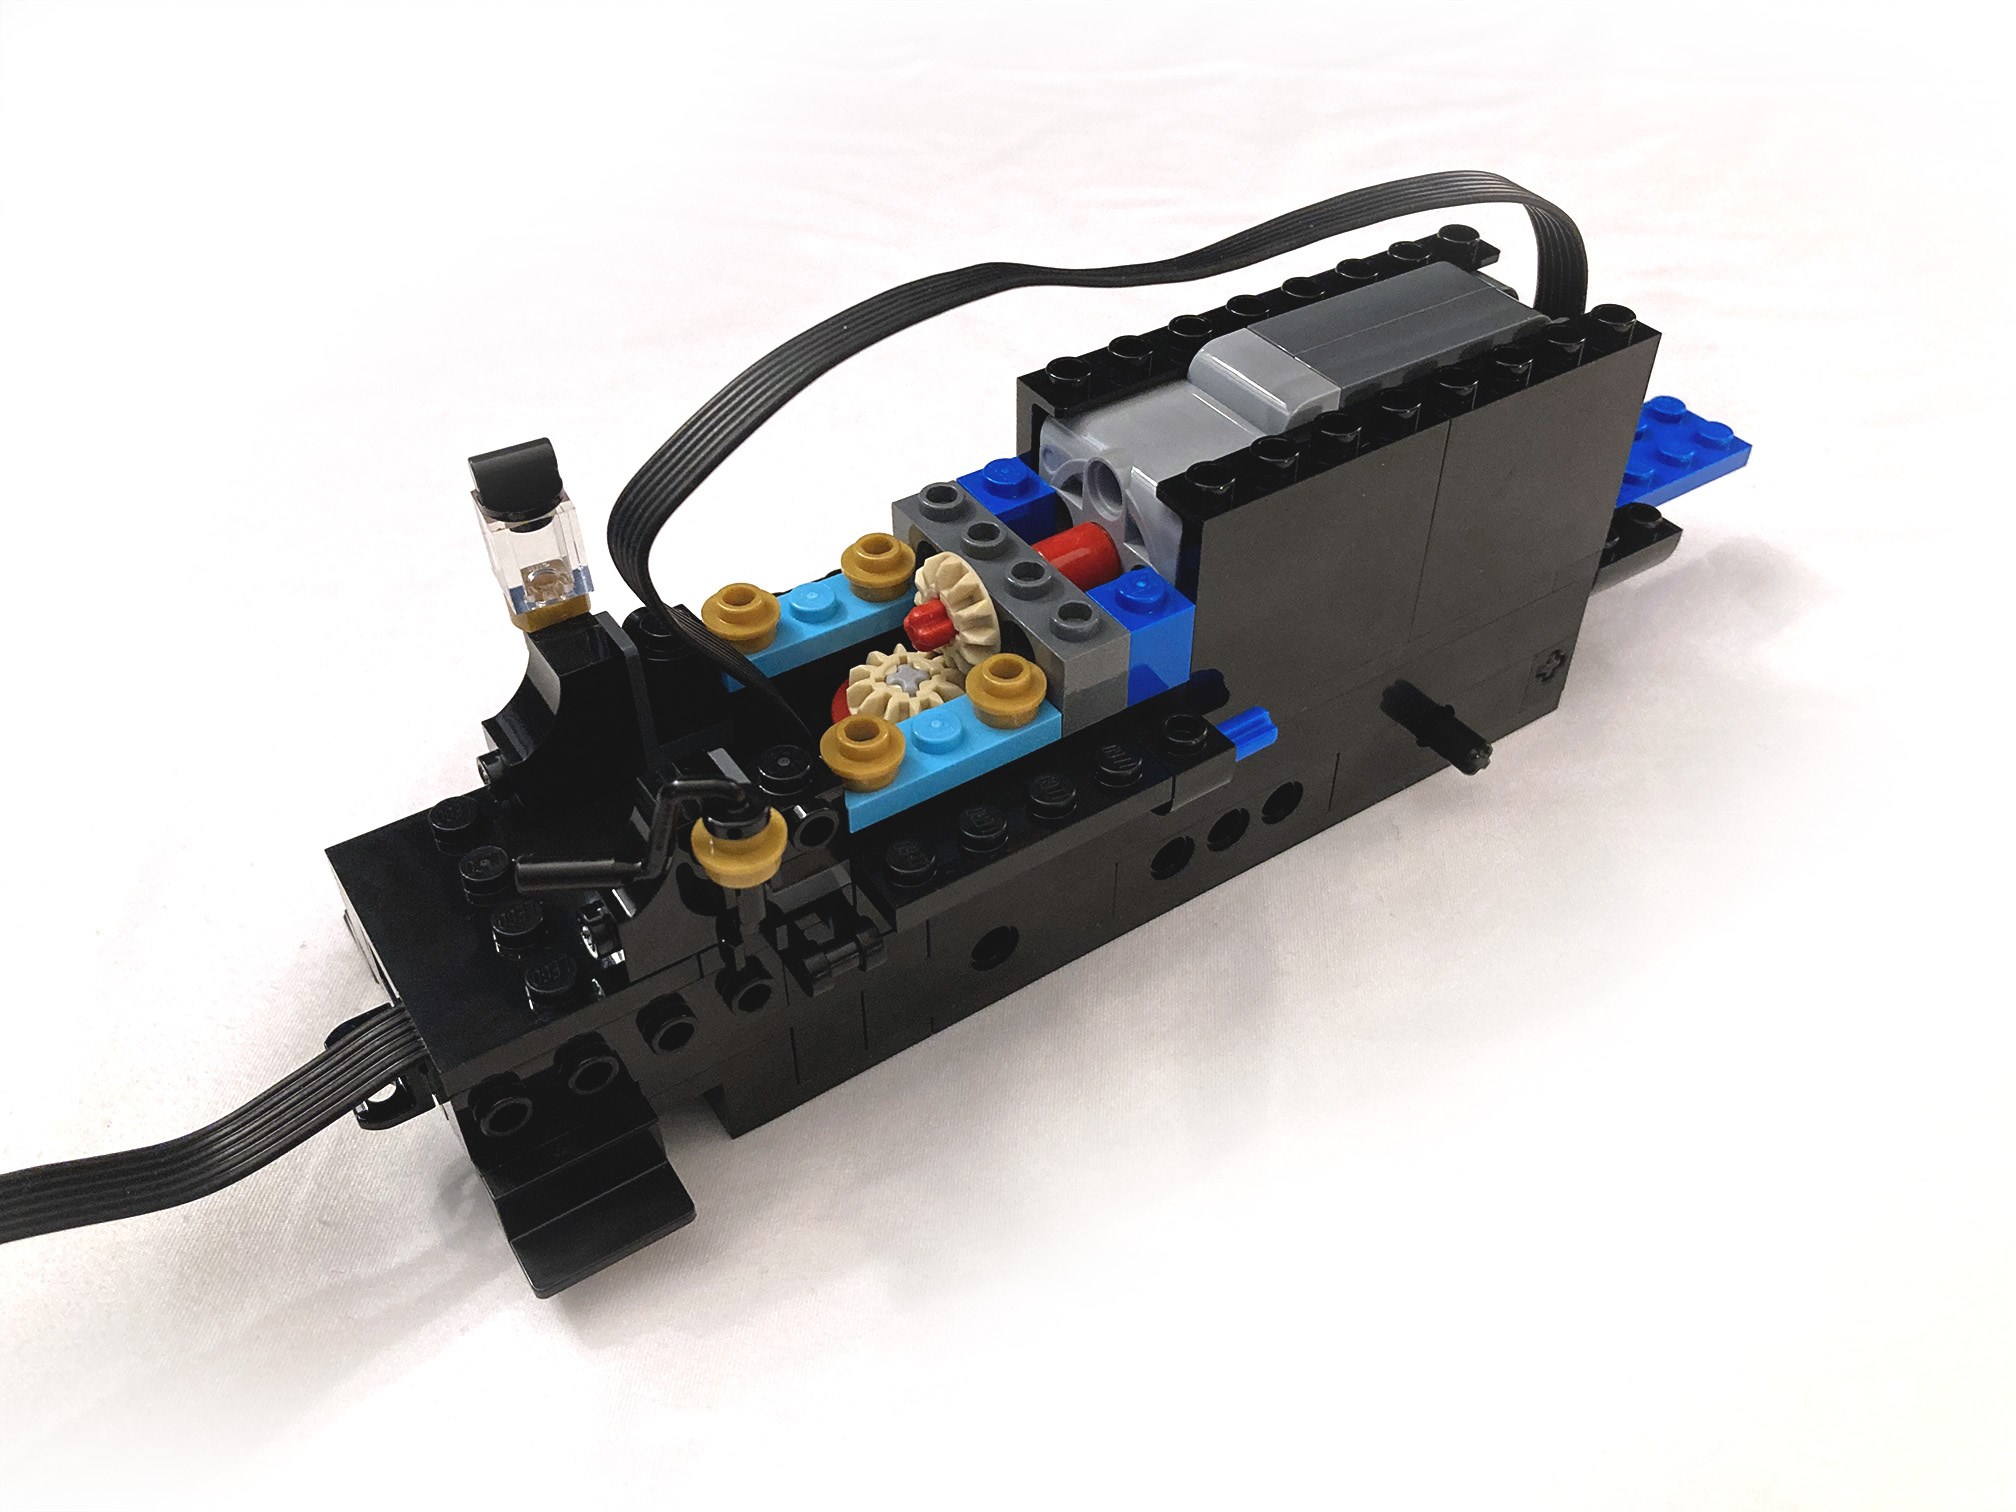
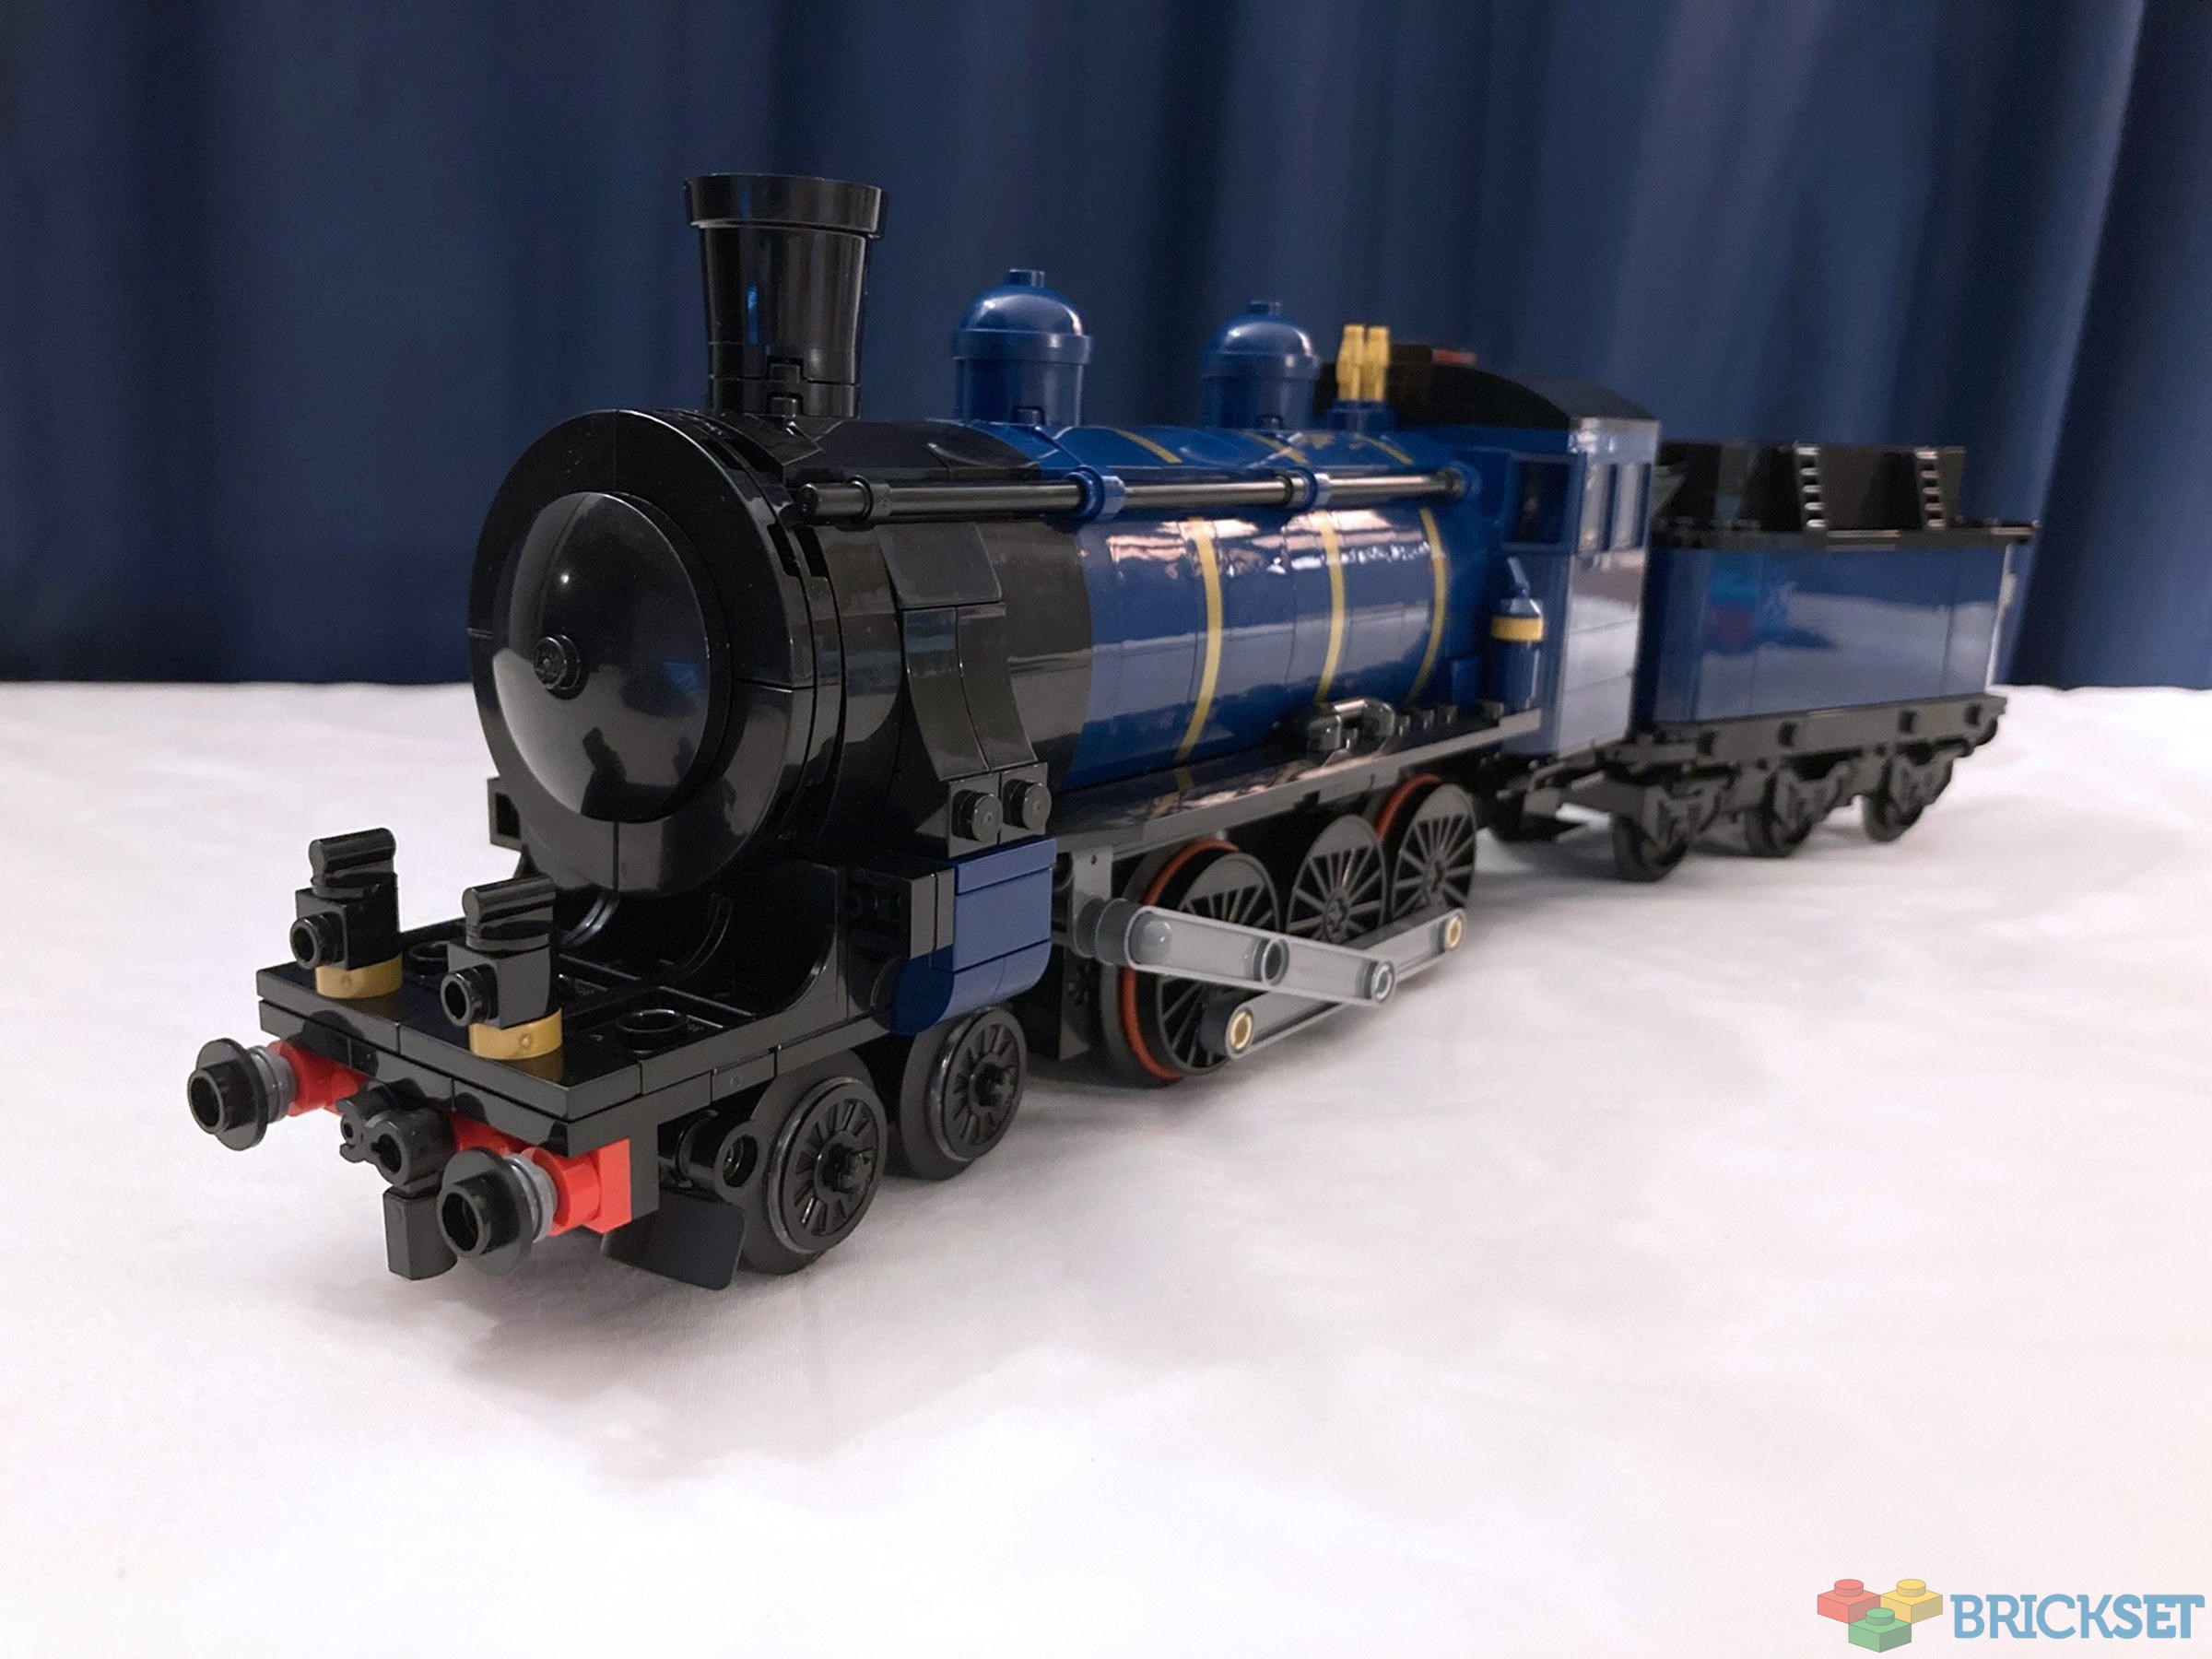
21344 Orient Express is arguably the best train since the revered 10194 Emerald Night. However, many have expressed disappointment that LEGO has not provided instructions to motorise it.
Brickset member Alex D, aka Train_of_Thought_Creations, has therefore come up with a solution that squeezes a Technic motor in the loco and a Powered Up hub in the tender.
Here are his step-by-step instructions showing how to do so and what pieces you'll need:
All aboard! This is your conductor speaking. Today I’ll be guiding you on the journey to getting your Sapphire Star locomotive up and running!
Before our departure, please be informed that all passengers should read this entire guide from beginning to end before attempting to motorise their locomotive. Some steps will be easier to follow correctly if you know what’s coming ahead down the track. That being said, we are now ready for departure...
Note: The article has been updated following problems reported concerning clicking gears.
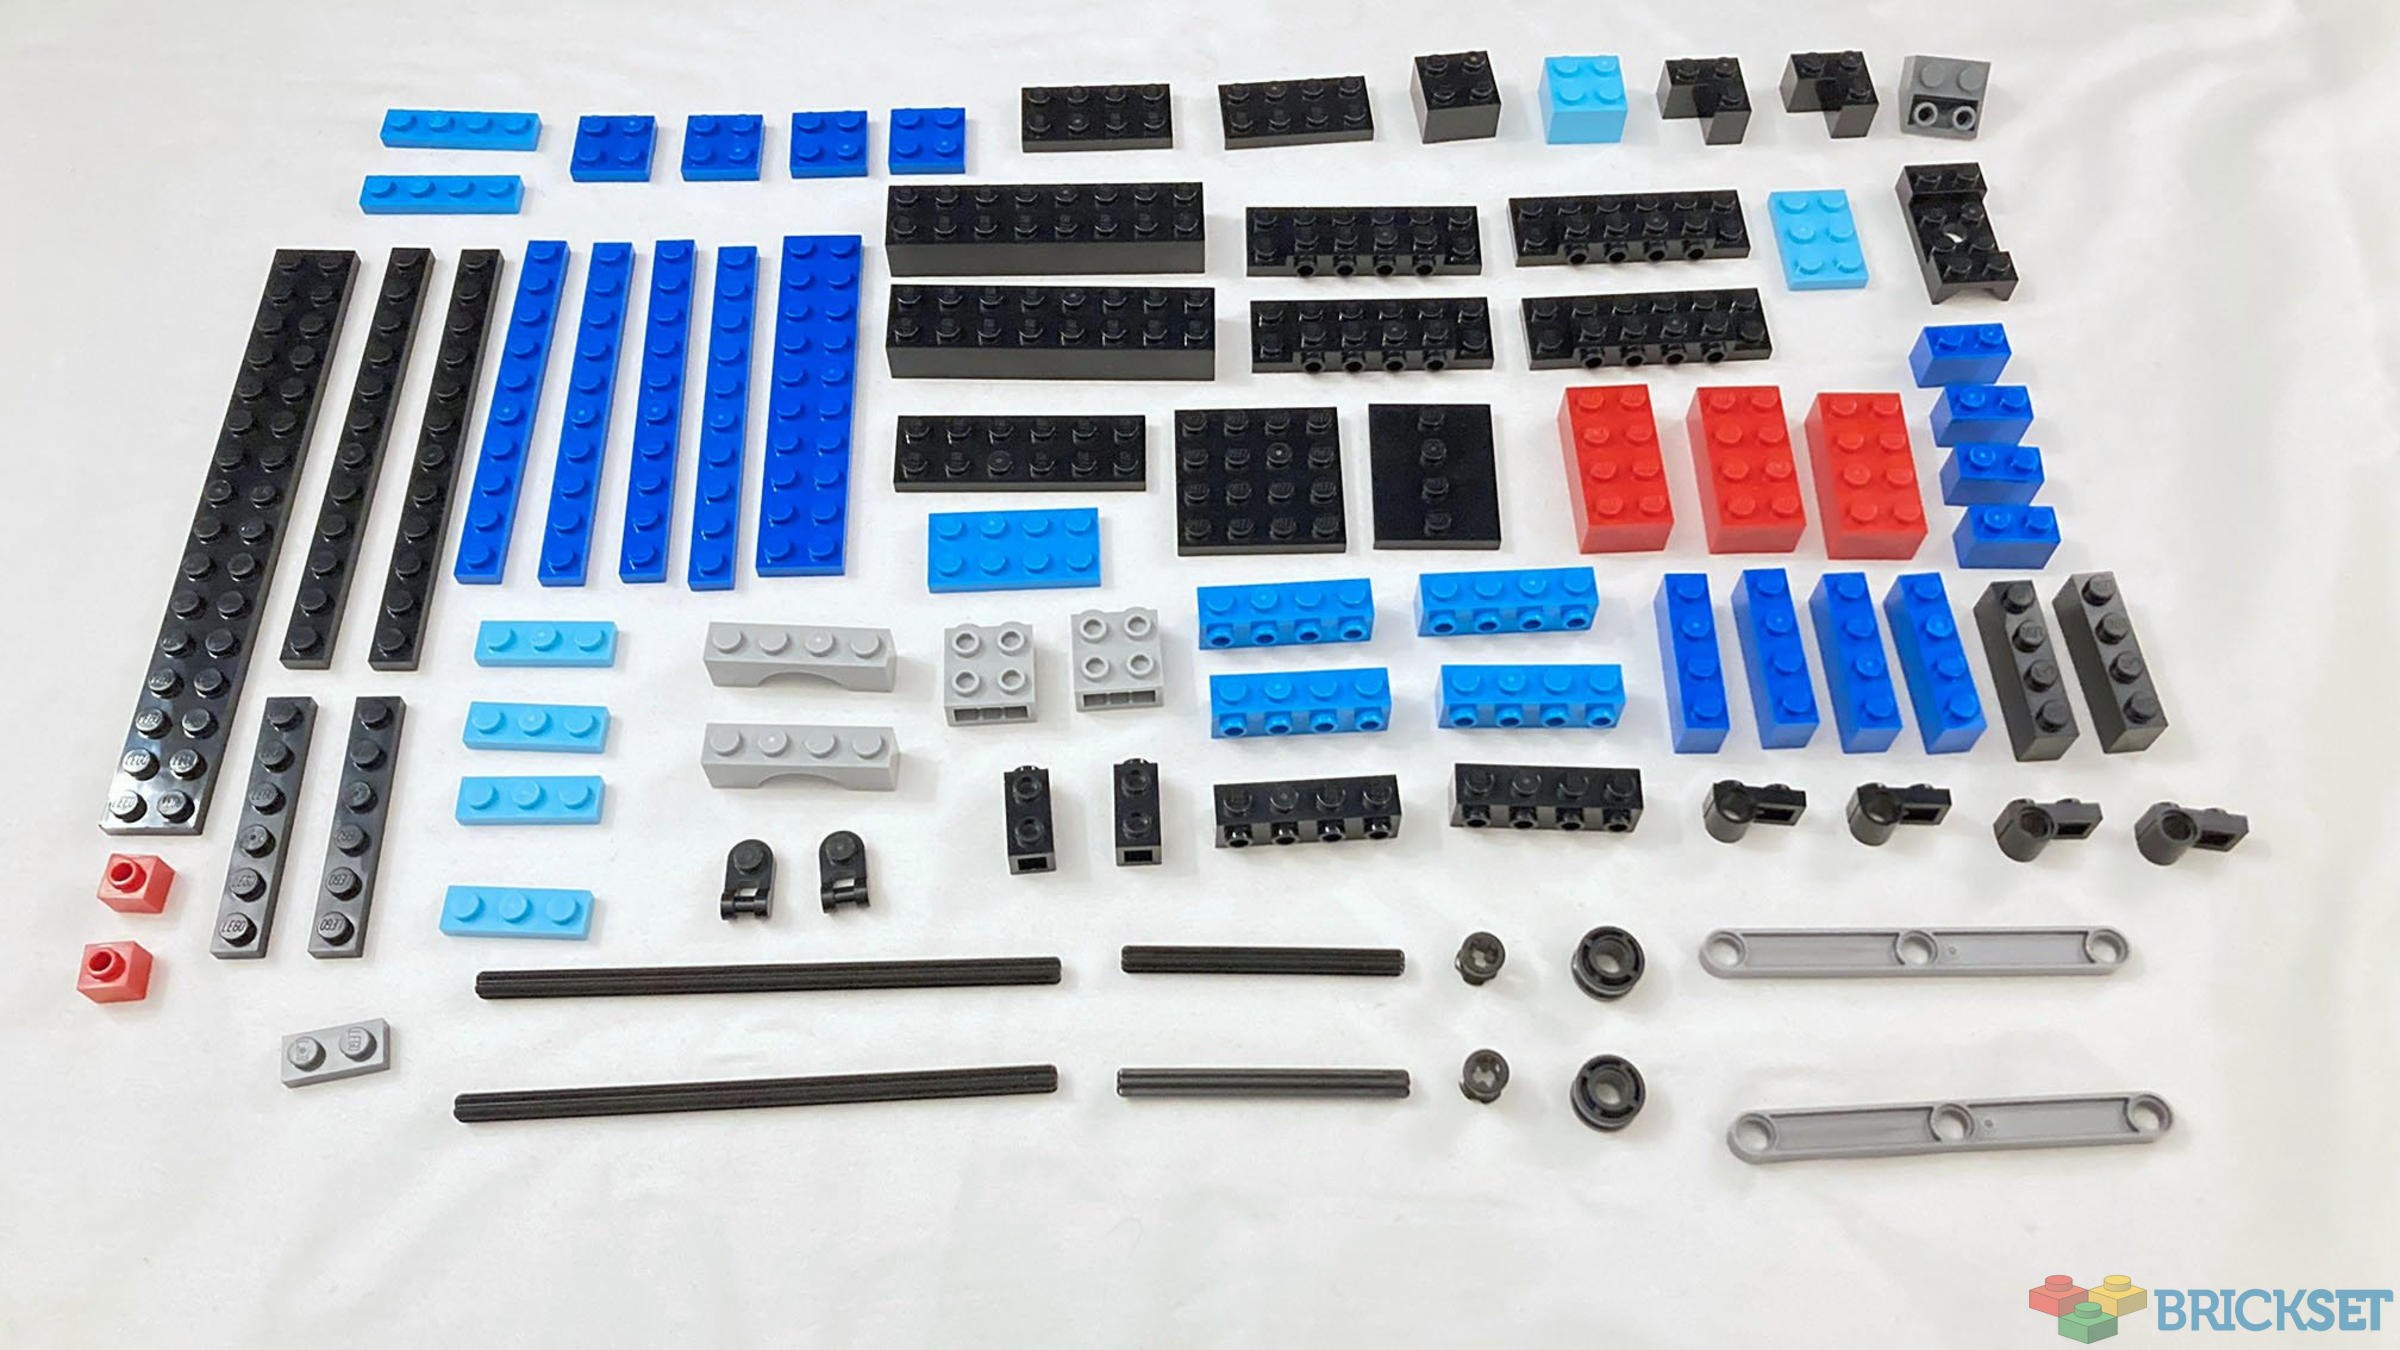
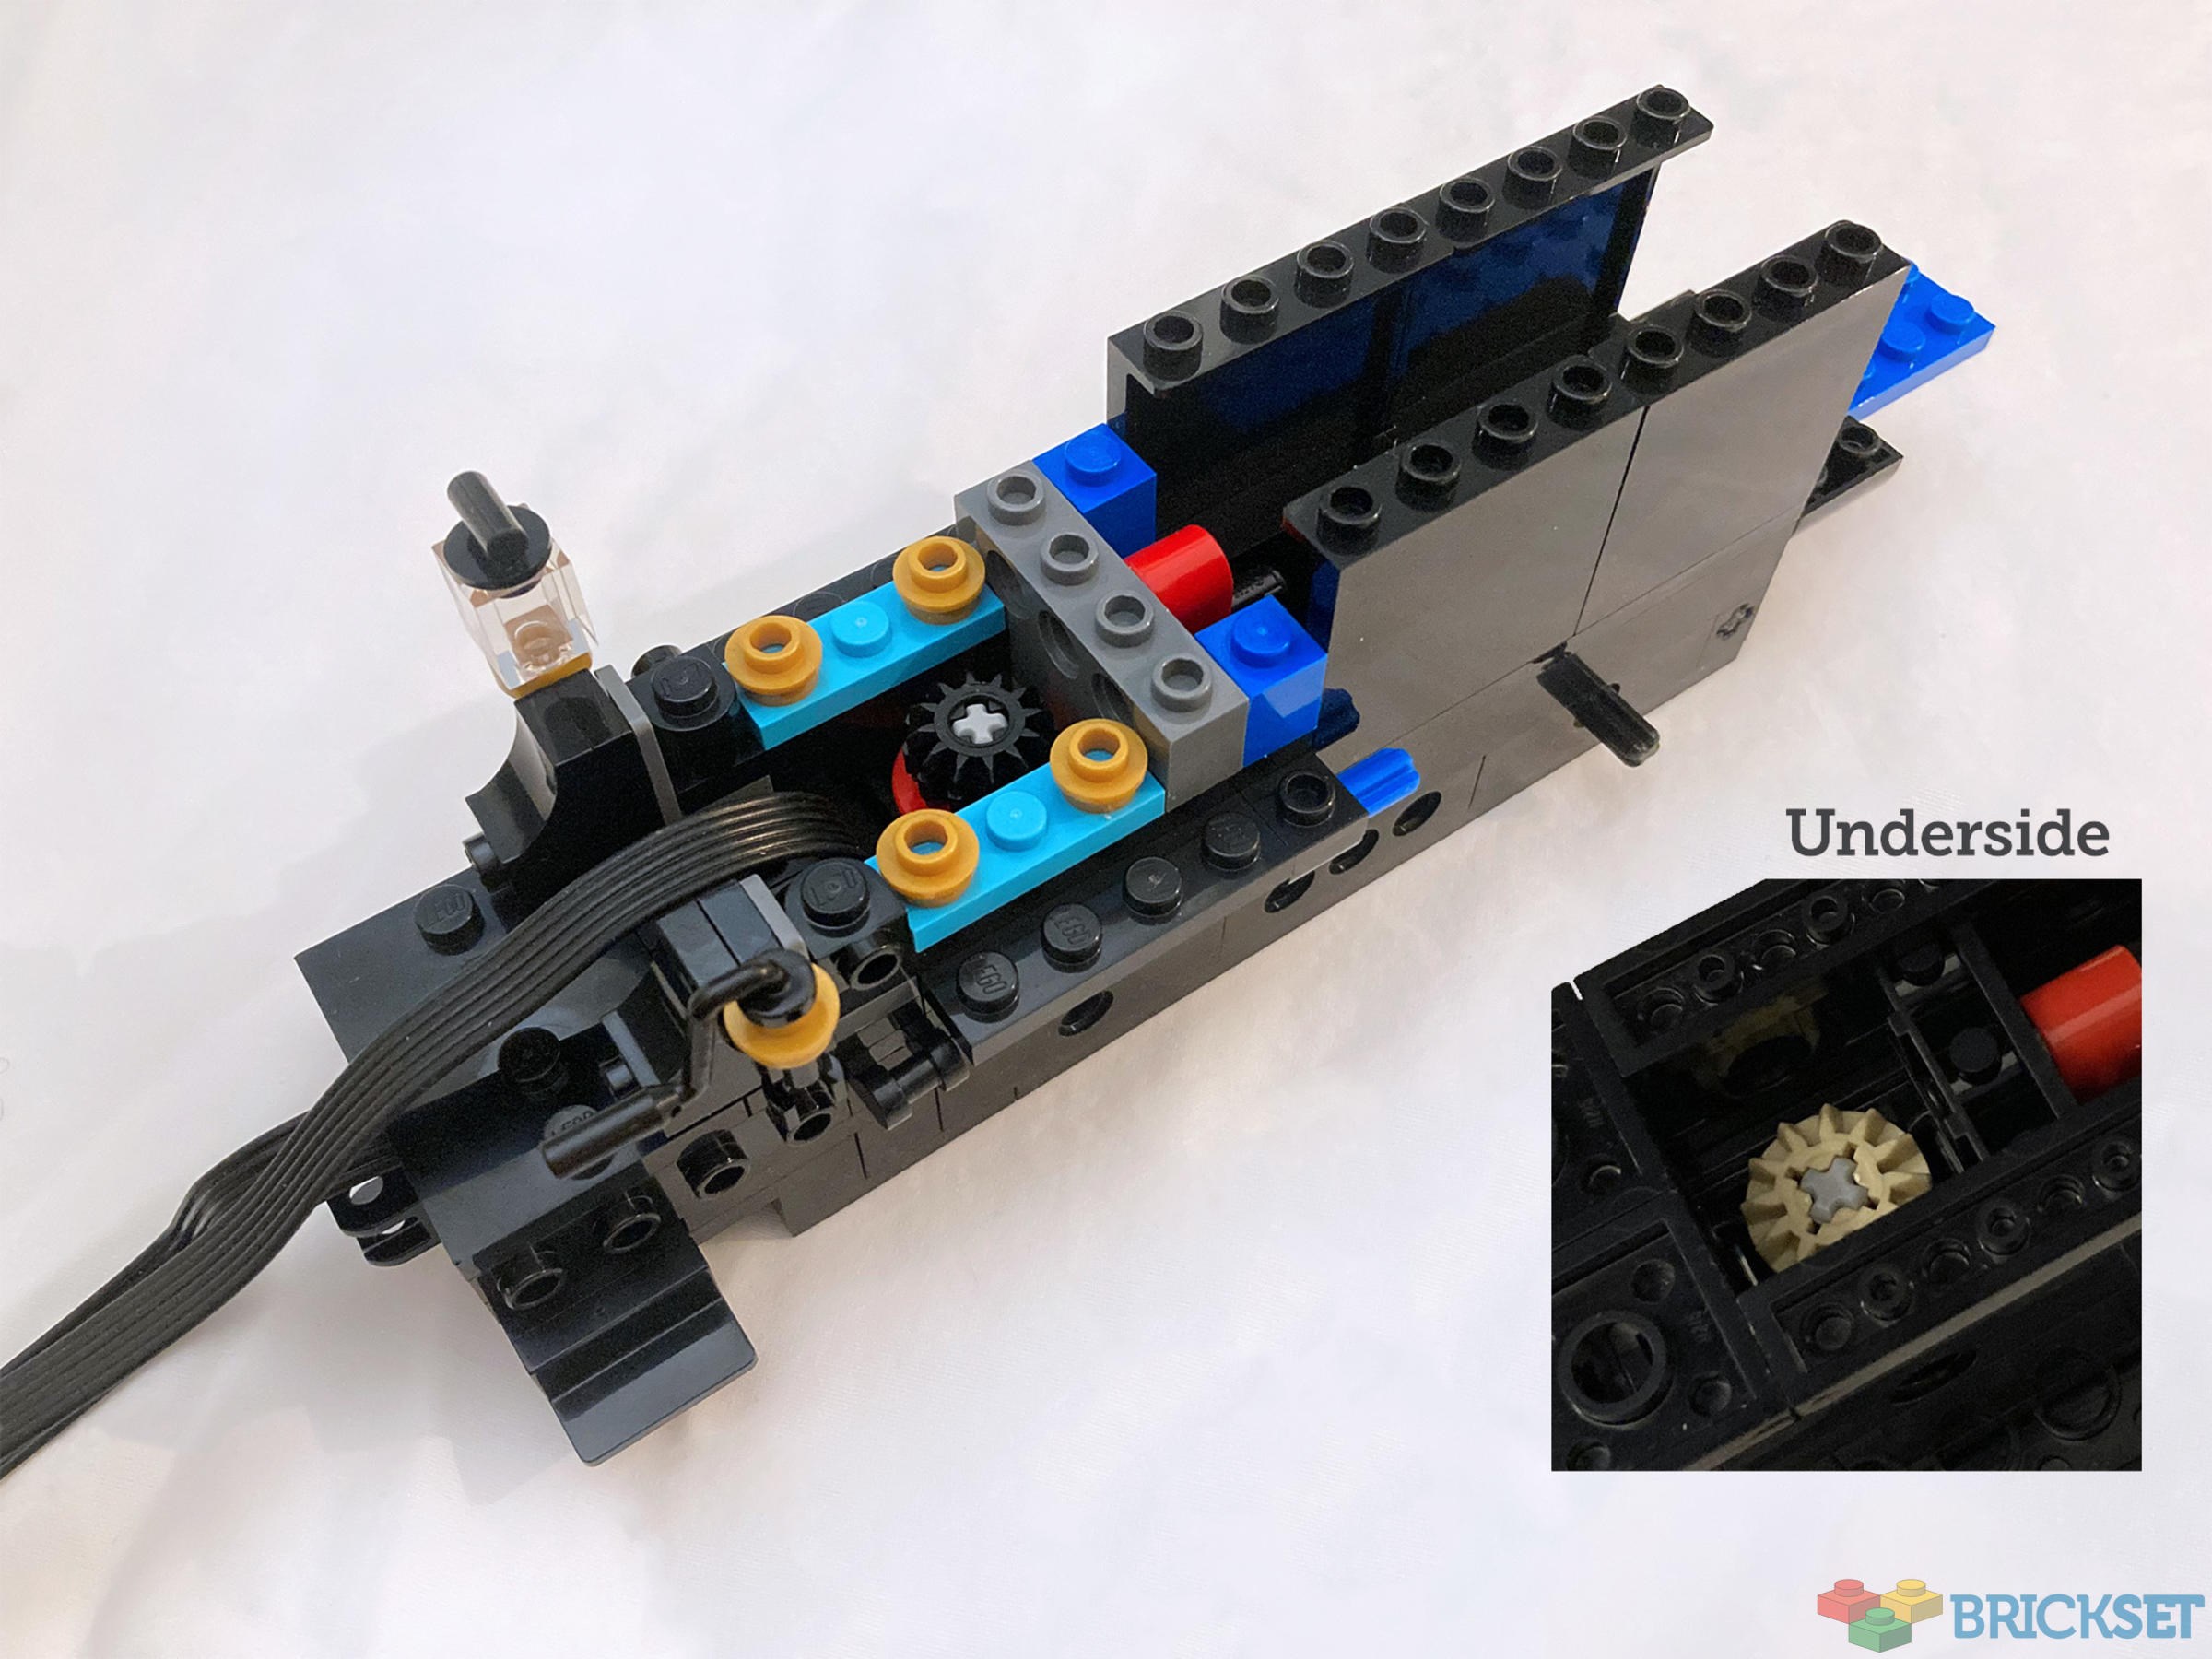
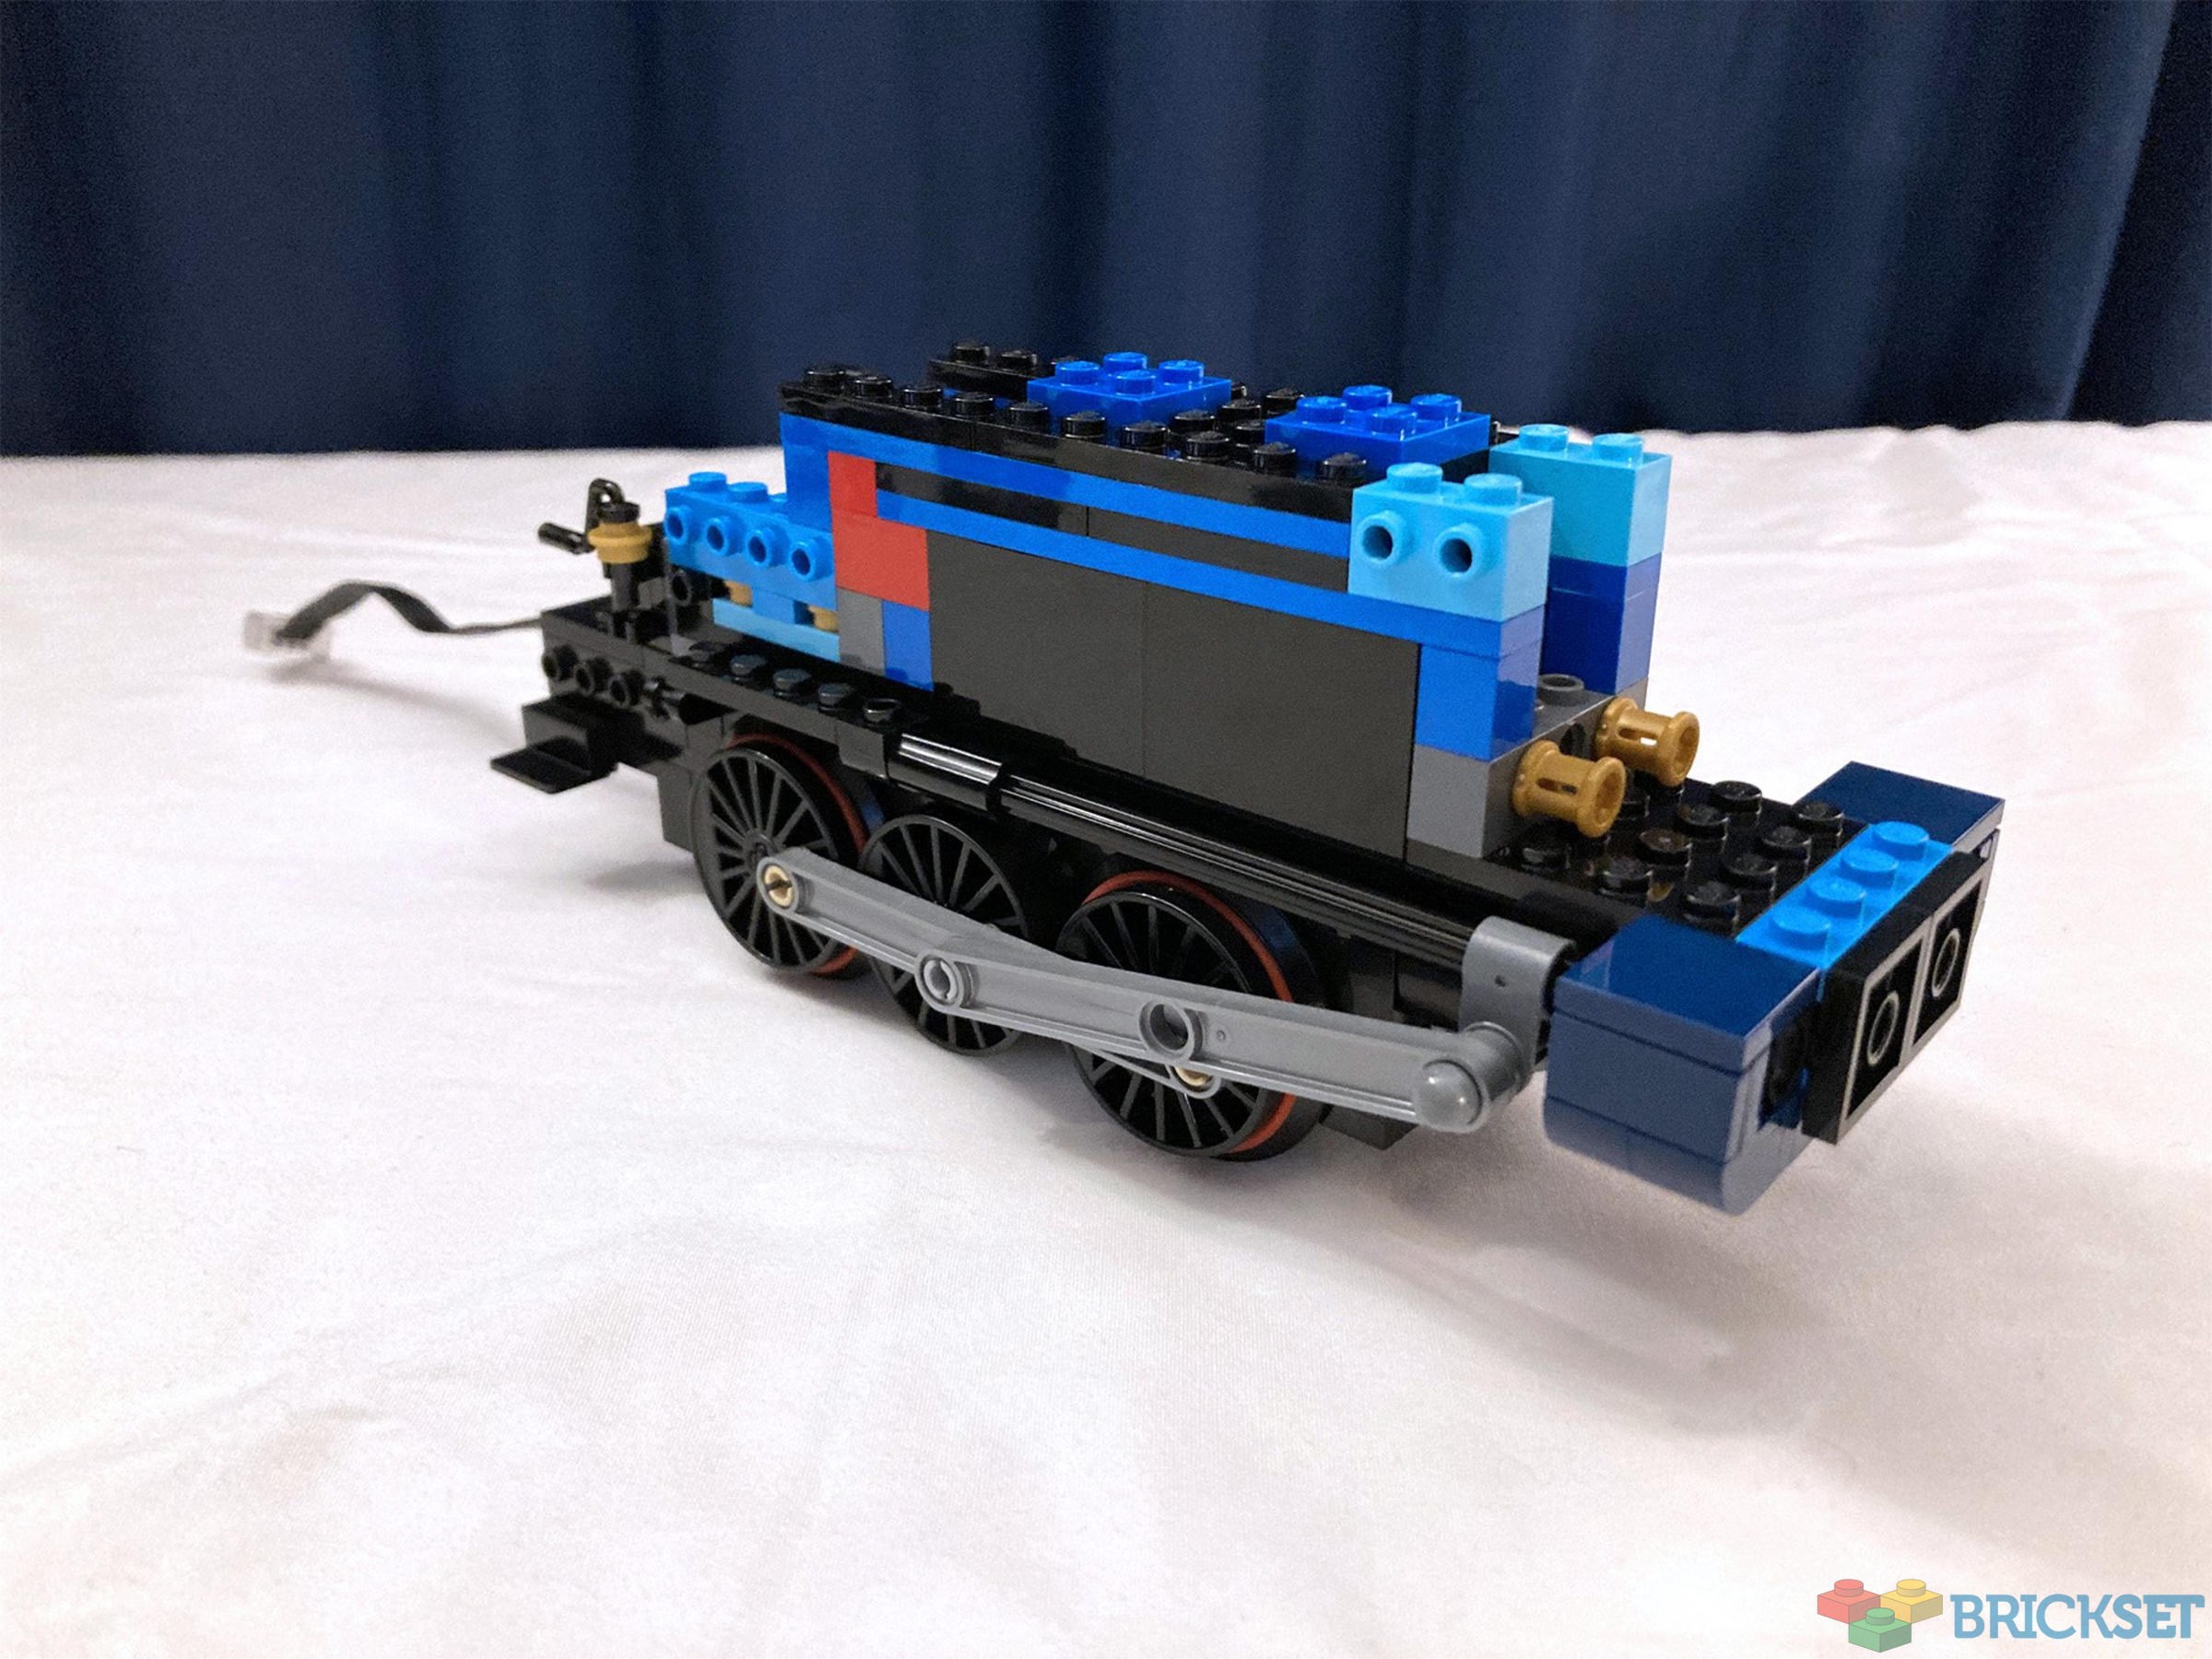
To begin motorising your Sapphire Star locomotive, disassemble it such that it matches the first photograph. Don’t get hasty at this step though, wait until you see the next picture before you start taking things apart. Please note that a grey 1x2 plate was removed from the stack toward the rear of the locomotive, but not from the stack toward the front.
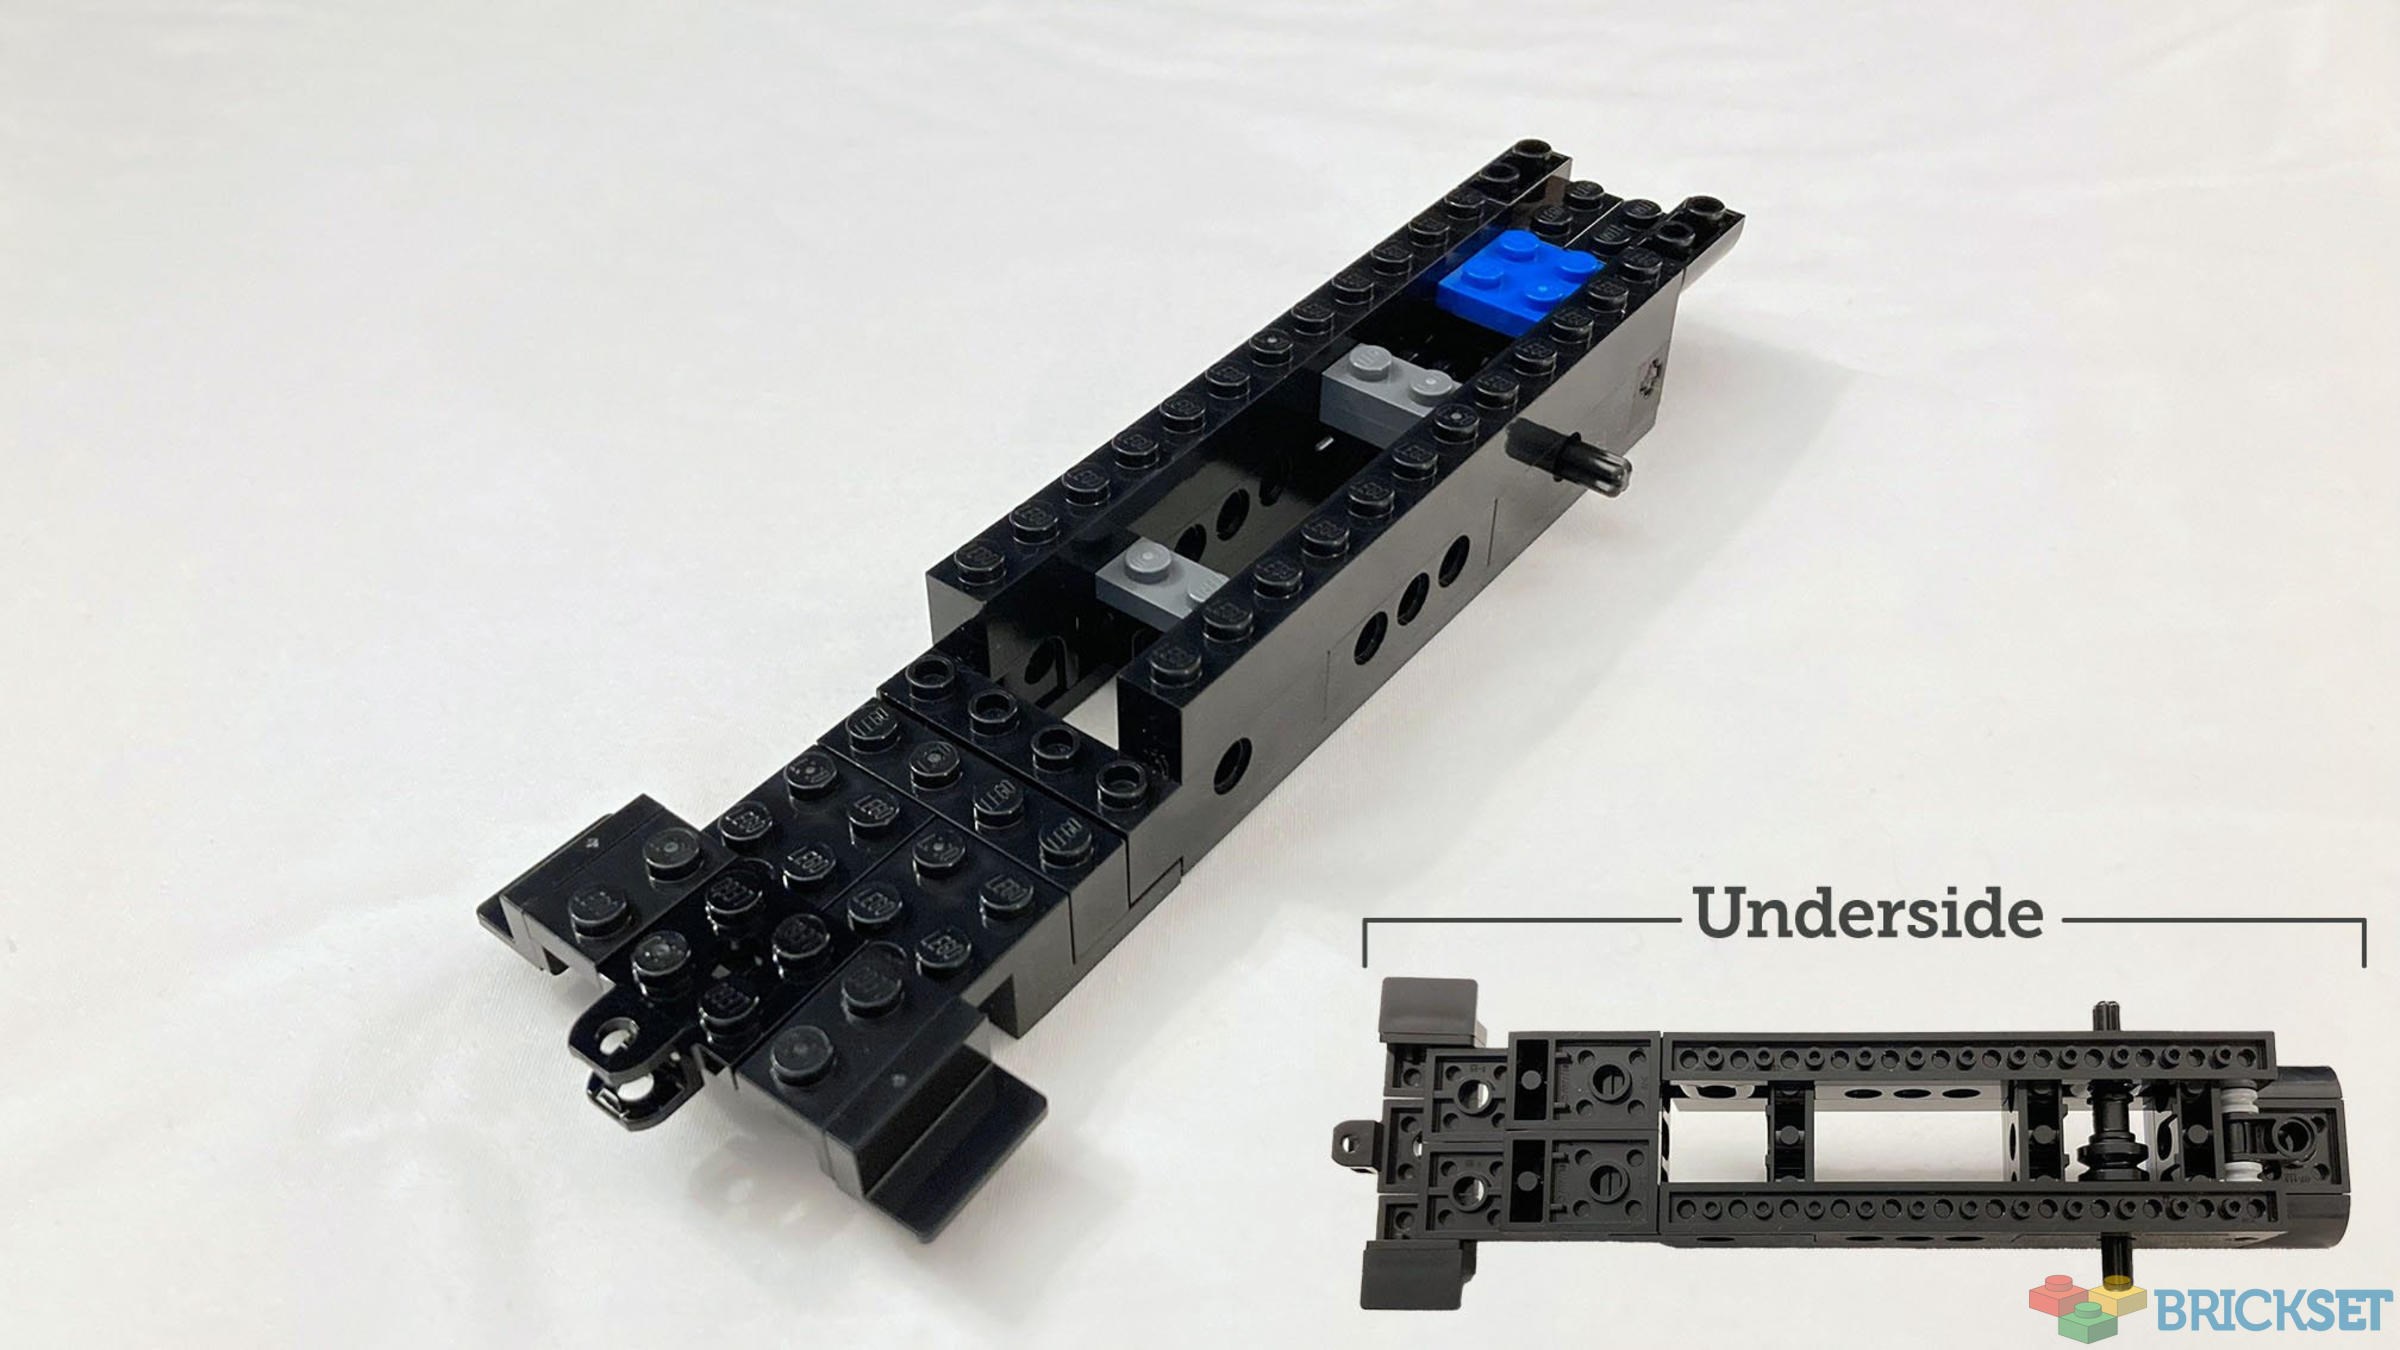
When disassembling, make sure to preserve all of the assemblies shown below. You’ll put these back on the model throughout the build.
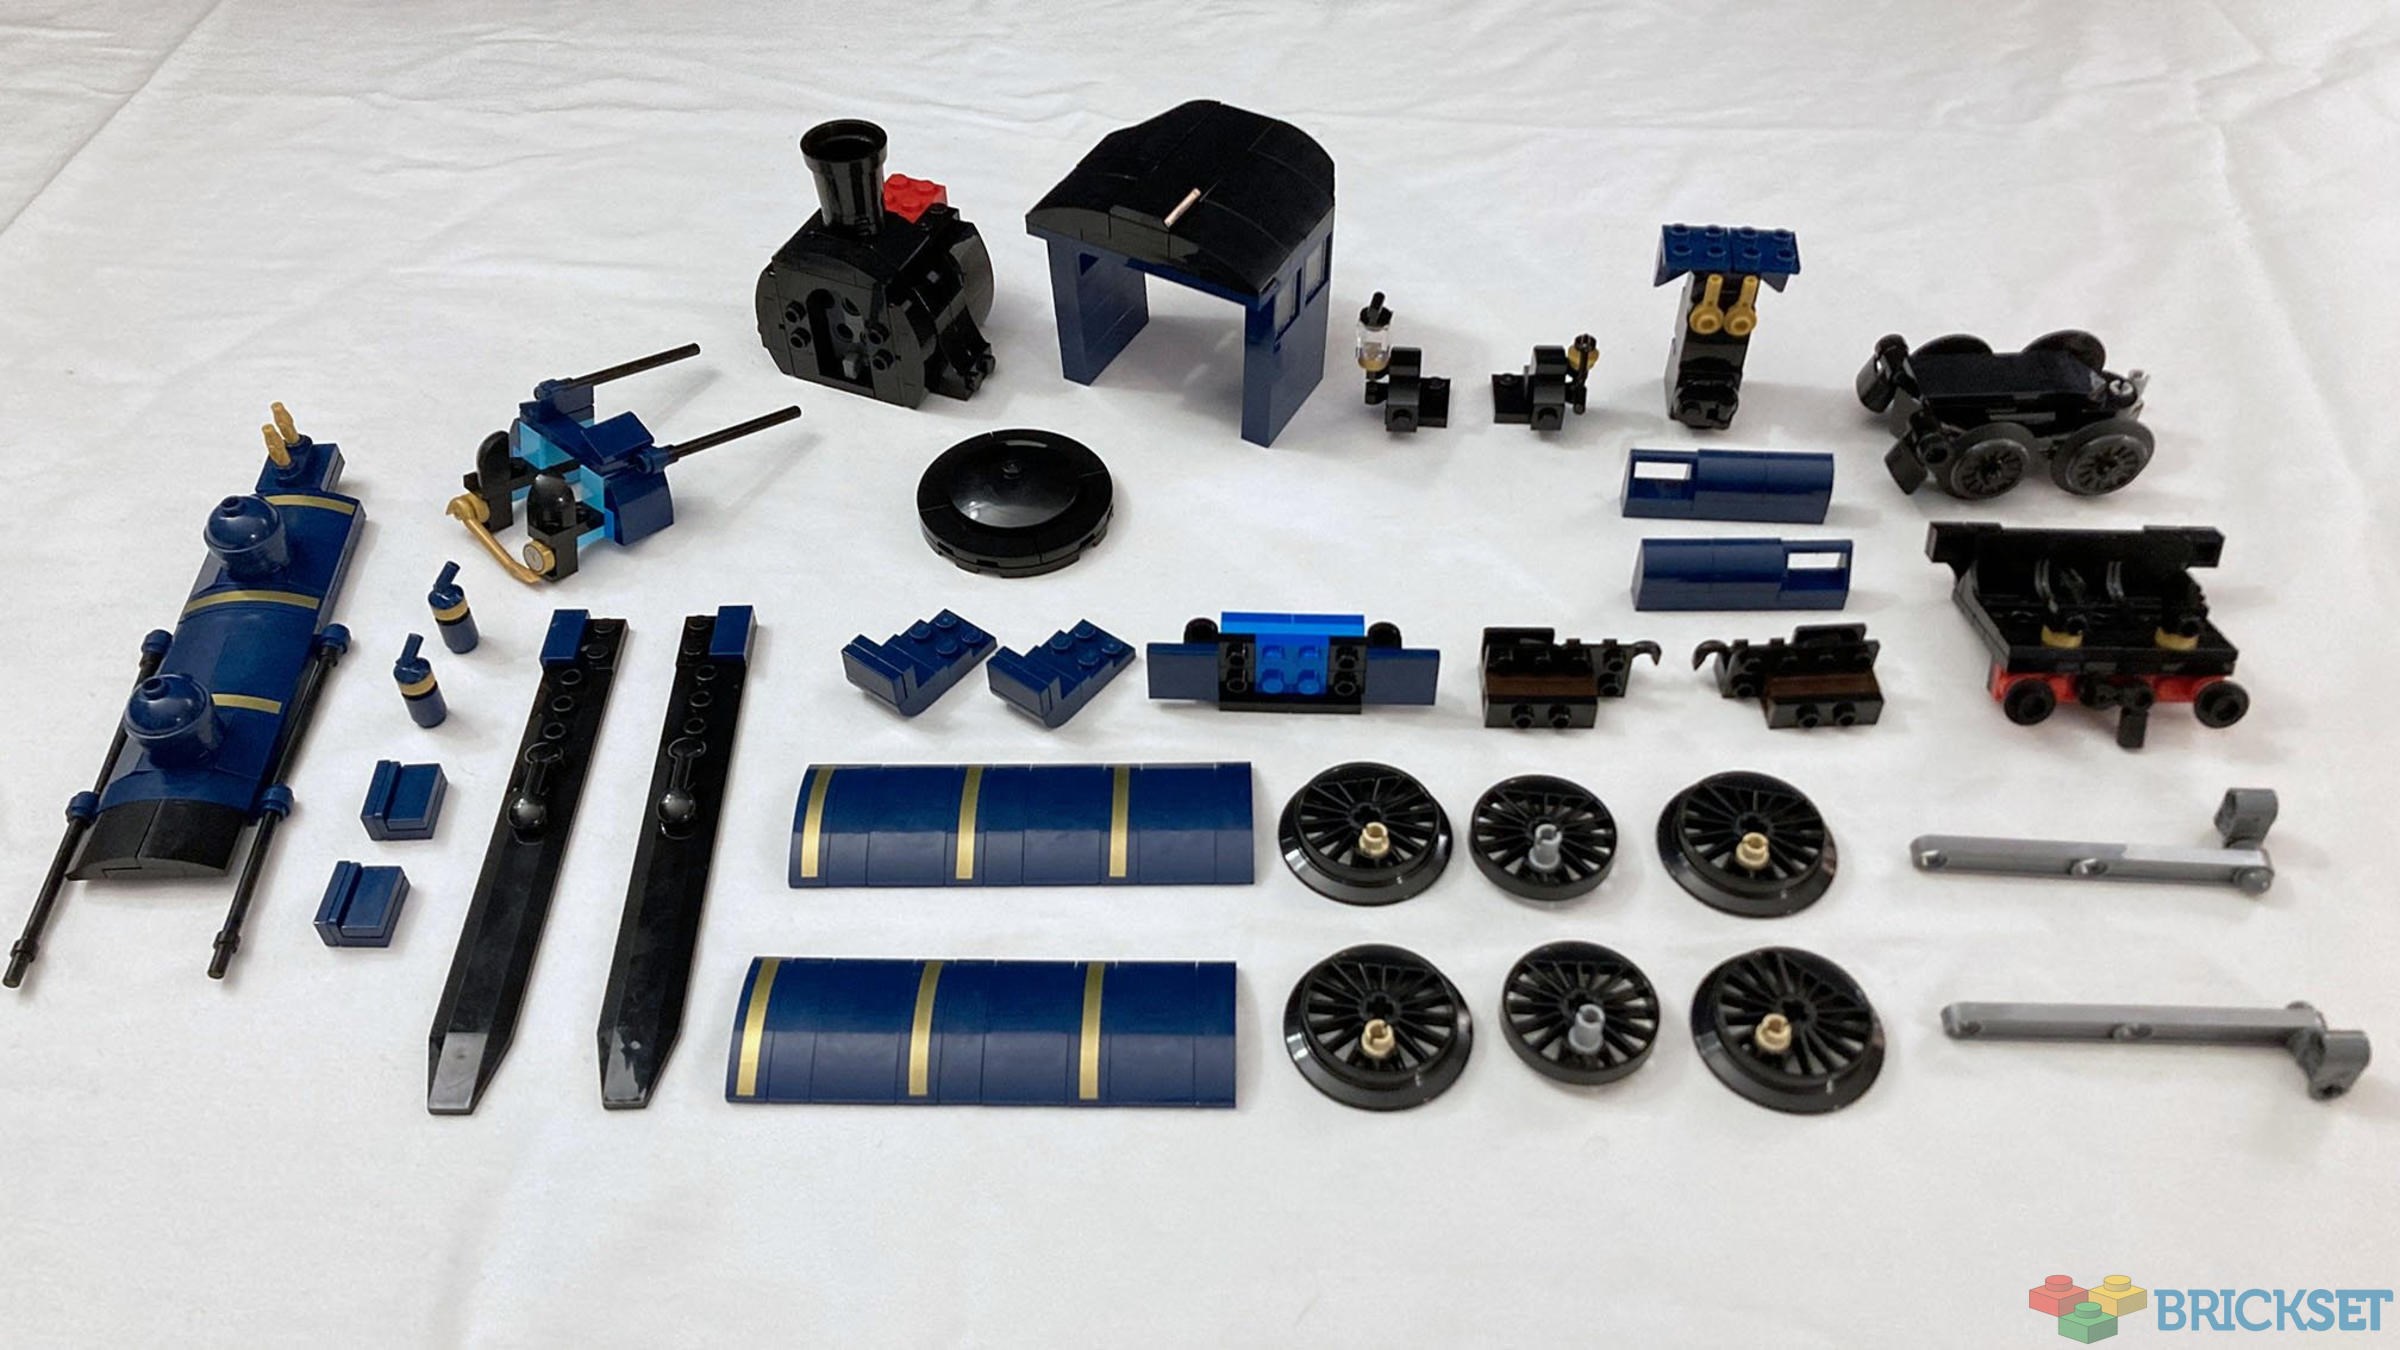
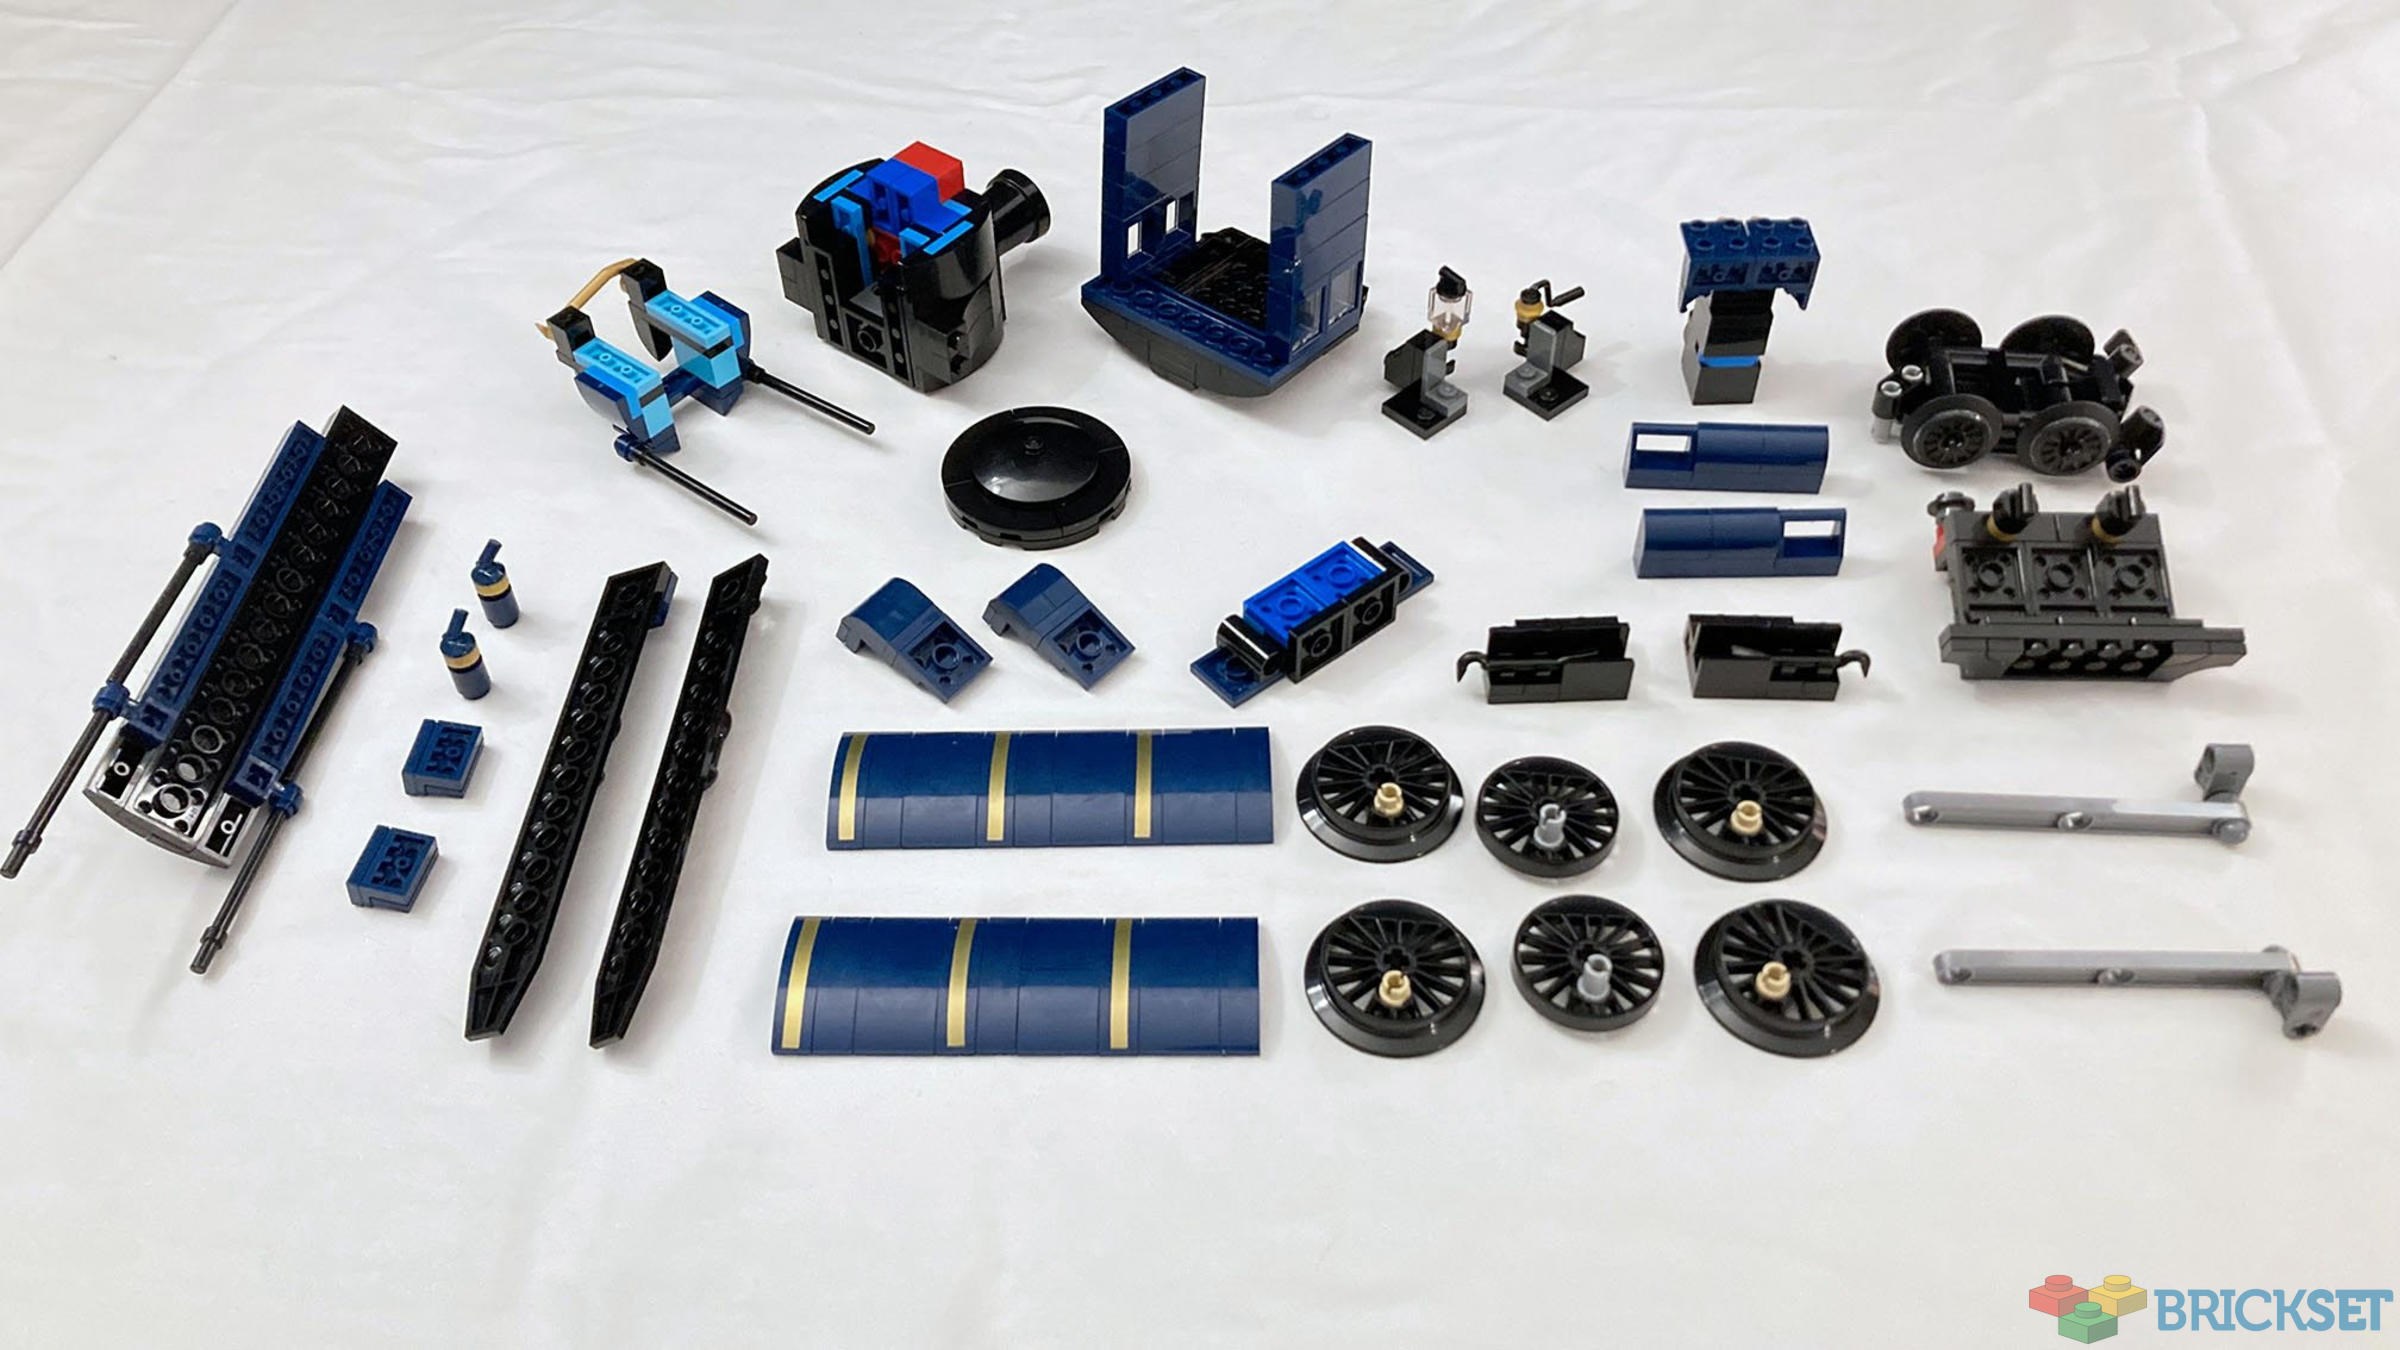
If disassembled correctly, you should have this selection of loose parts left over. Set them aside, as you’ll still need some of them for the build.
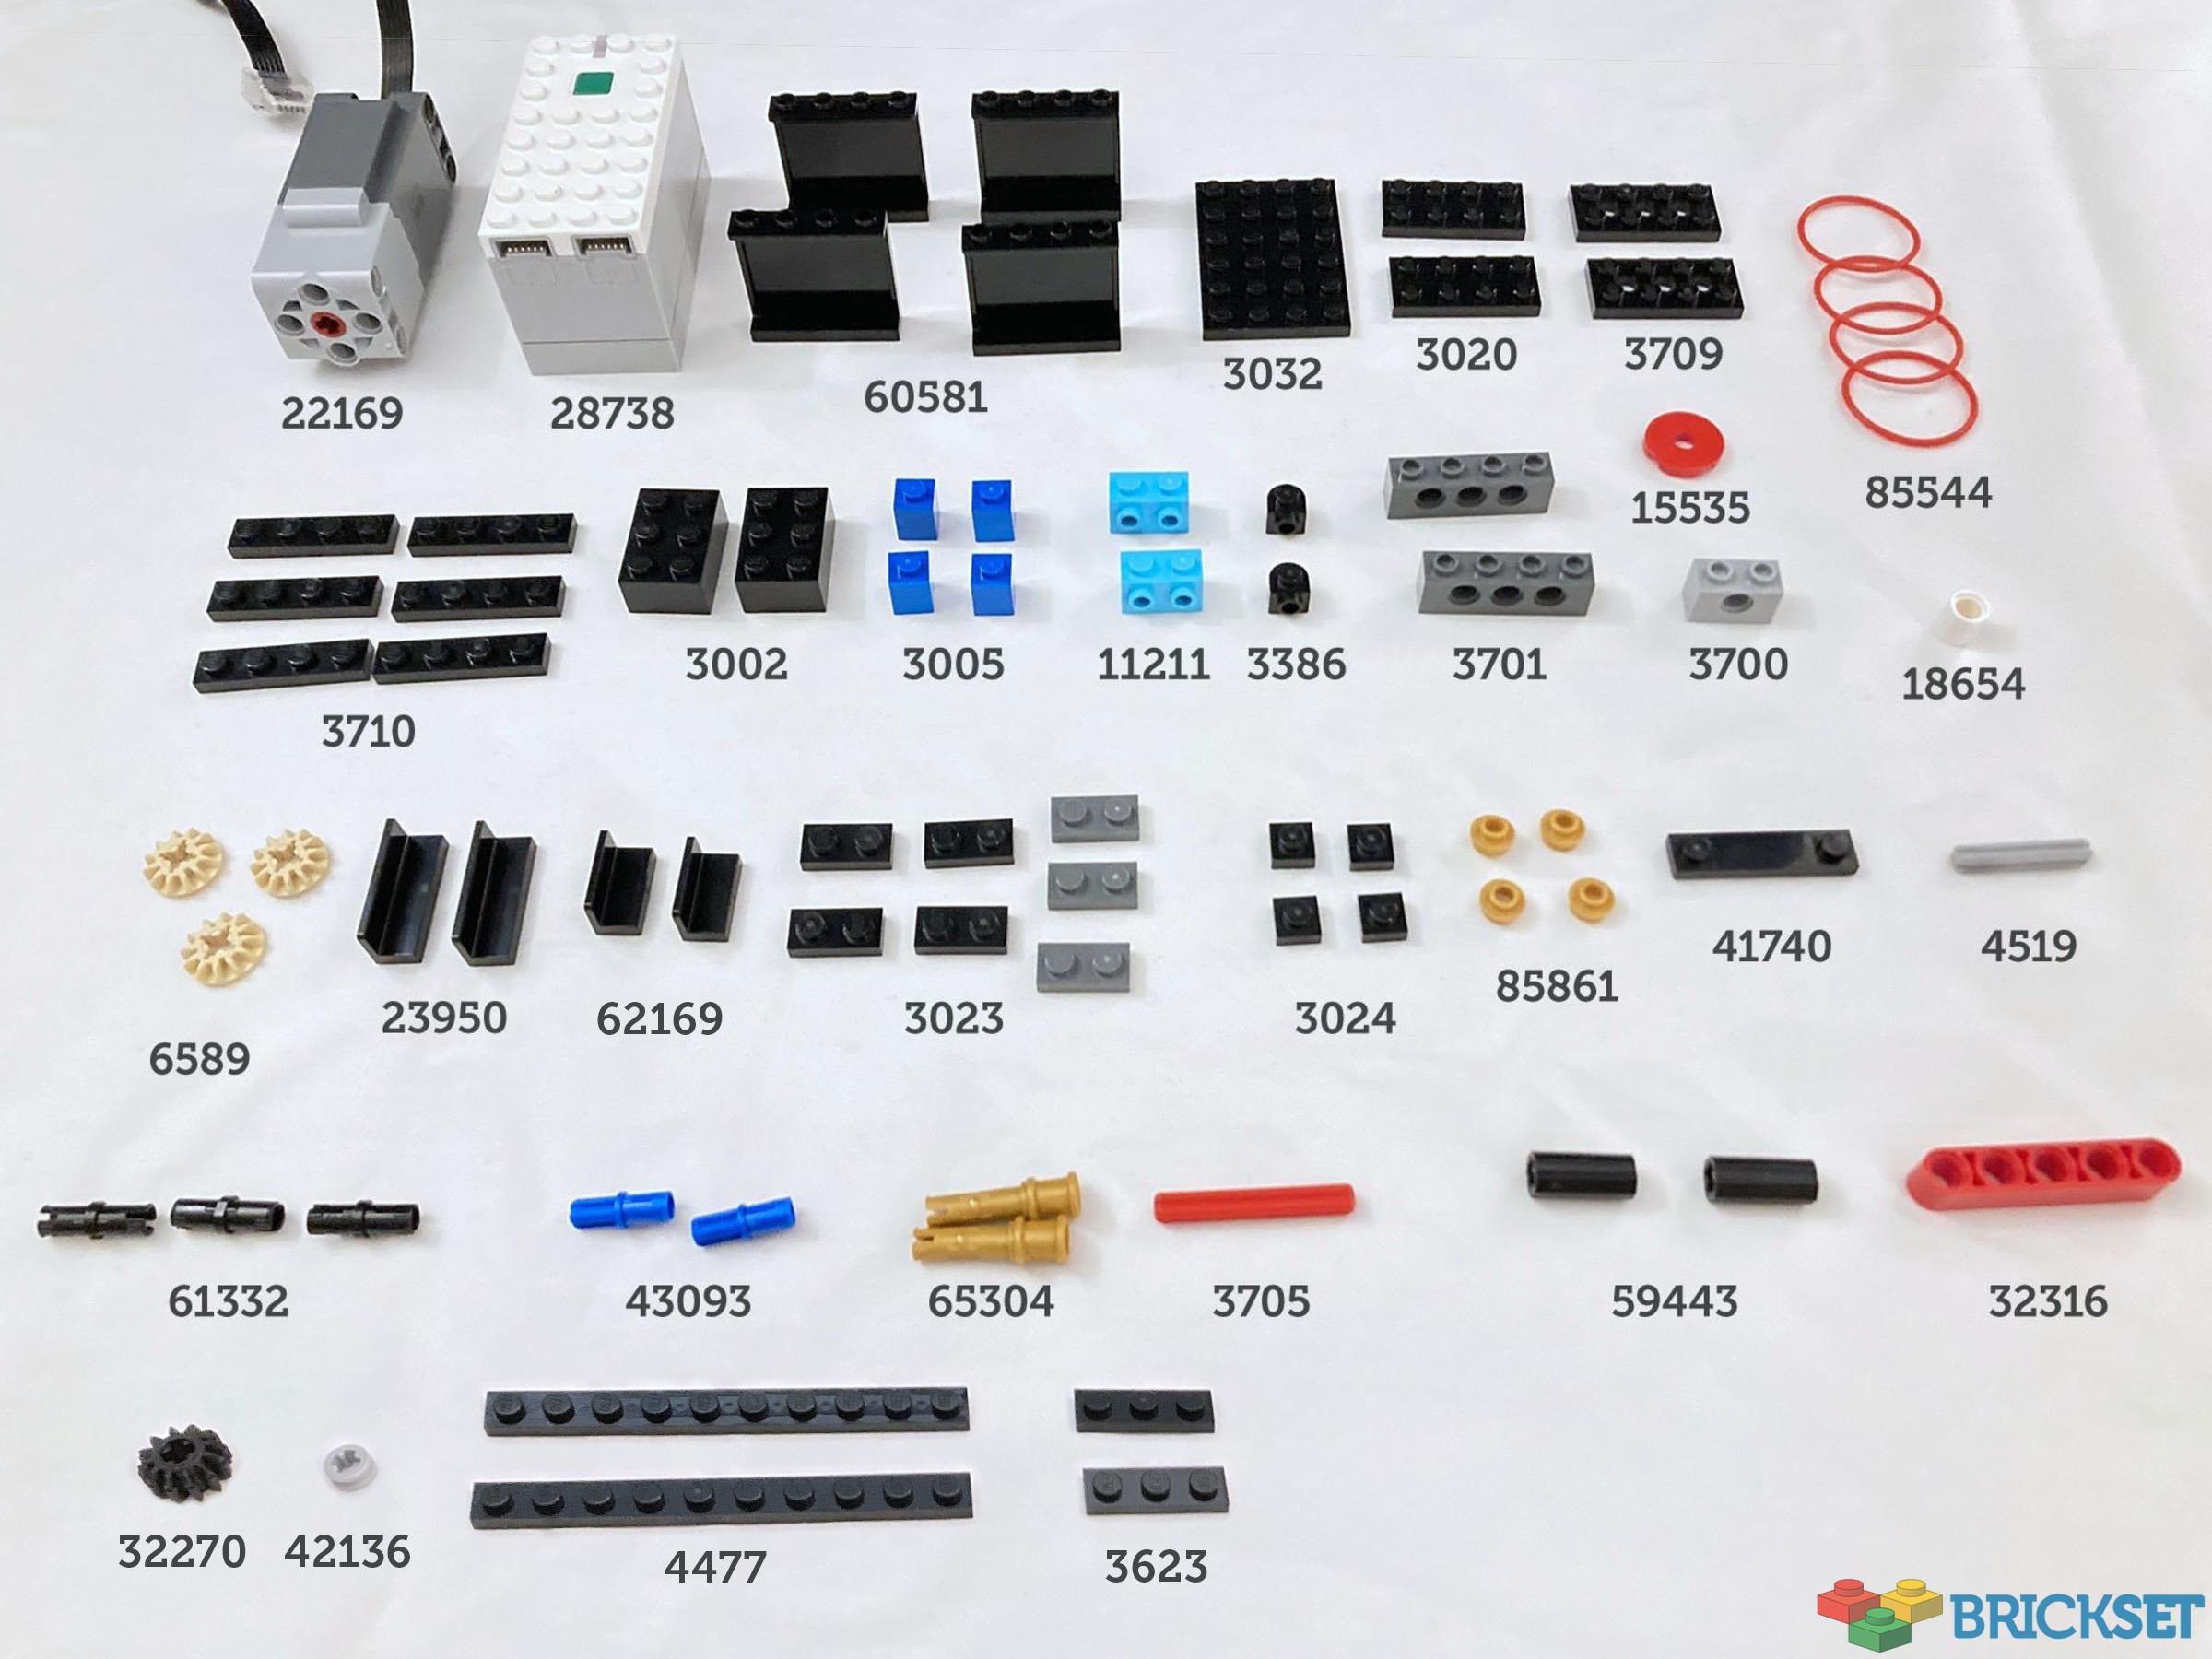
What would a motorisation tutorial be without the motor? Here it is, along with the rest of the additional parts you will need. Here's a BrickLink wanted list XML file for use if you intend to get them from there.
Once you’ve acquired them, add them to the pile of parts that you set aside in the last step.
With your inventory all set up, it is time to start building! I’ll grey out any of the parts you’ve already placed in the last step, so you can easily see what still needs to be added. I’ll provide some notes along the way as well.
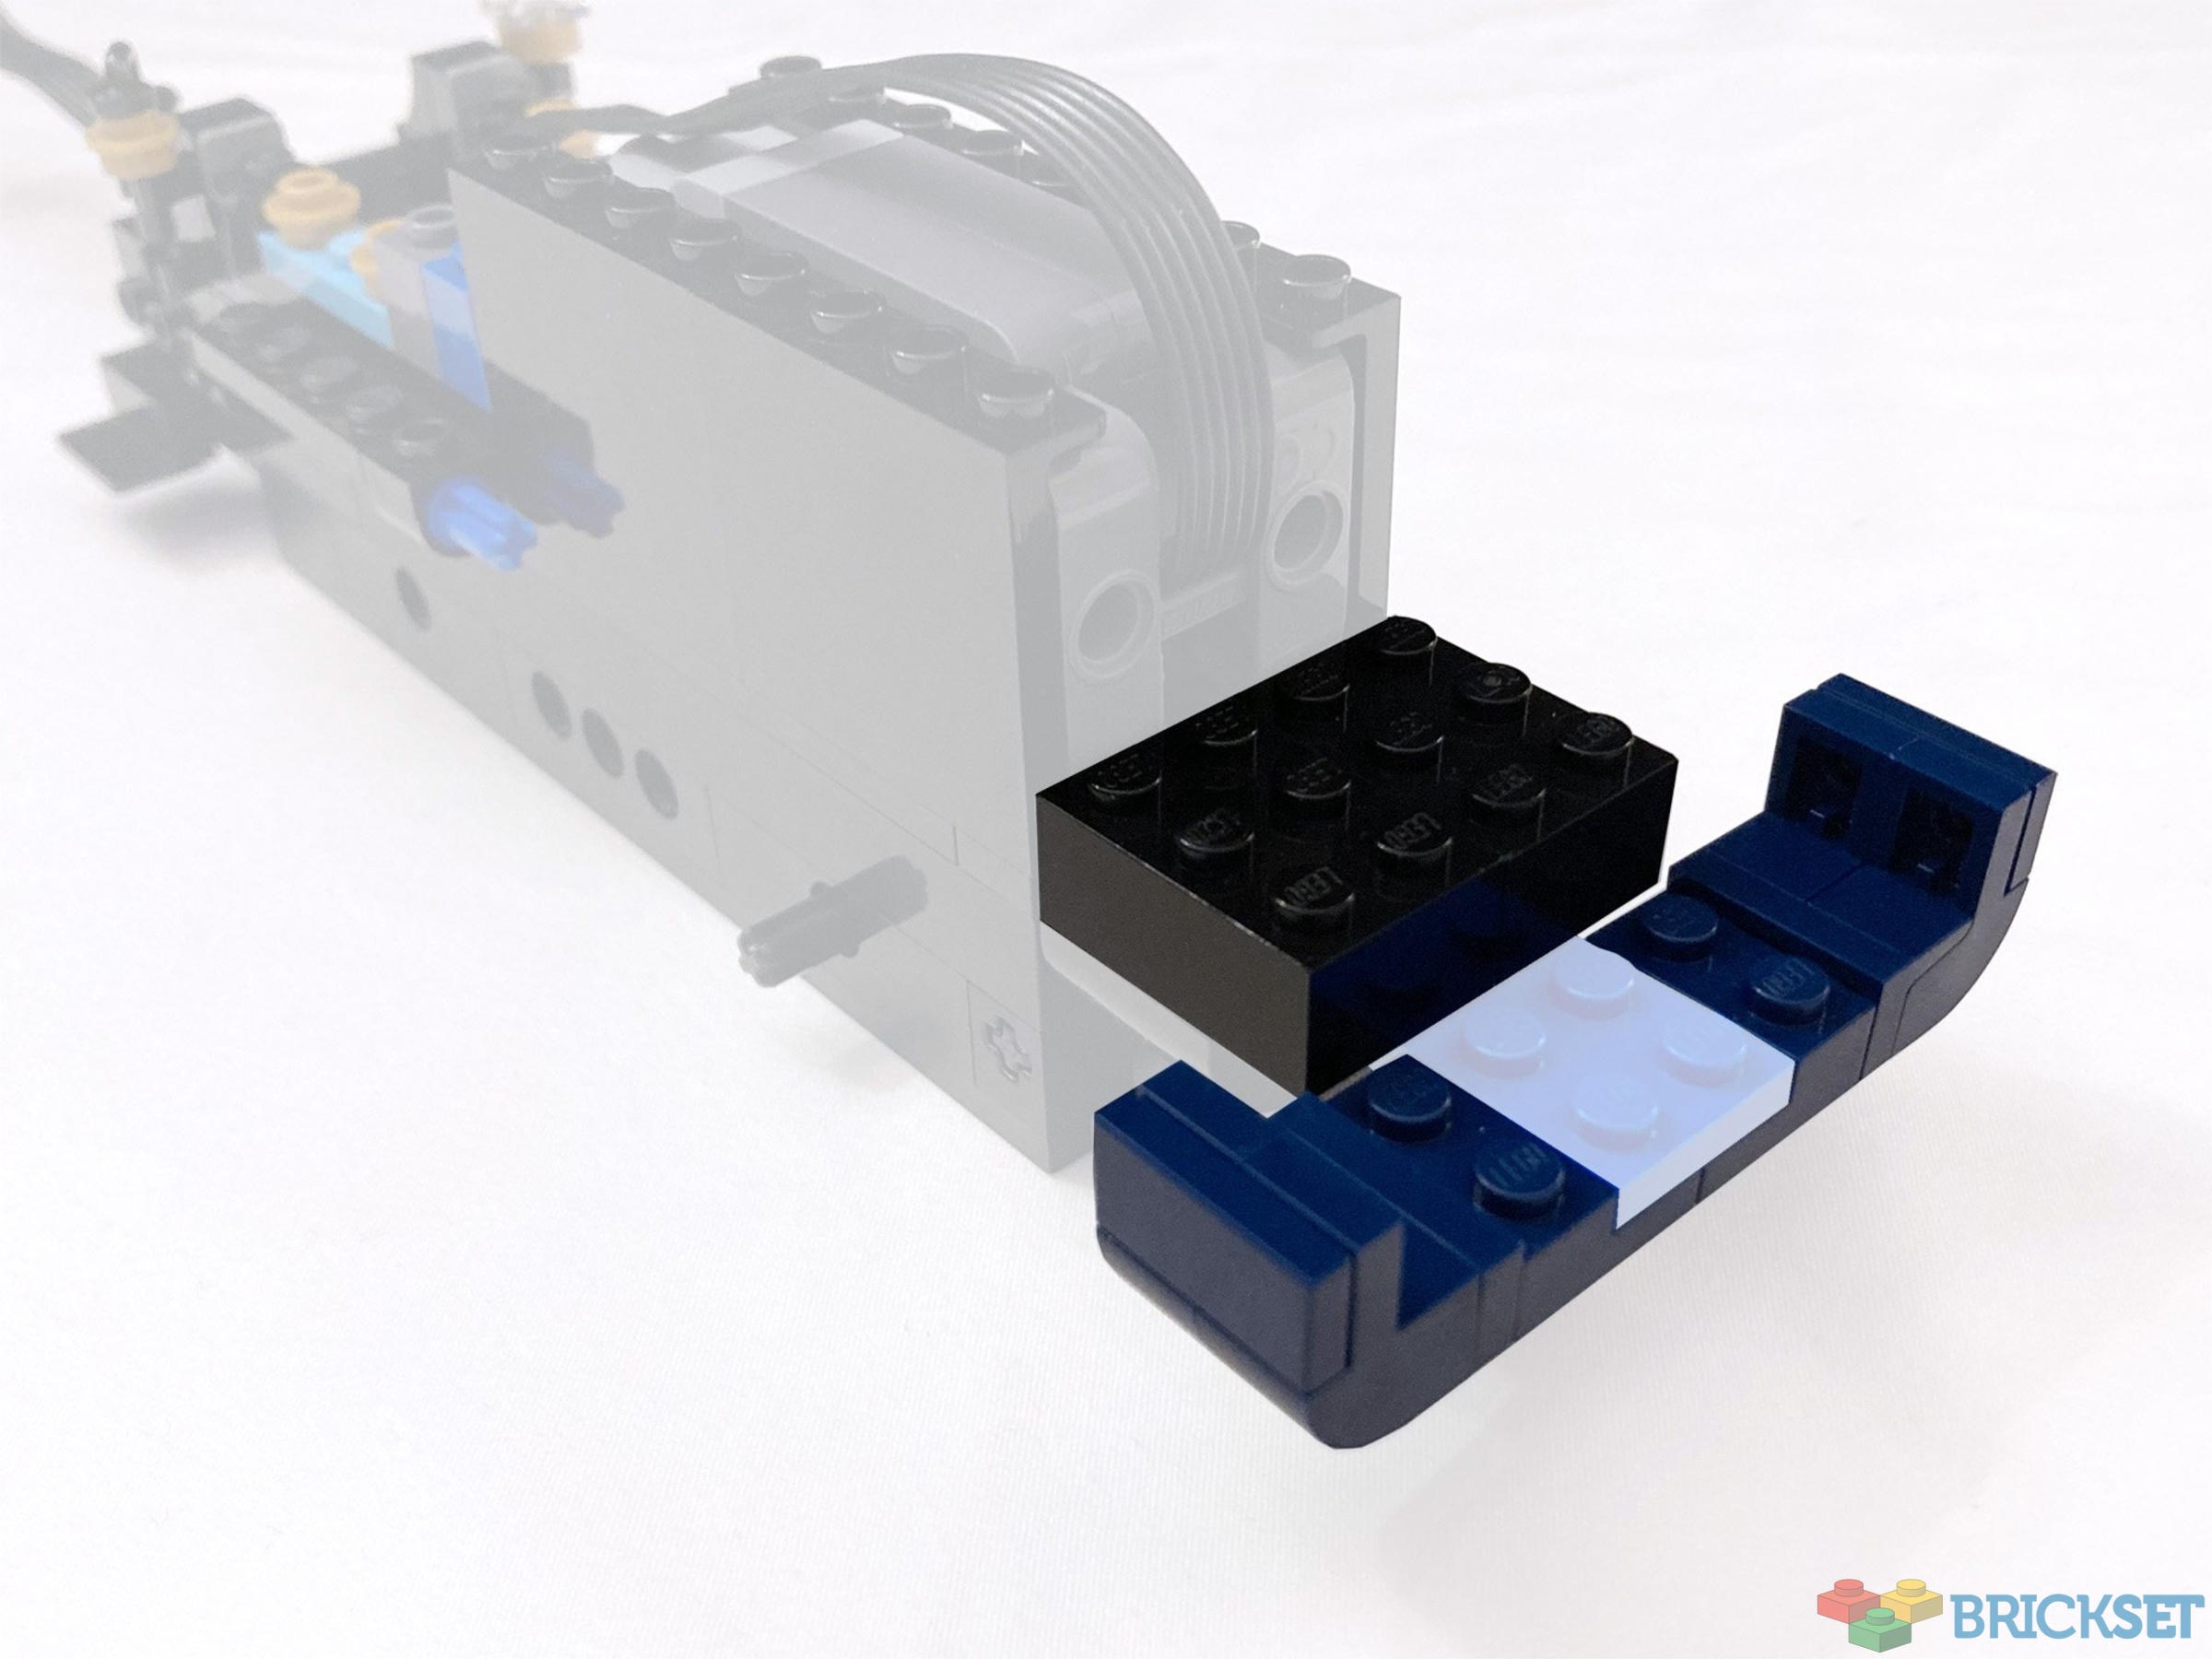
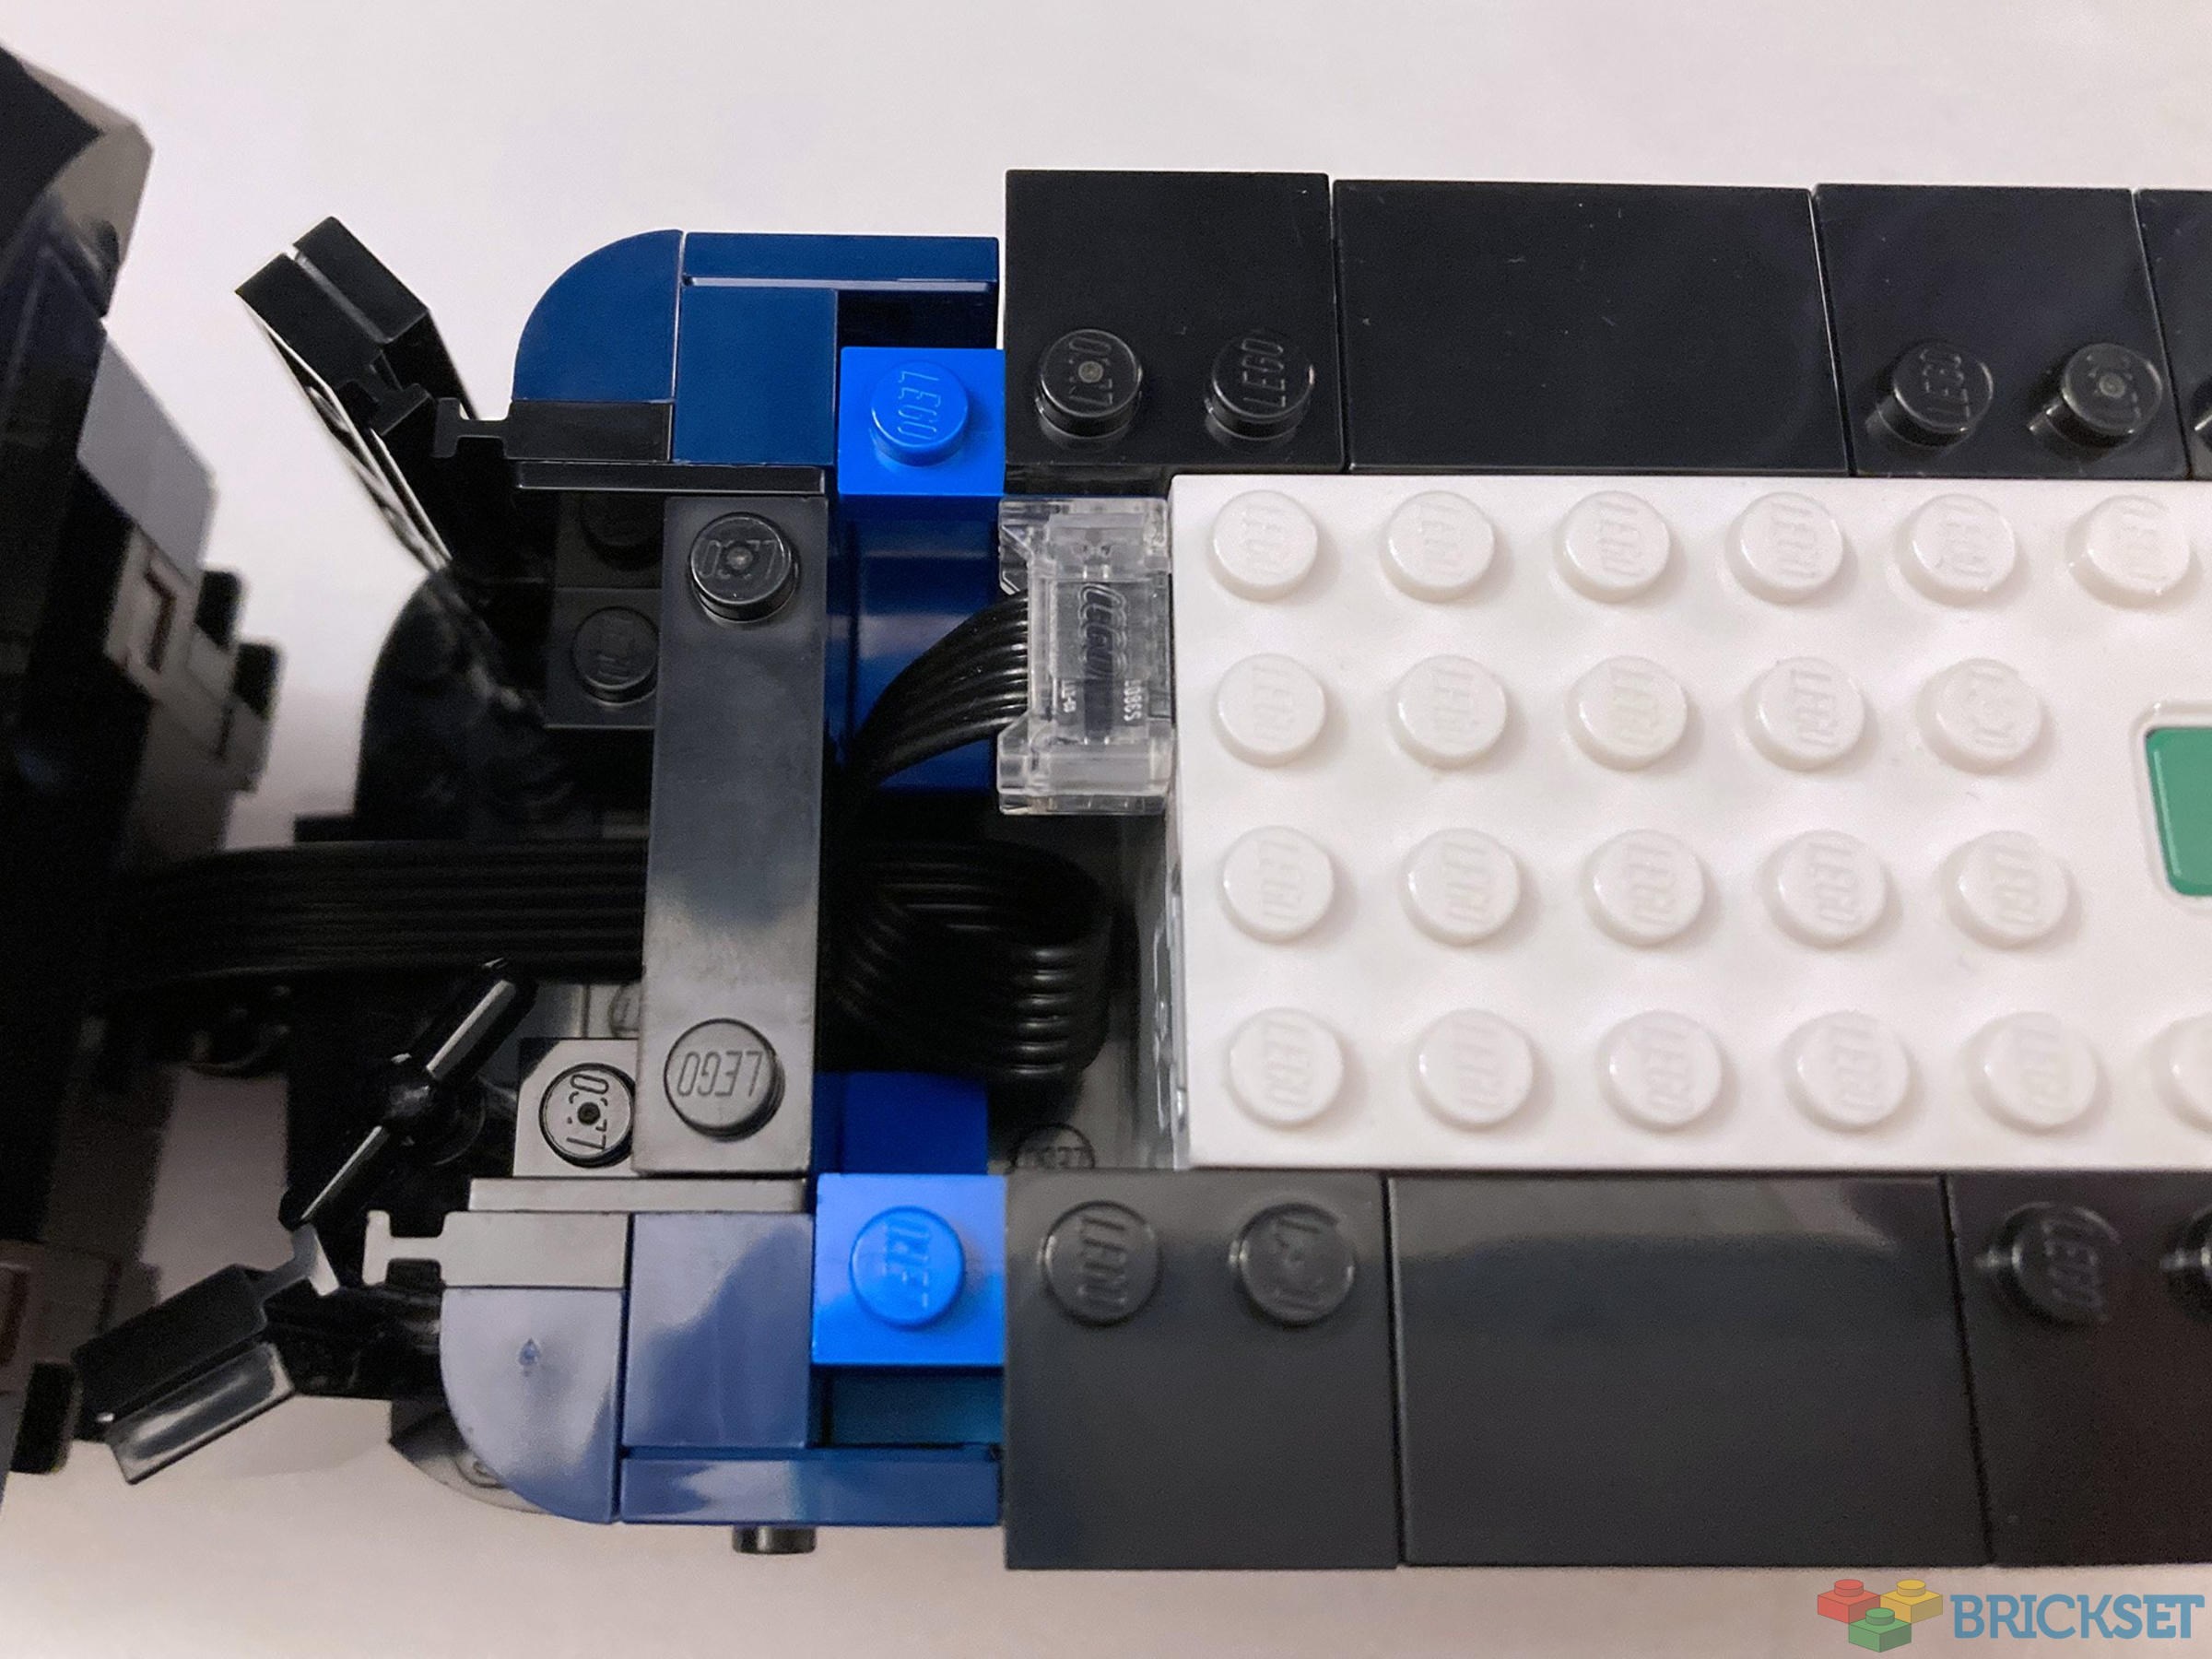
In this next step, the smooth section forward of the panel pieces is the 1x4 plate with reduced studs. The panels will be used as a channel for the cable at a later step.
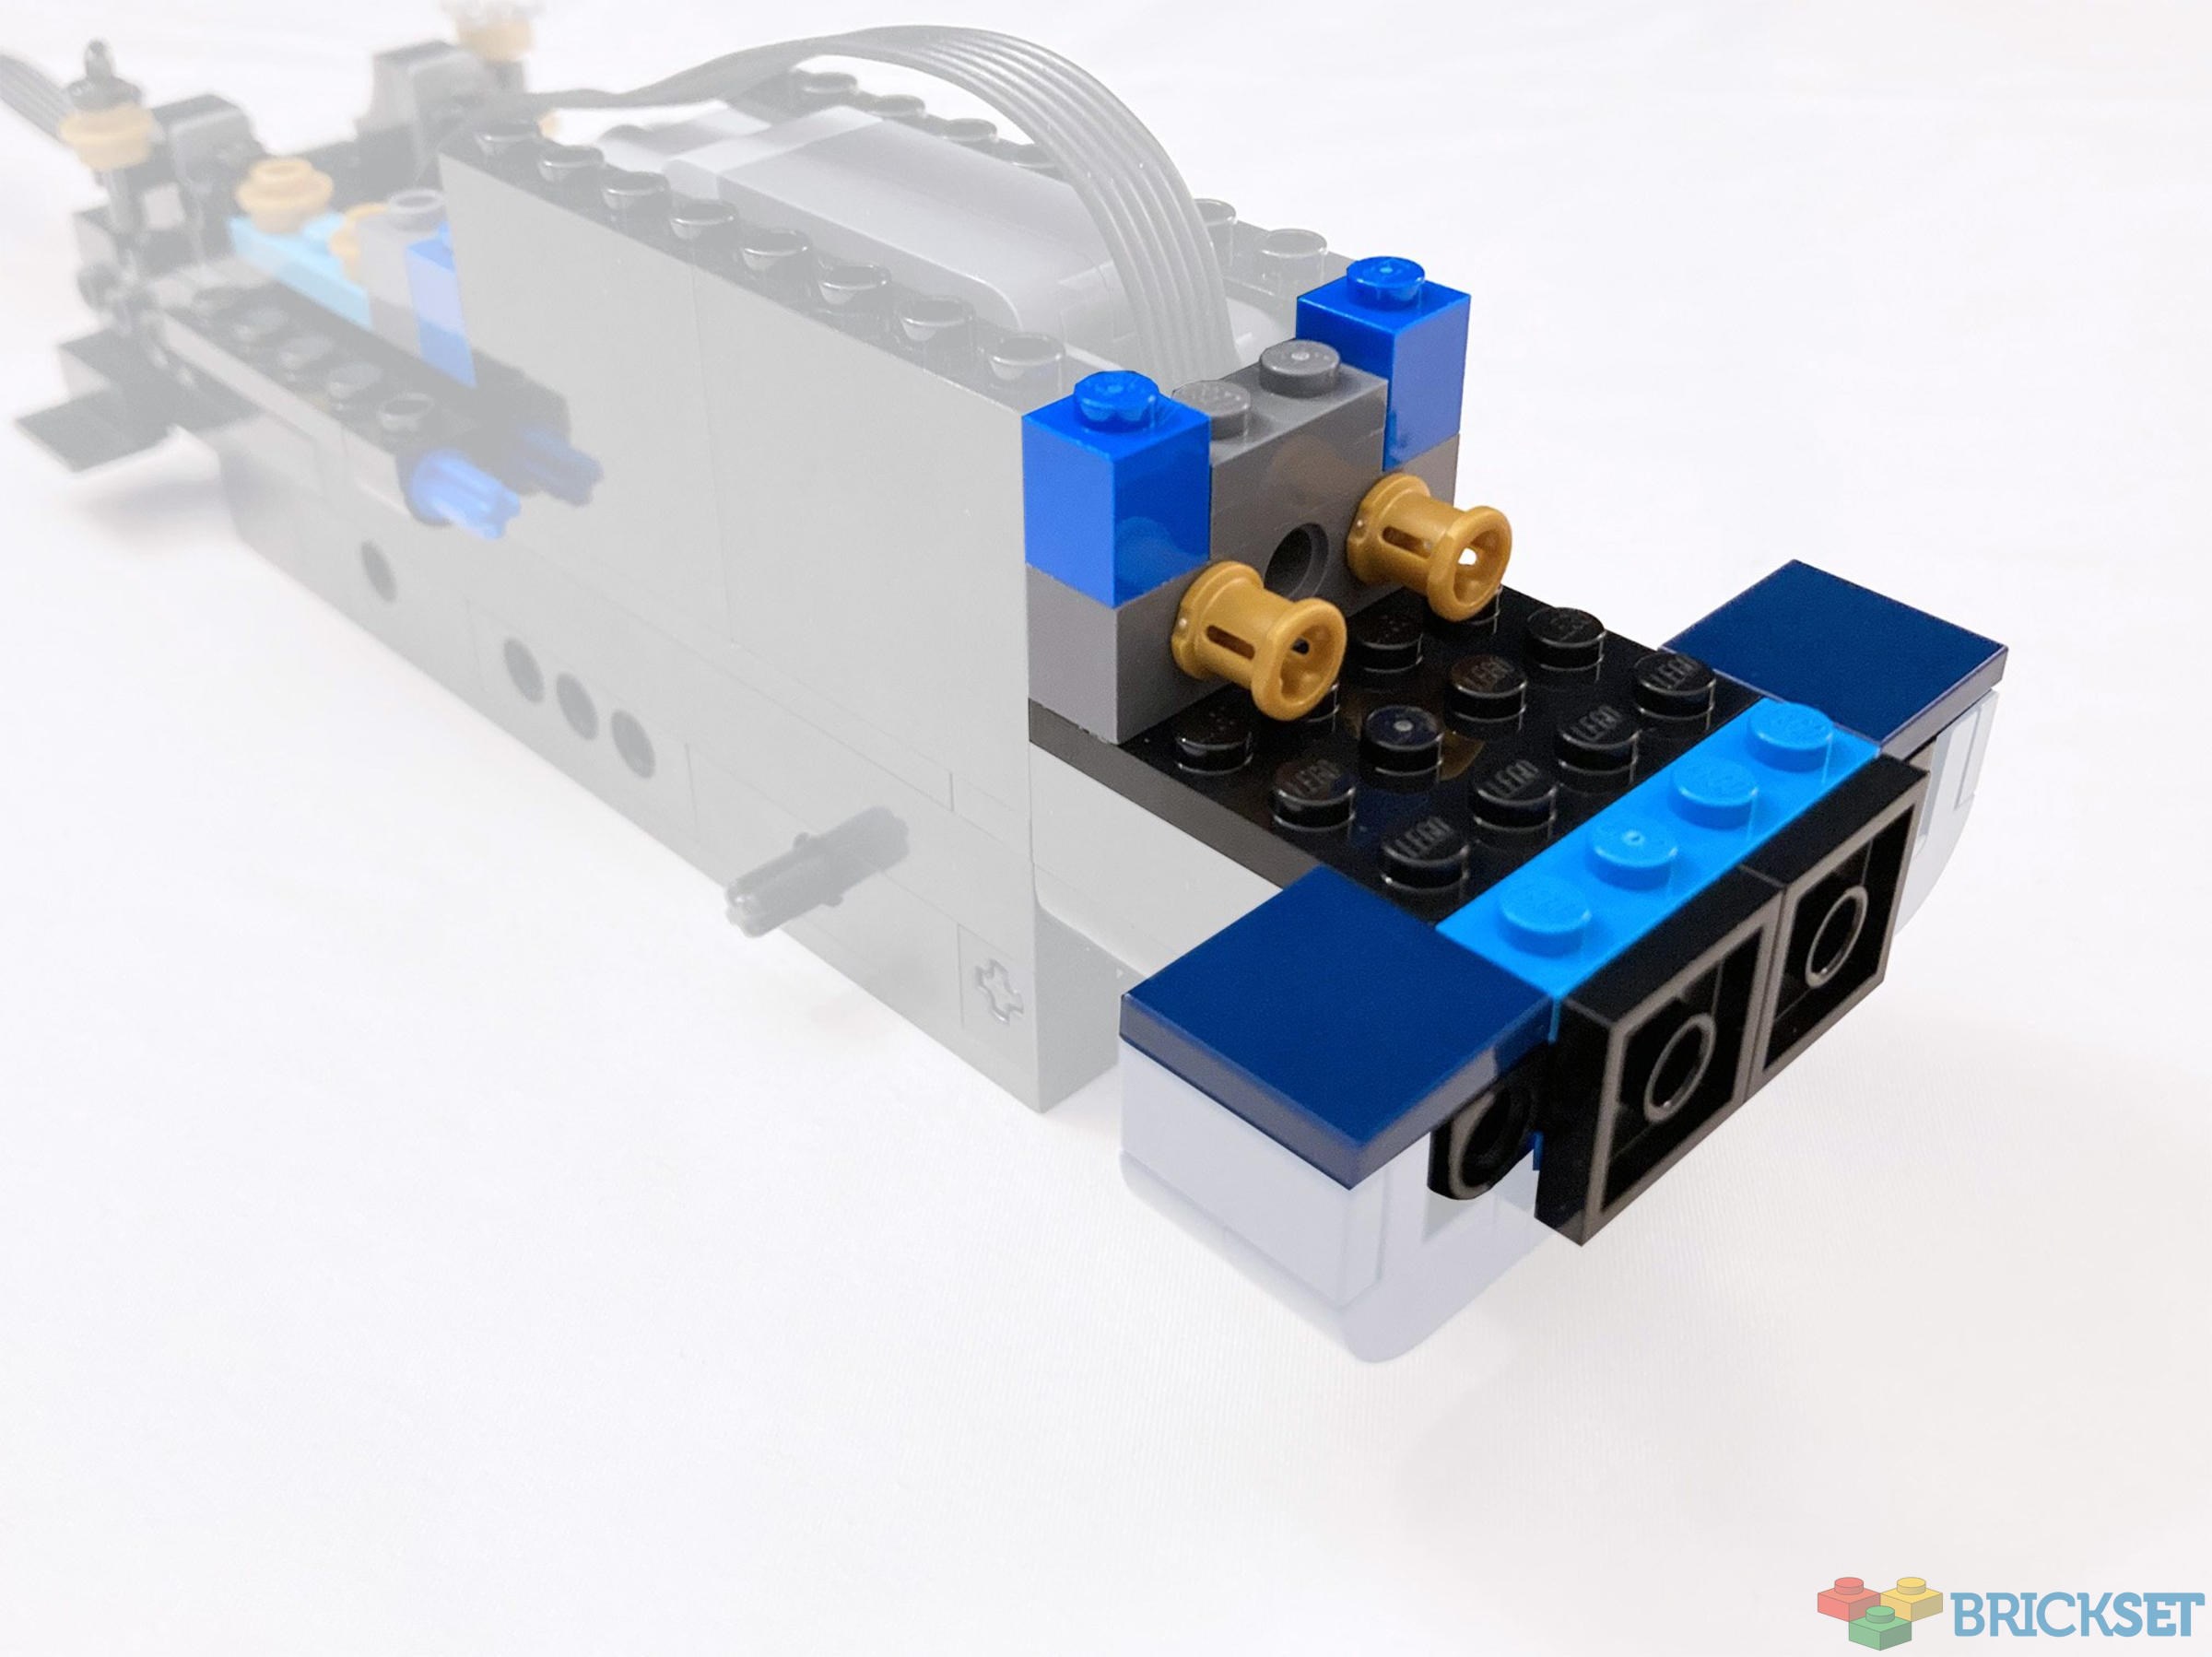
Conductor’s note: The stack of grey plates here is 2 plates high.
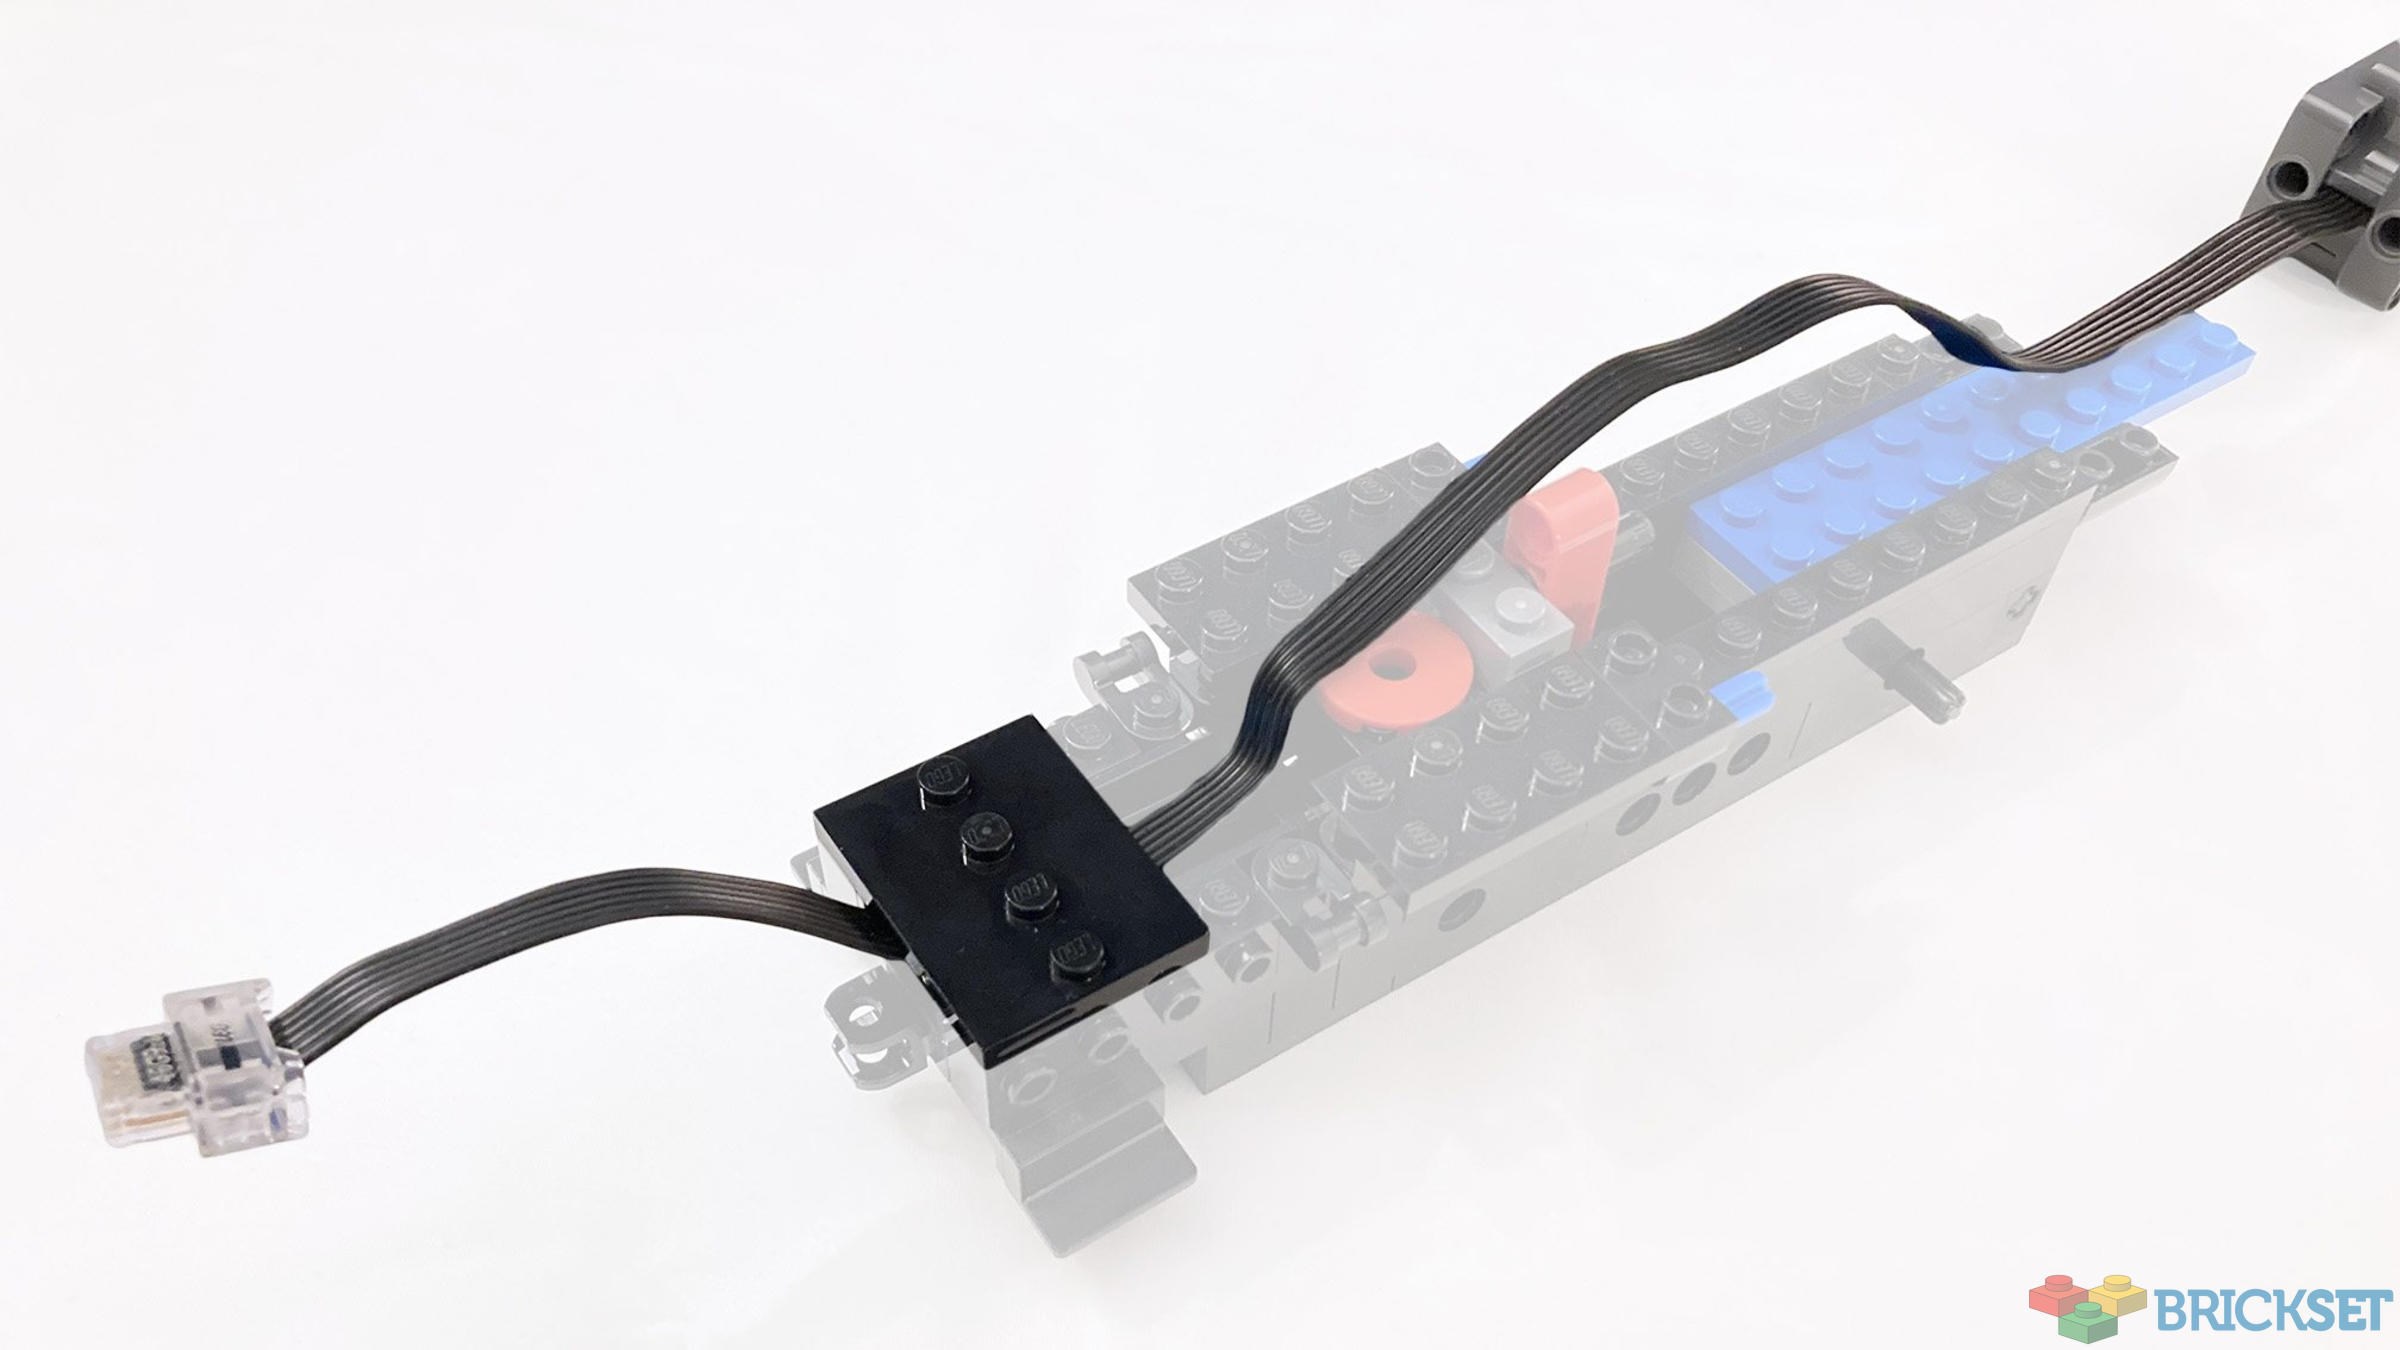
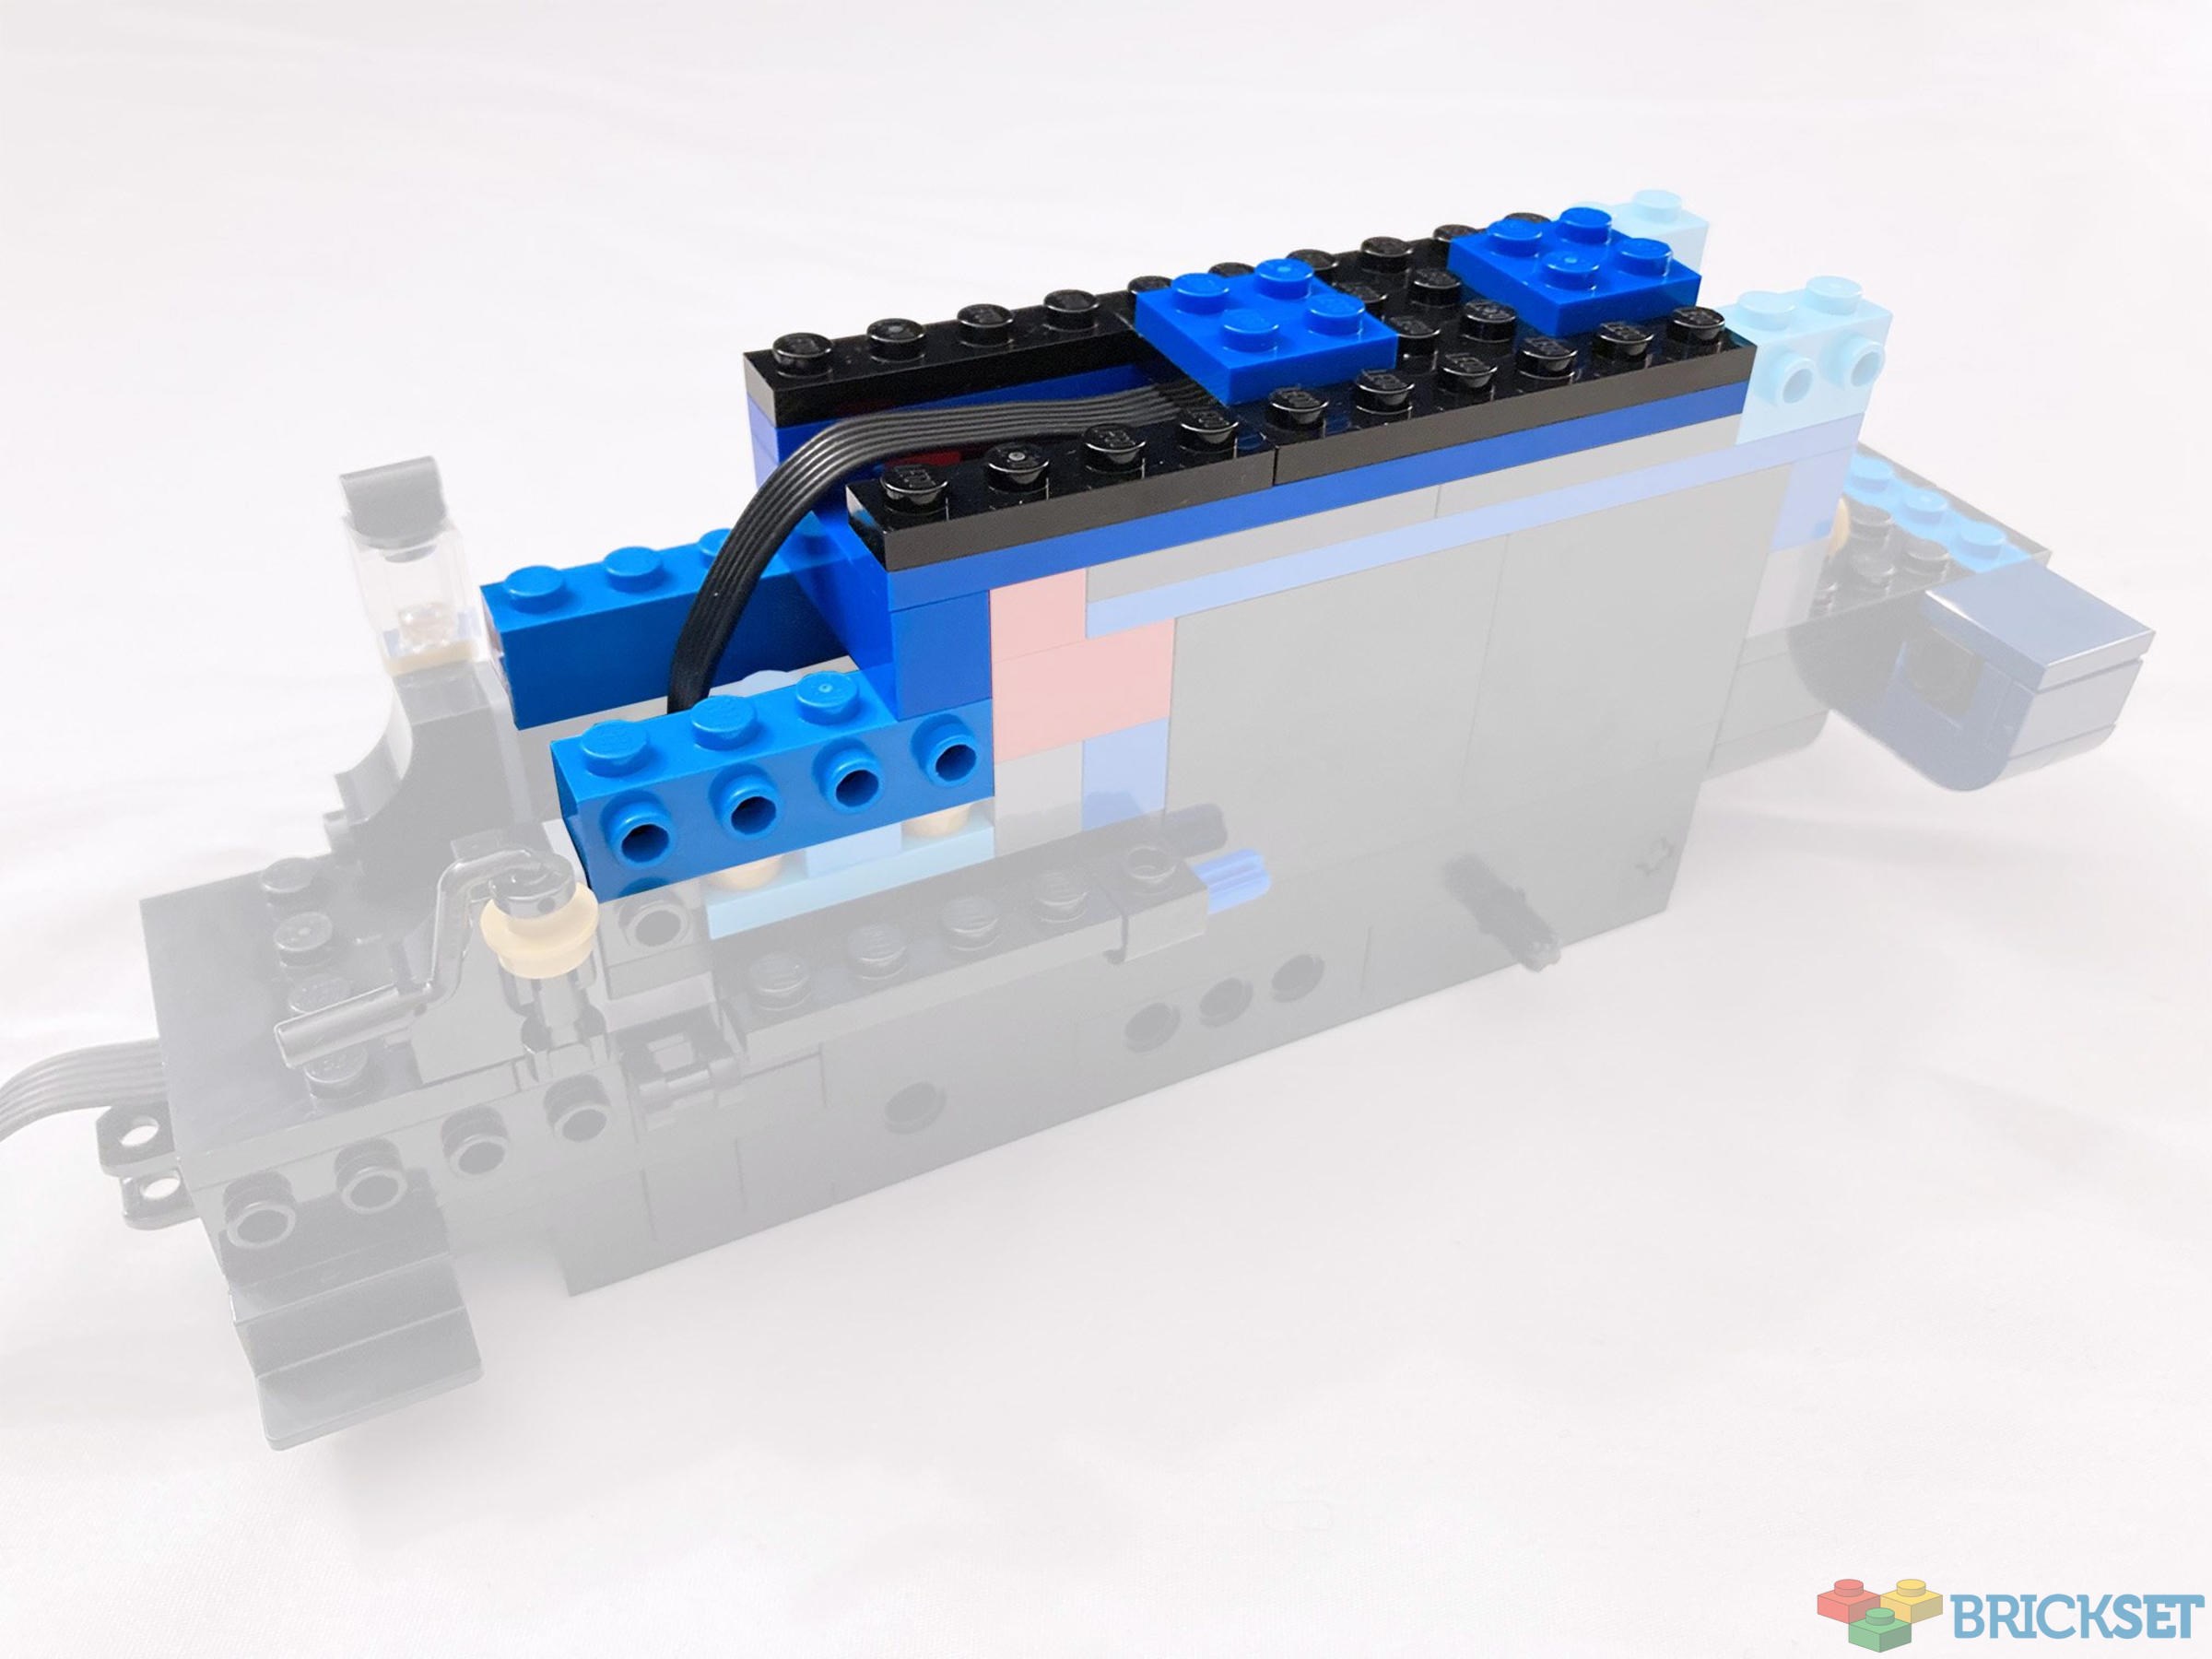
Secure the cable as shown with the 3x4 plate.
This is the first step that re-introduces some of the assemblies that you set aside earlier.
In this step you are only adding the 3L axle and the two gears, so I decided not to grey it out.
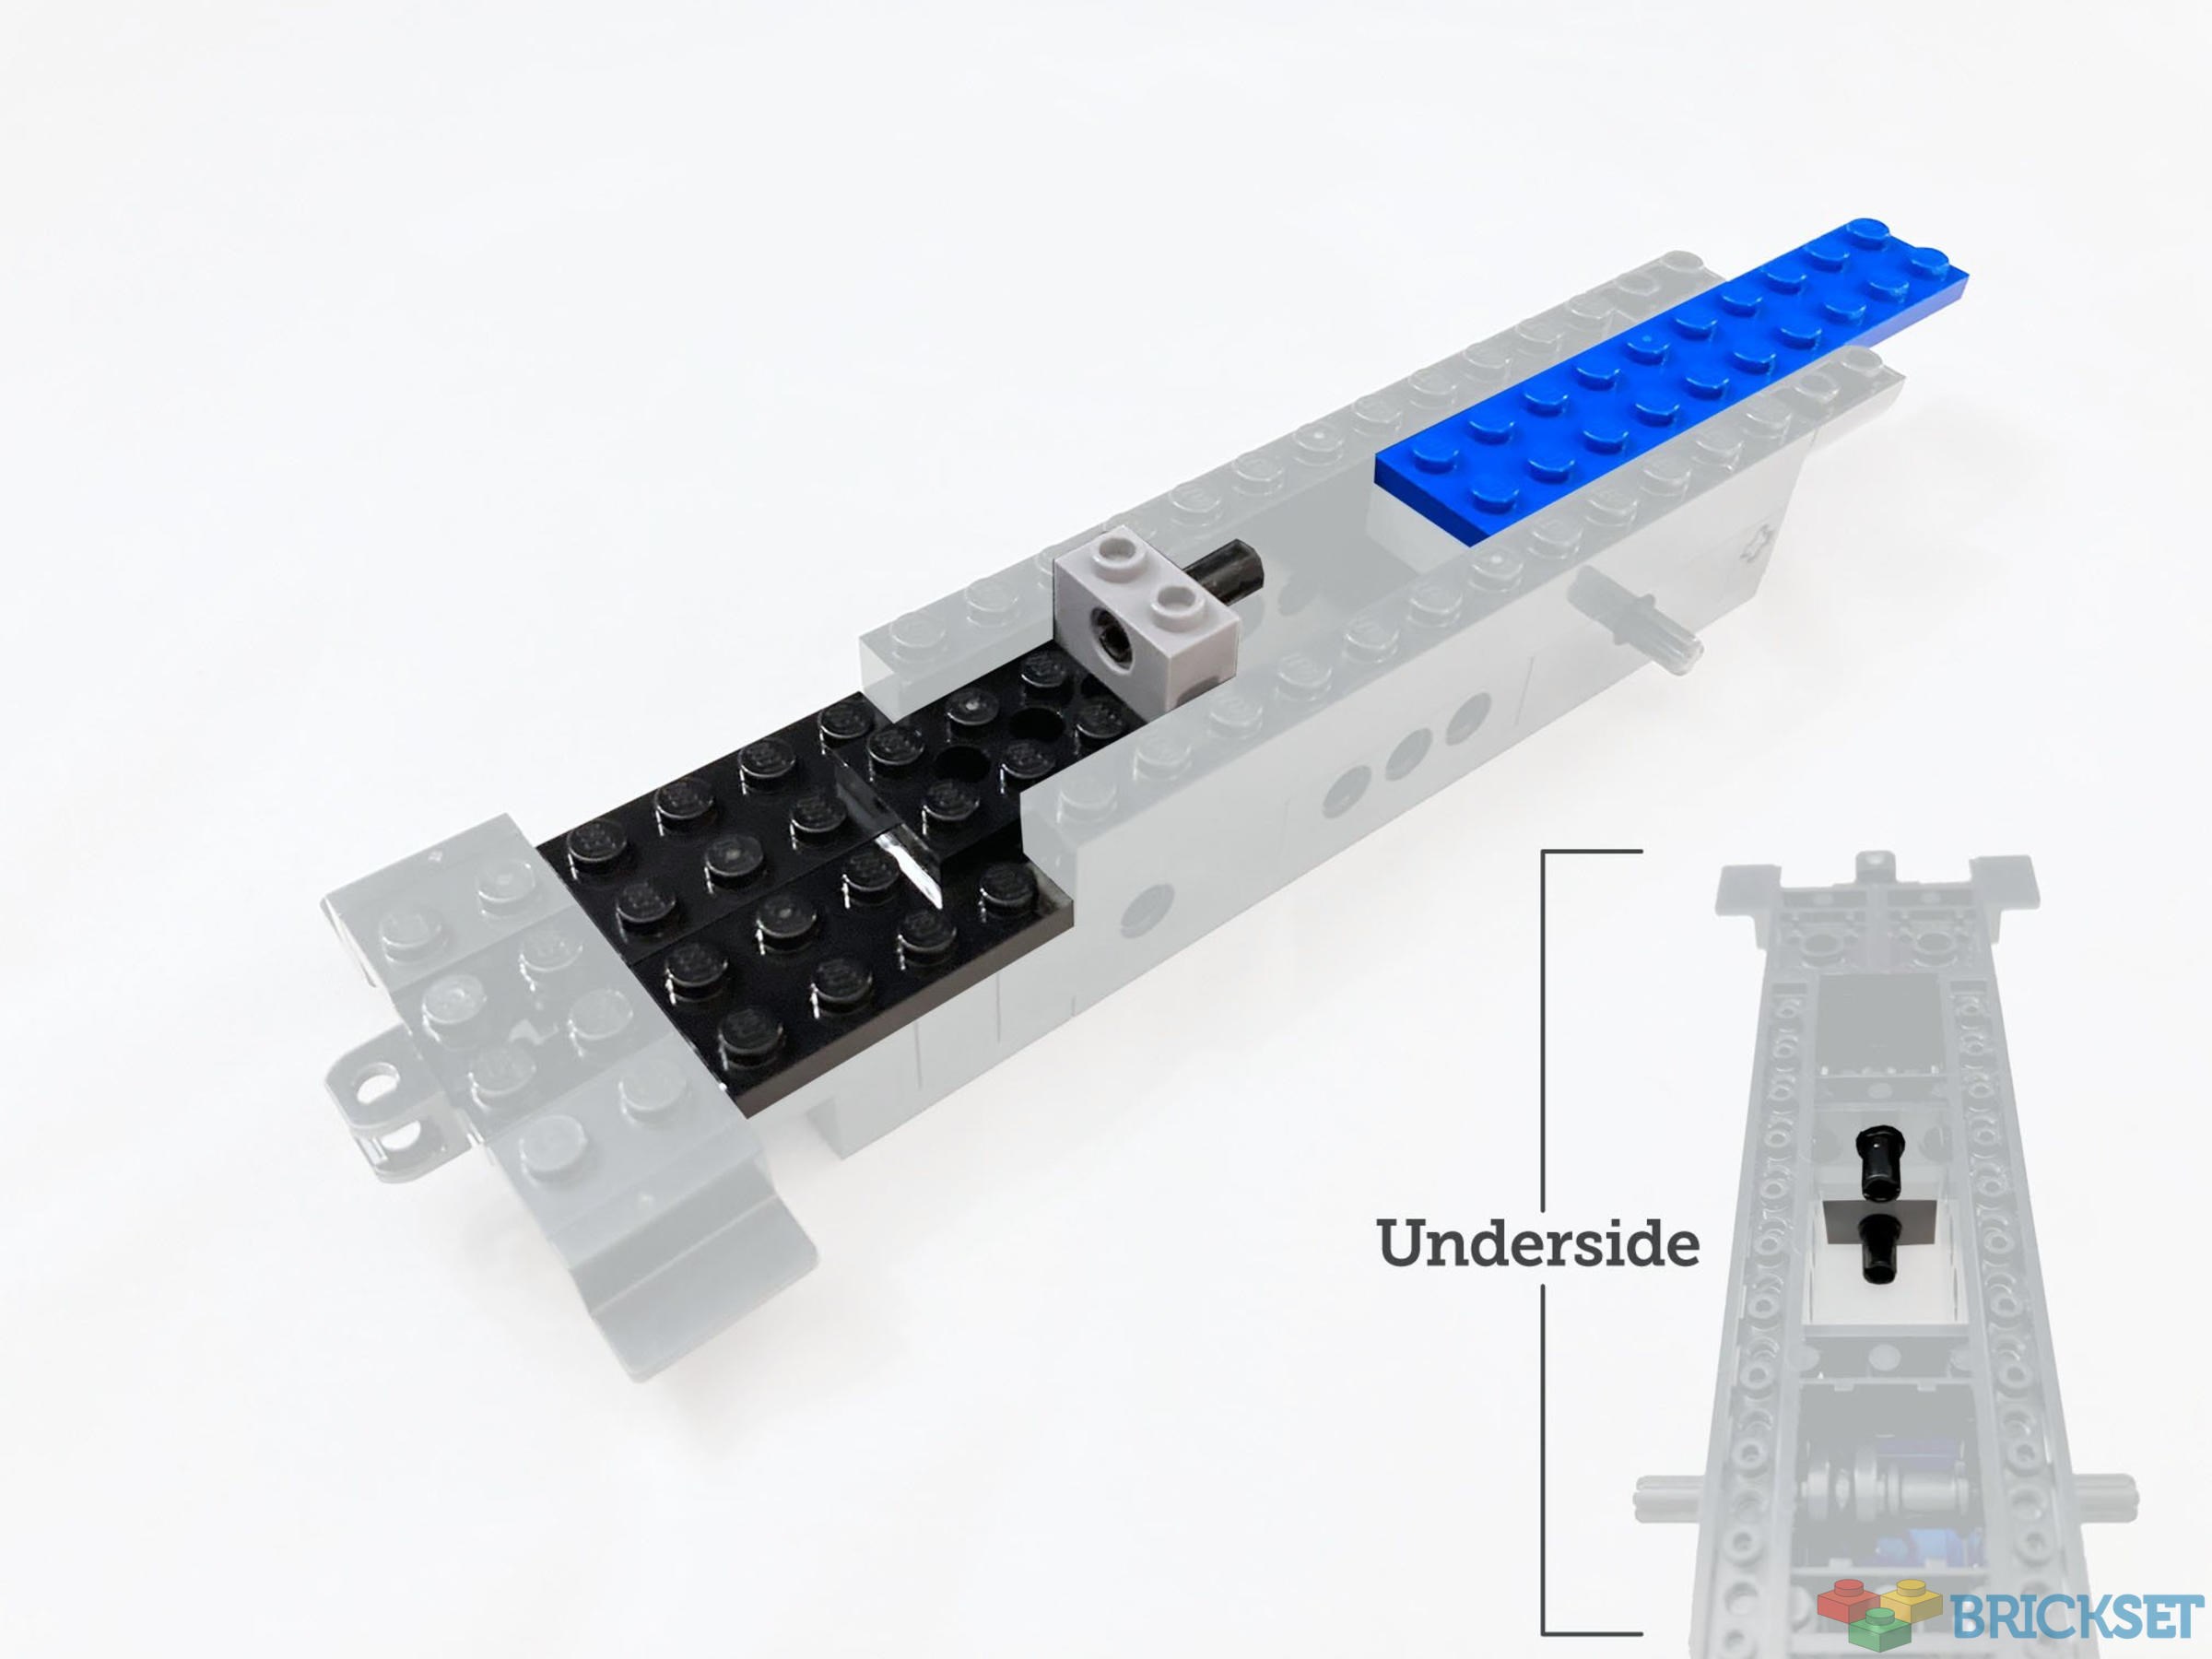
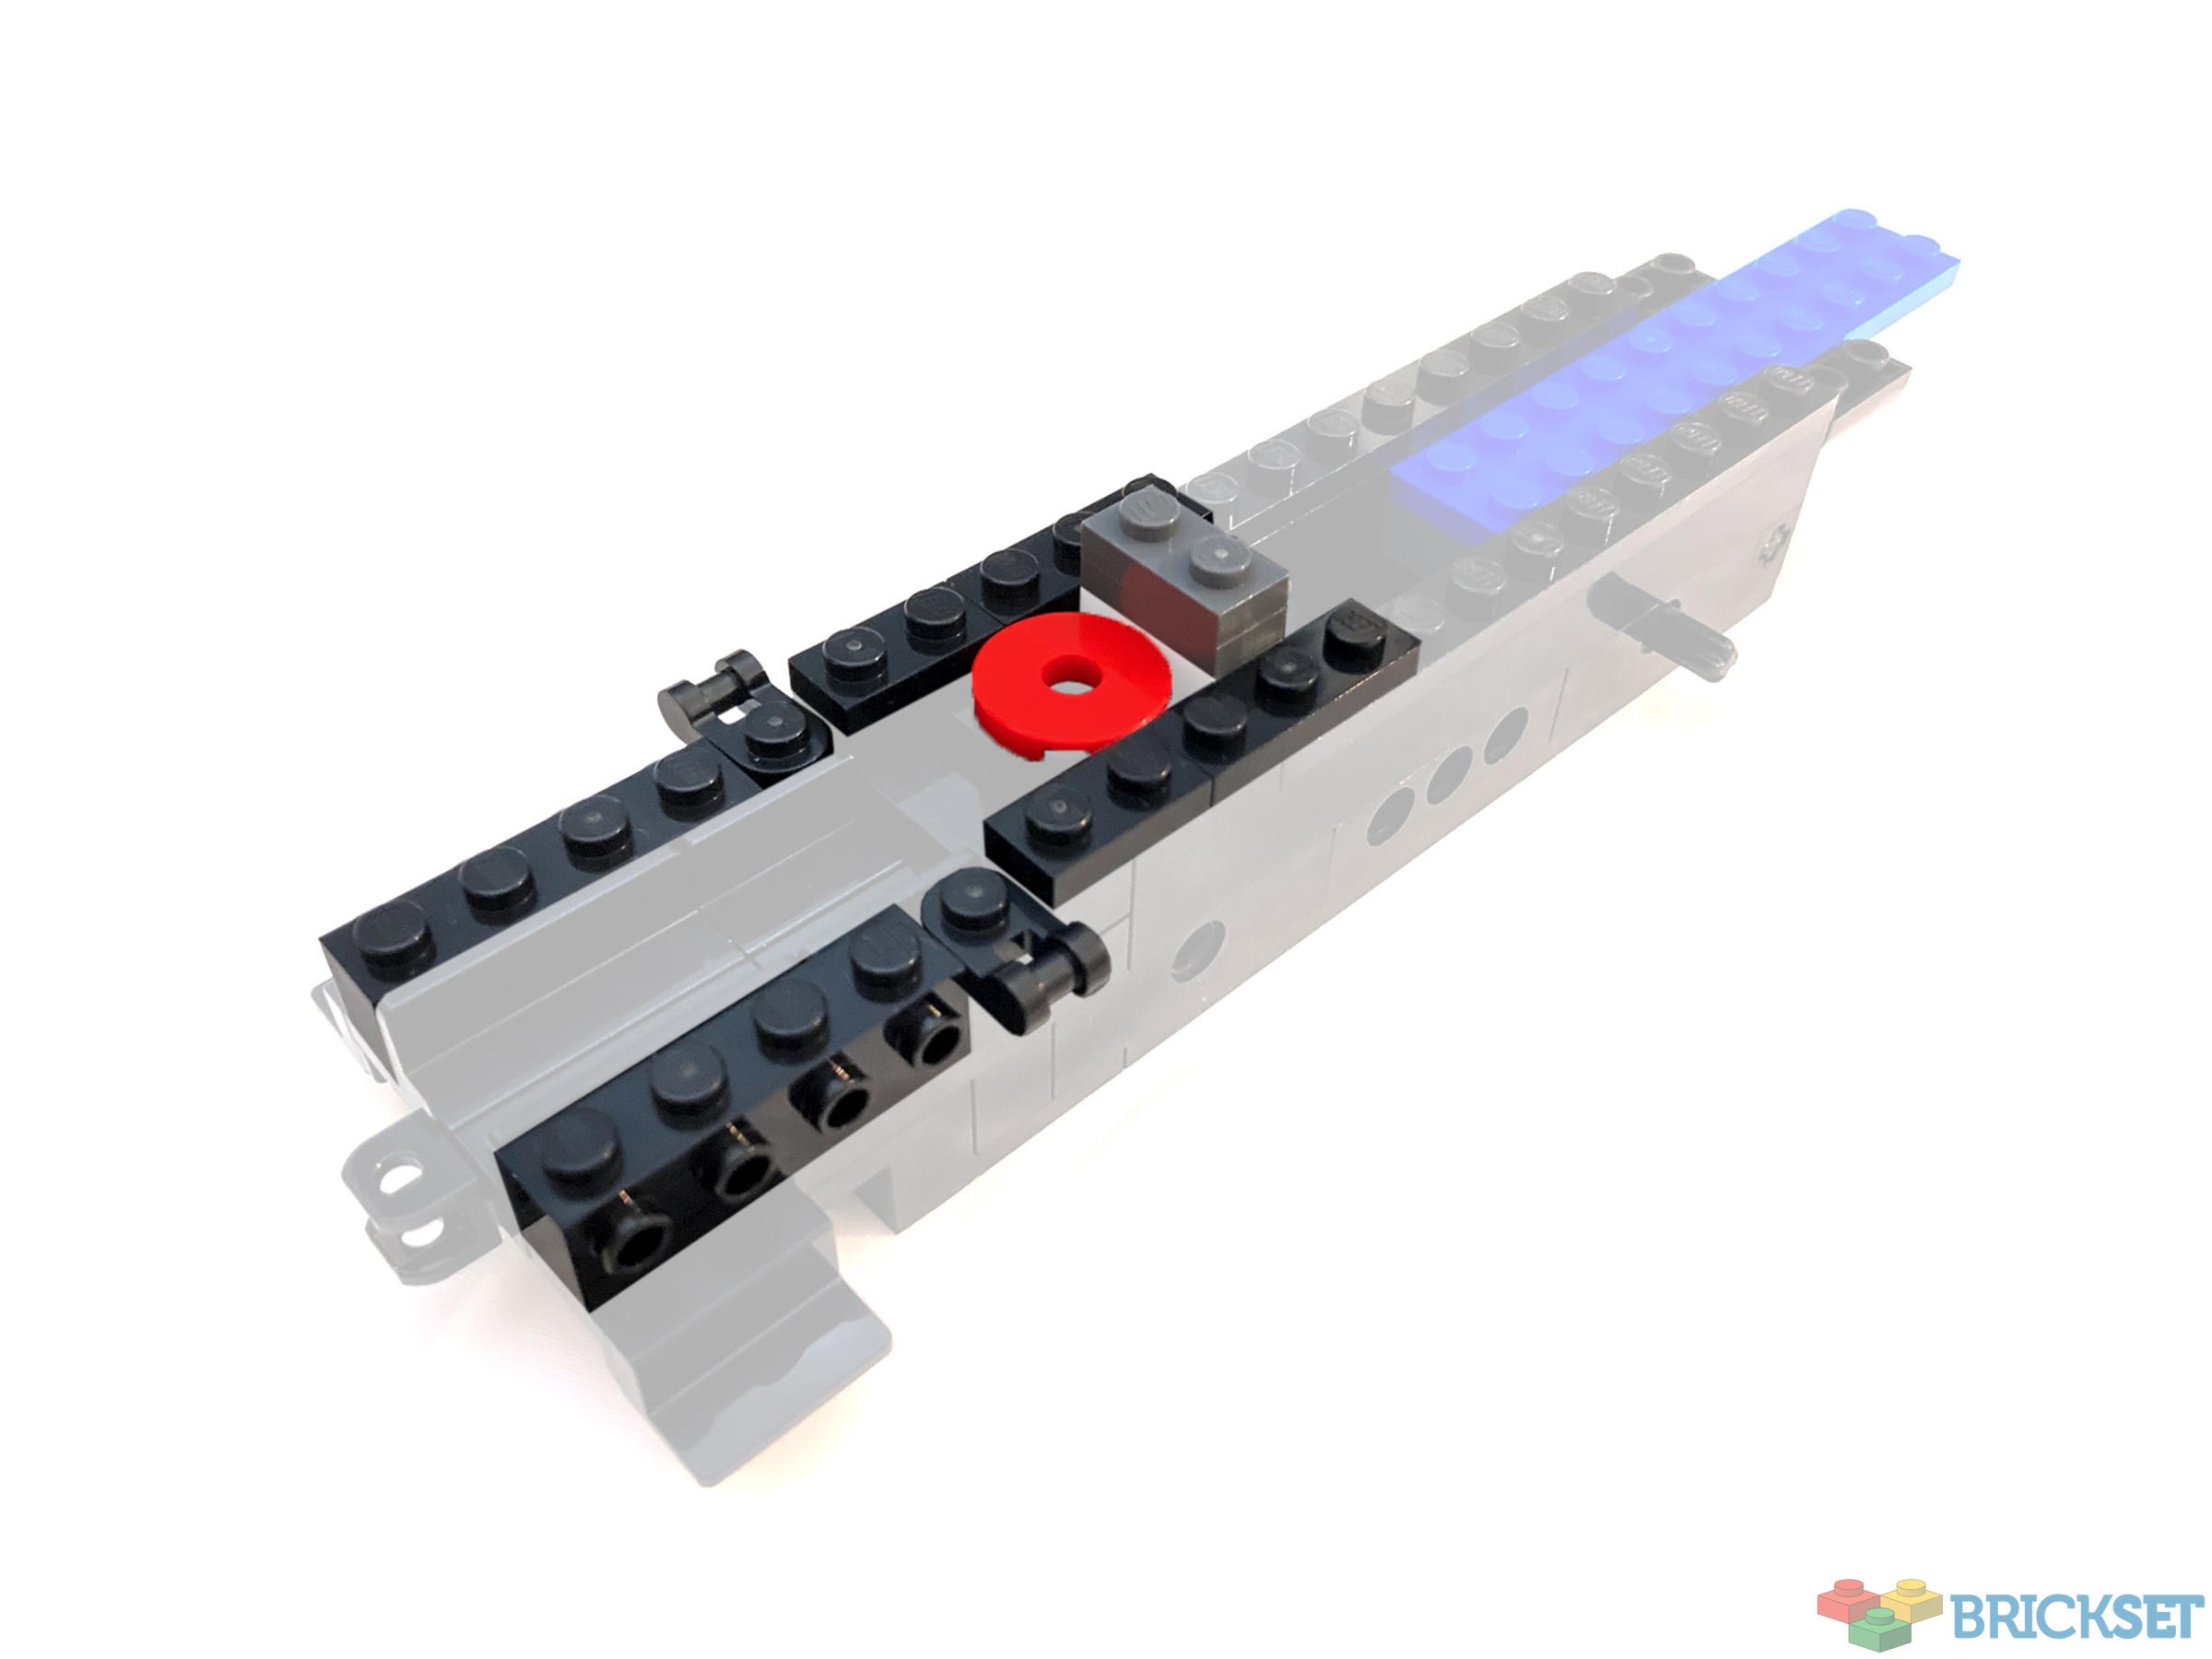
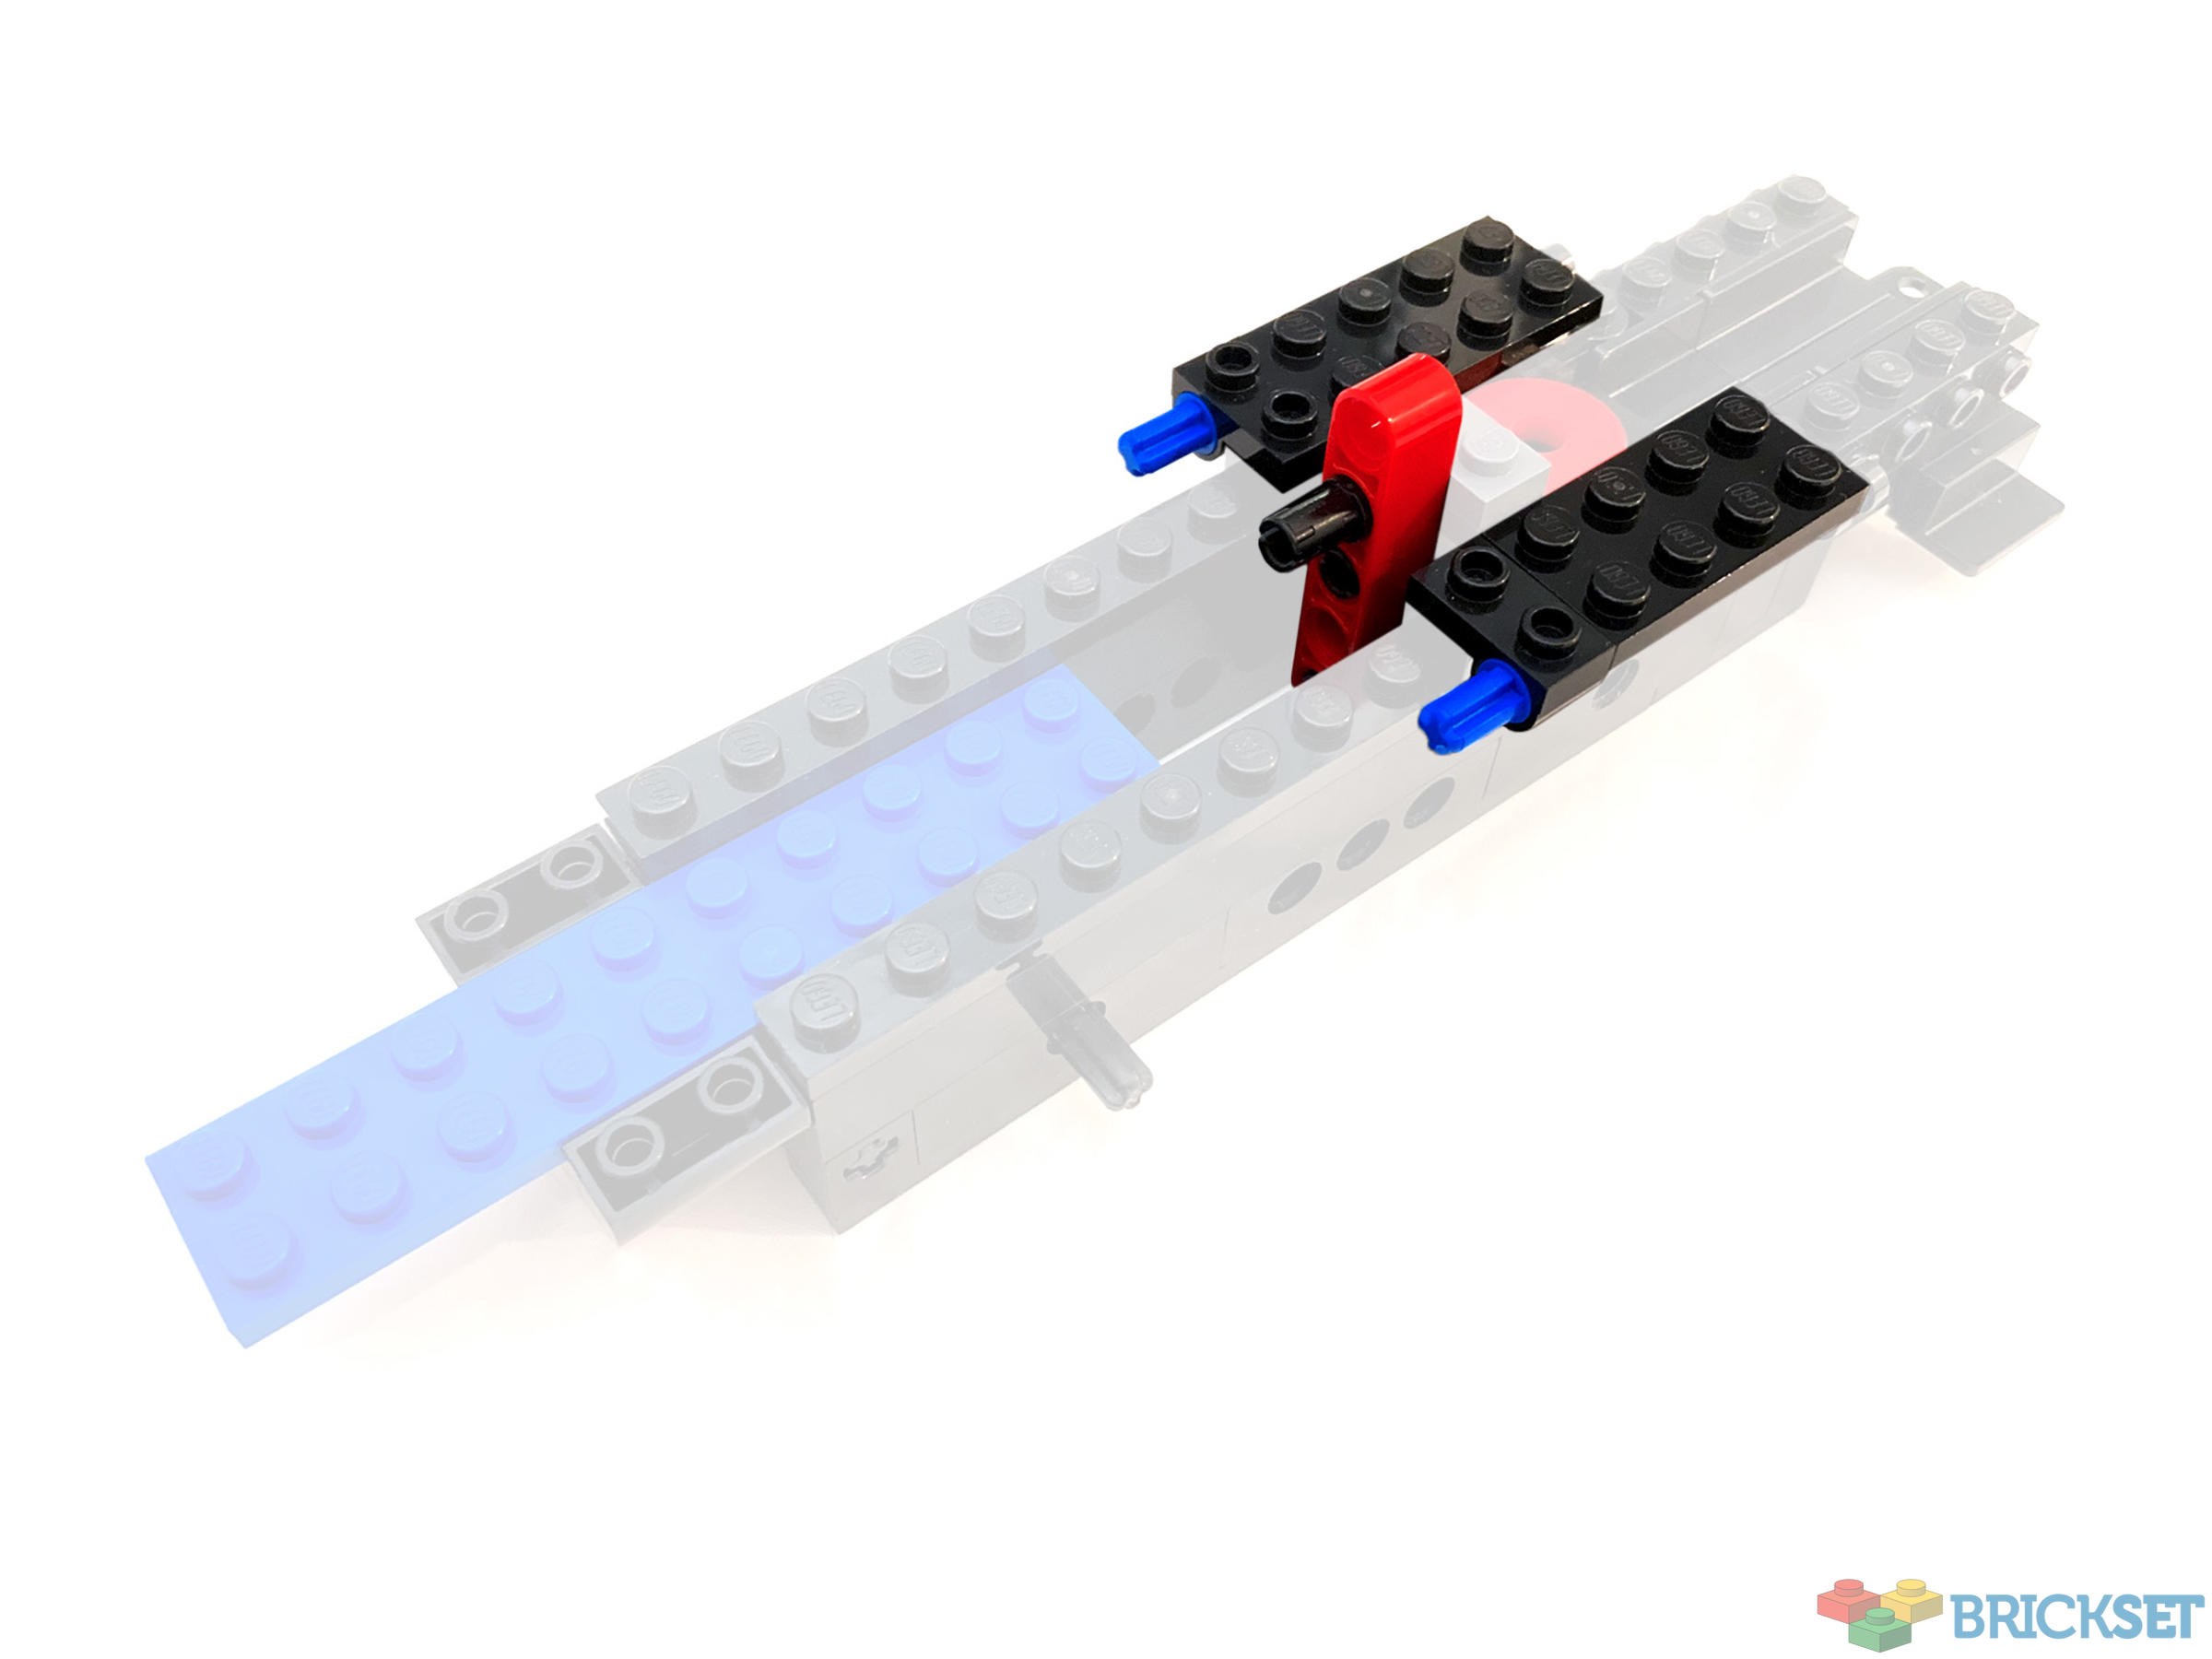
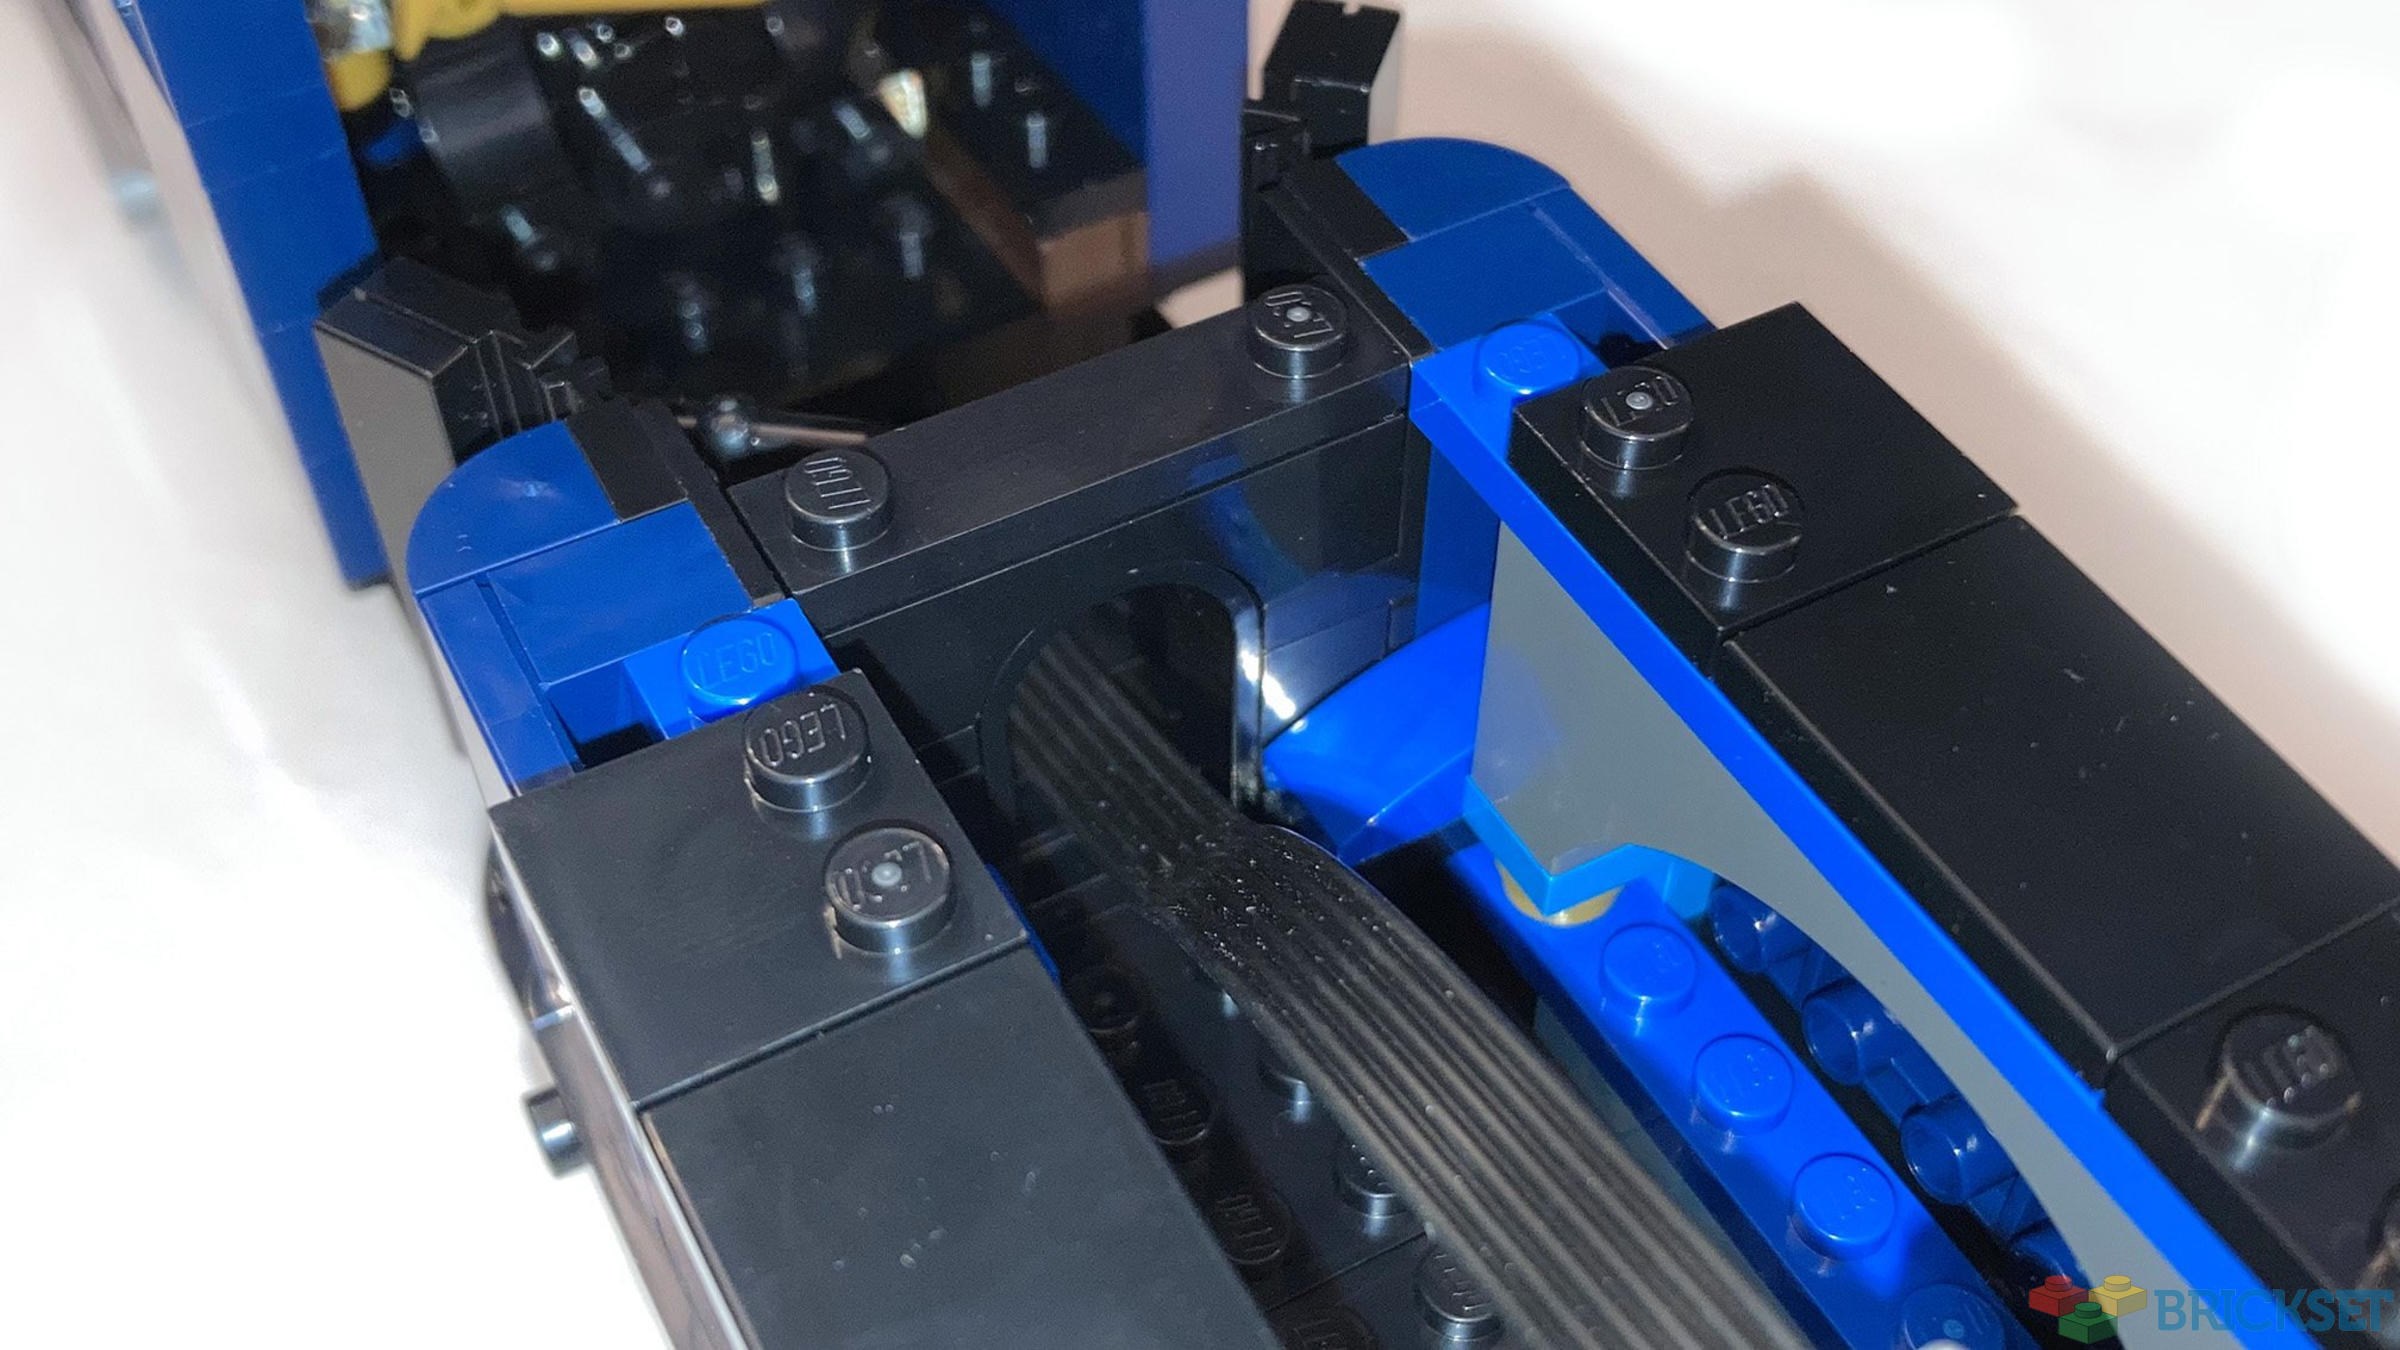
Here's where things start to get tricky. There’s an order of operations to this step.
First, slide the motor into the channel made by the panels.
Next, place the tan gear and grey 1/2 bushing on the very end of the red 4L axle, as shown in the bottom right corner of the picture. Pay close attention to the position of the teeth.
Last, line it up with the hole and push the axle all the way through.
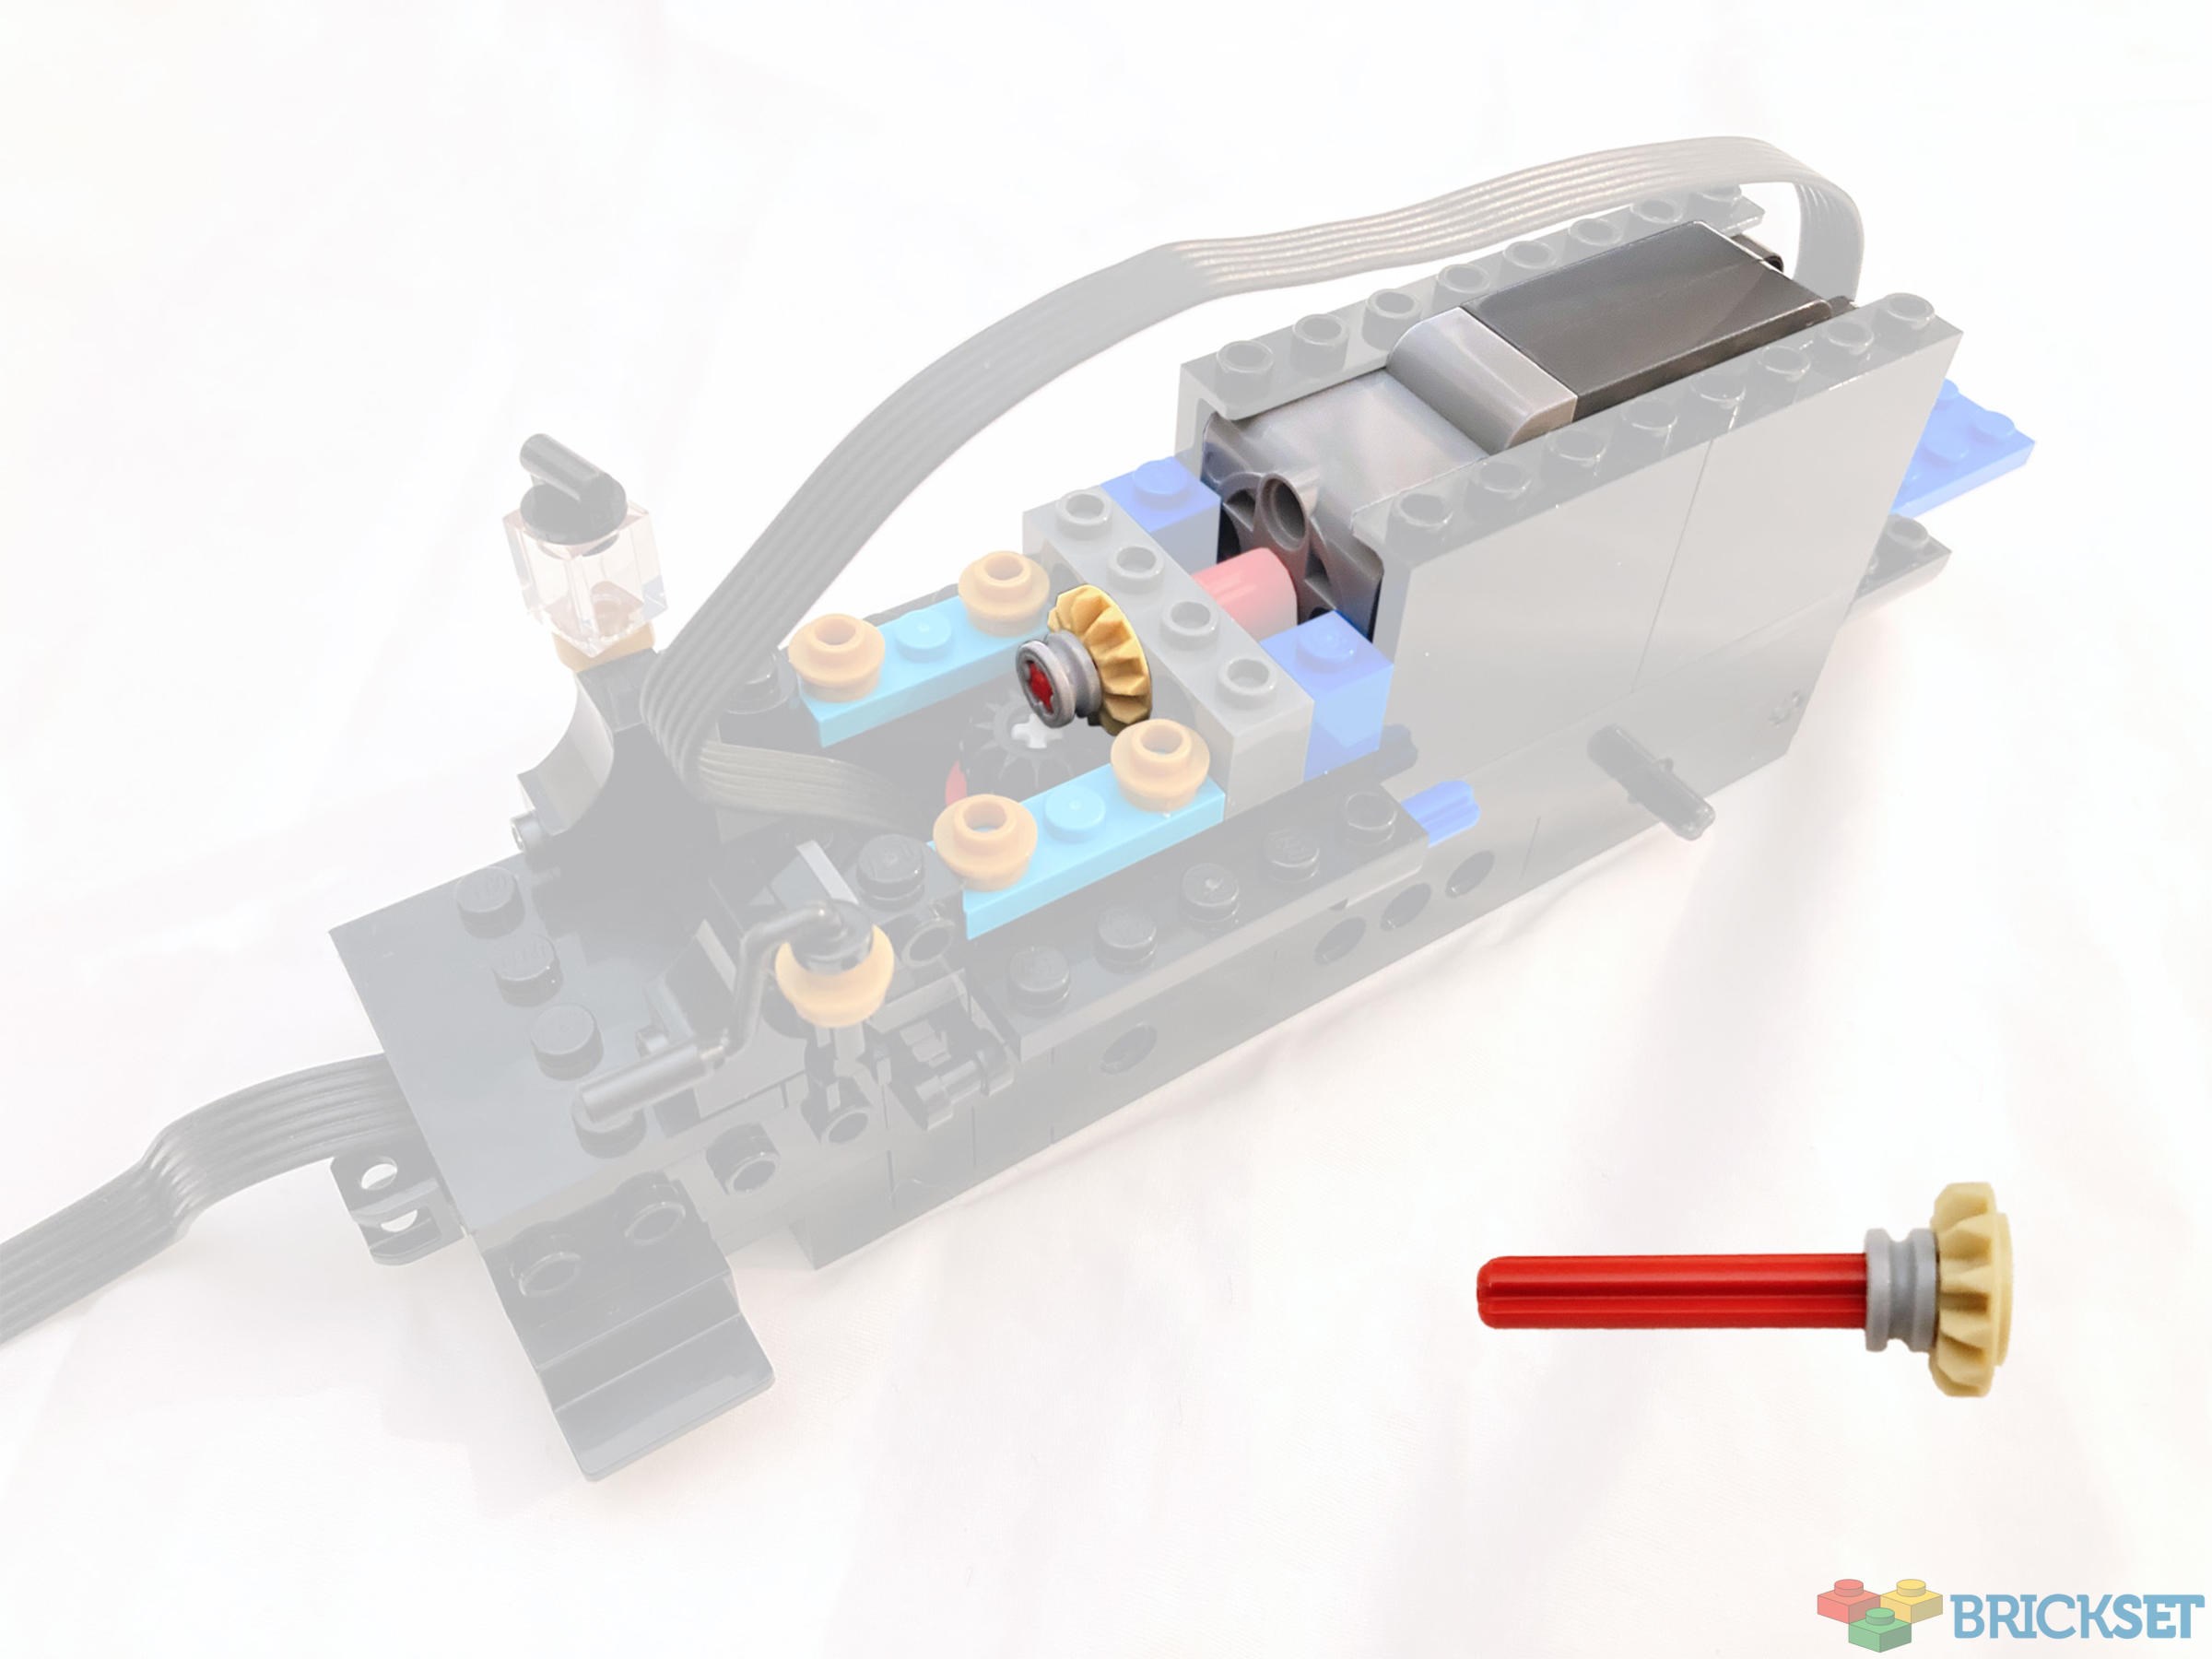
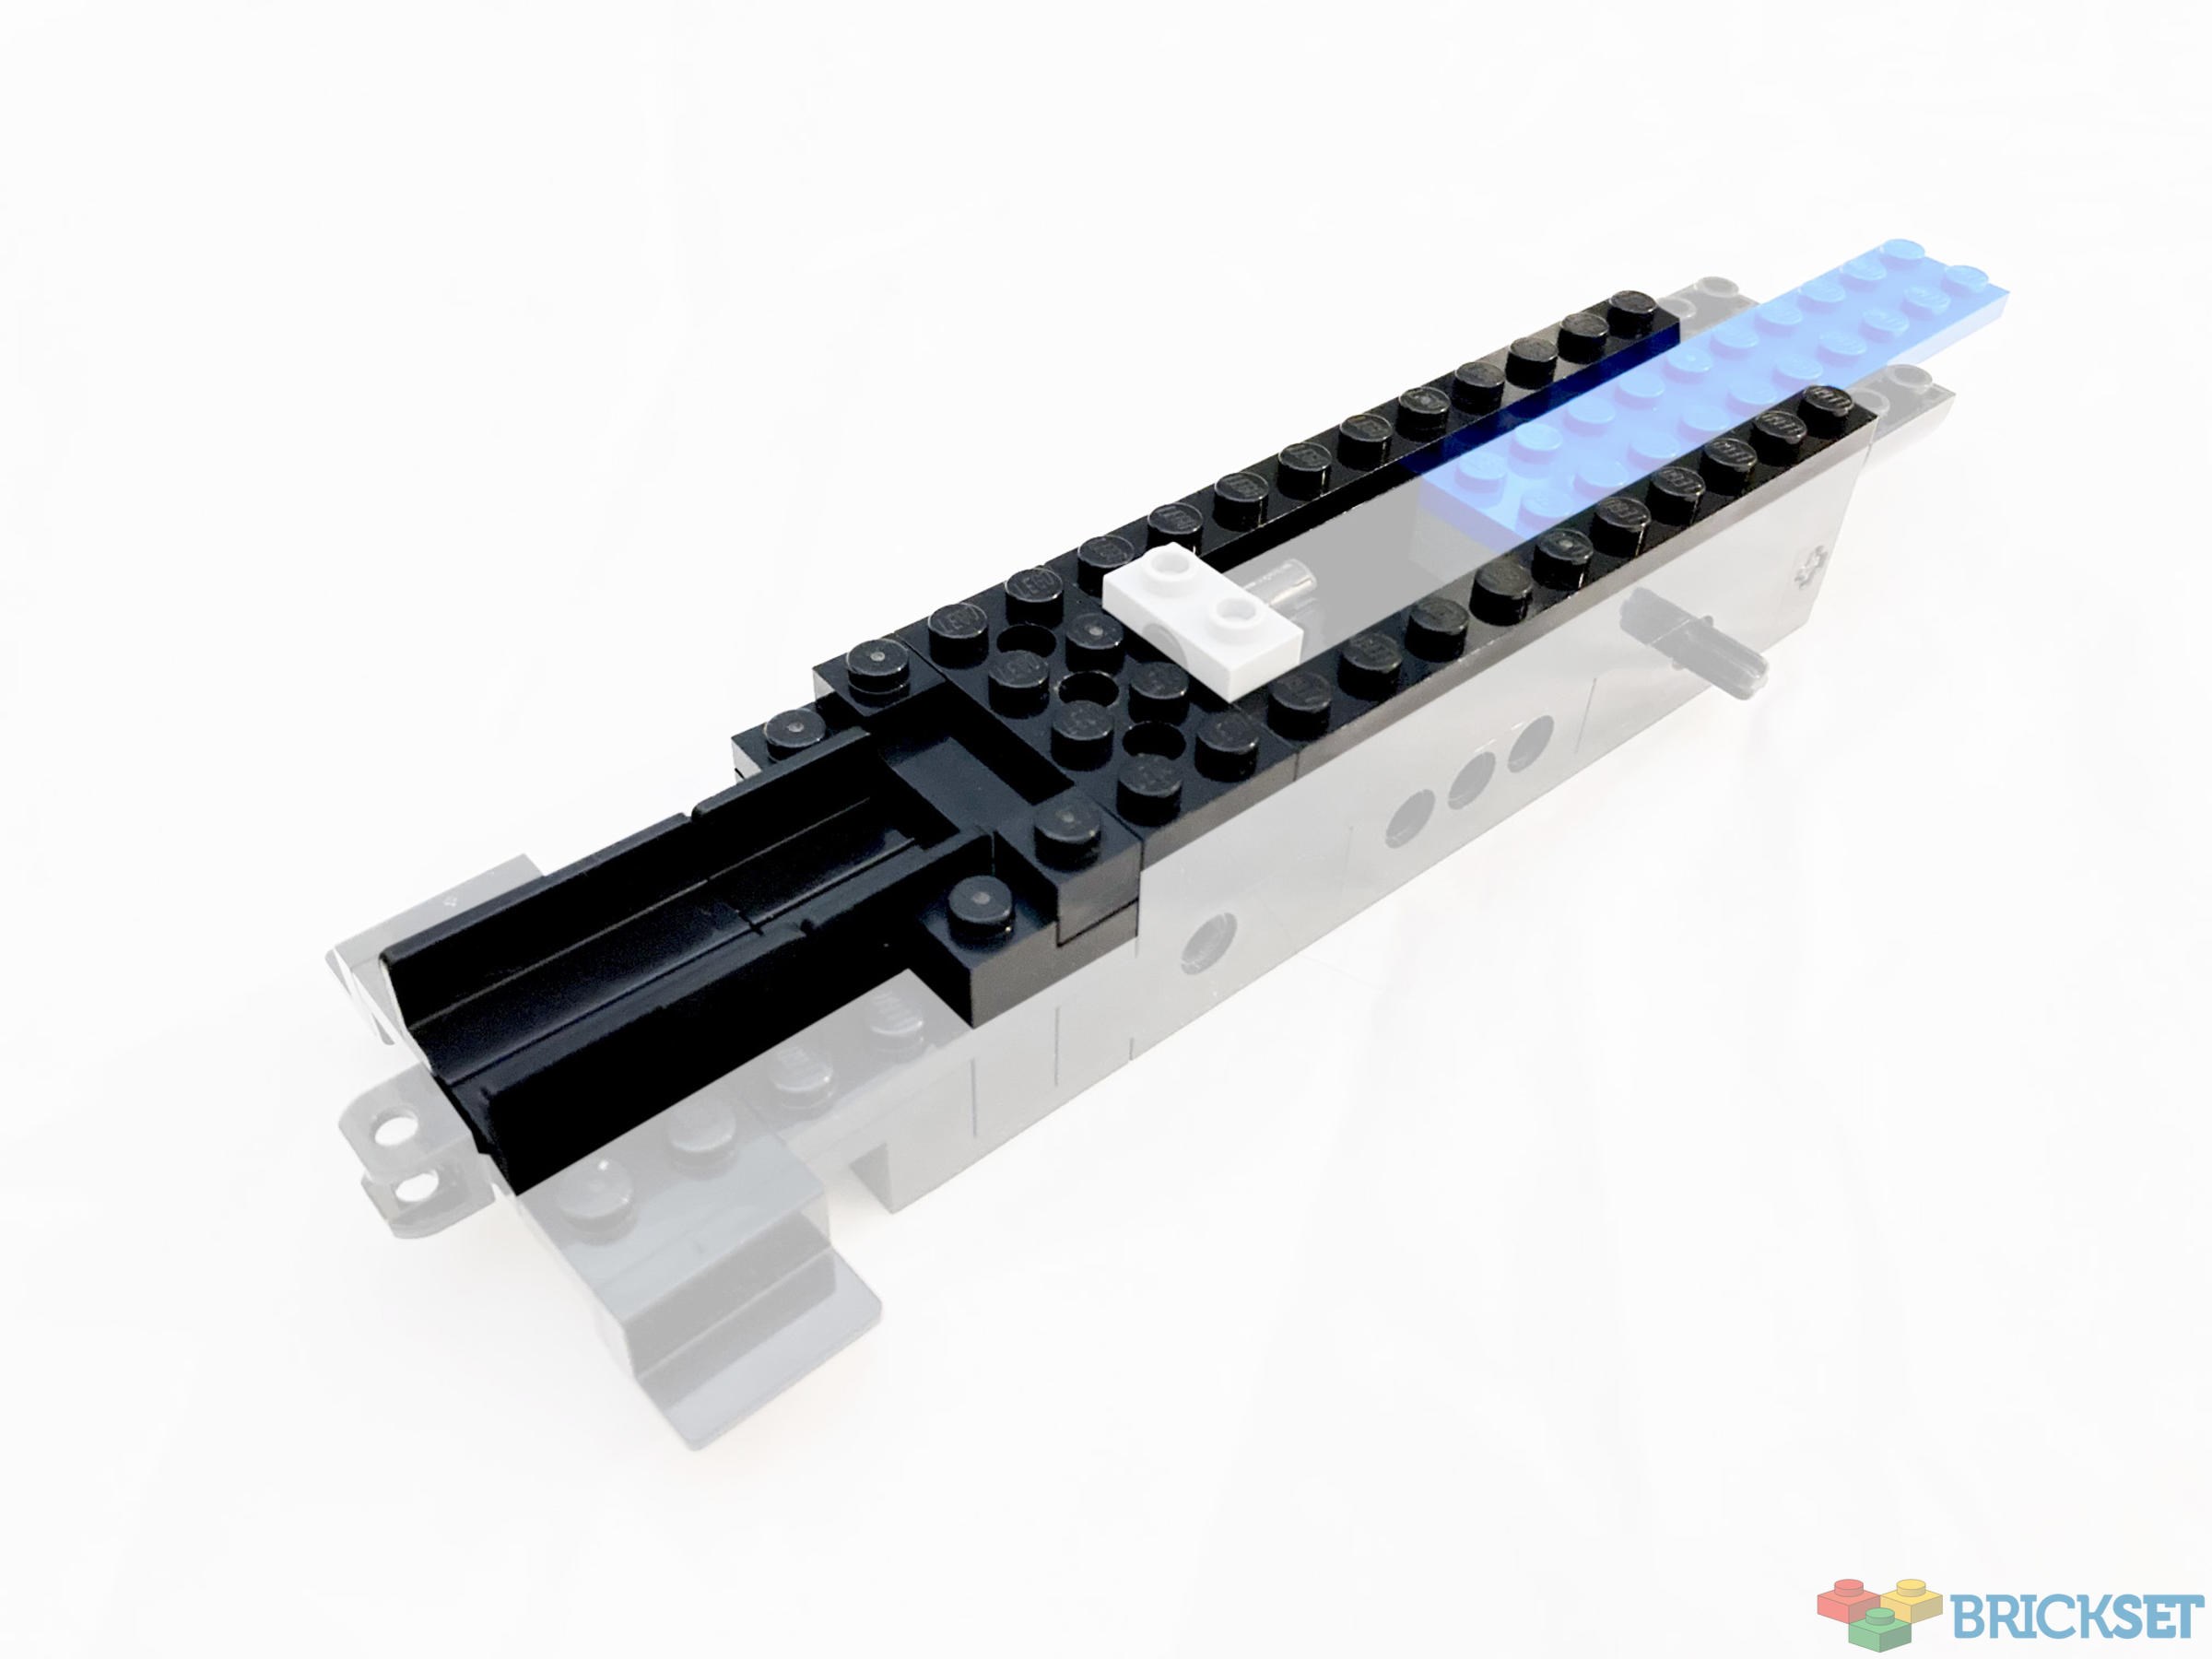
The gold pins secure the motor and prevent it from pivoting up and down from the forces at play. The gears are less inclined to slip this way.
You’ll notice that I did not grey out the cable. The position of it relative to the blue 1x4 plate and red 2x4 brick is very important, so optimal clarity was needed for this step. Keep a close eye the position of the cable in future steps.
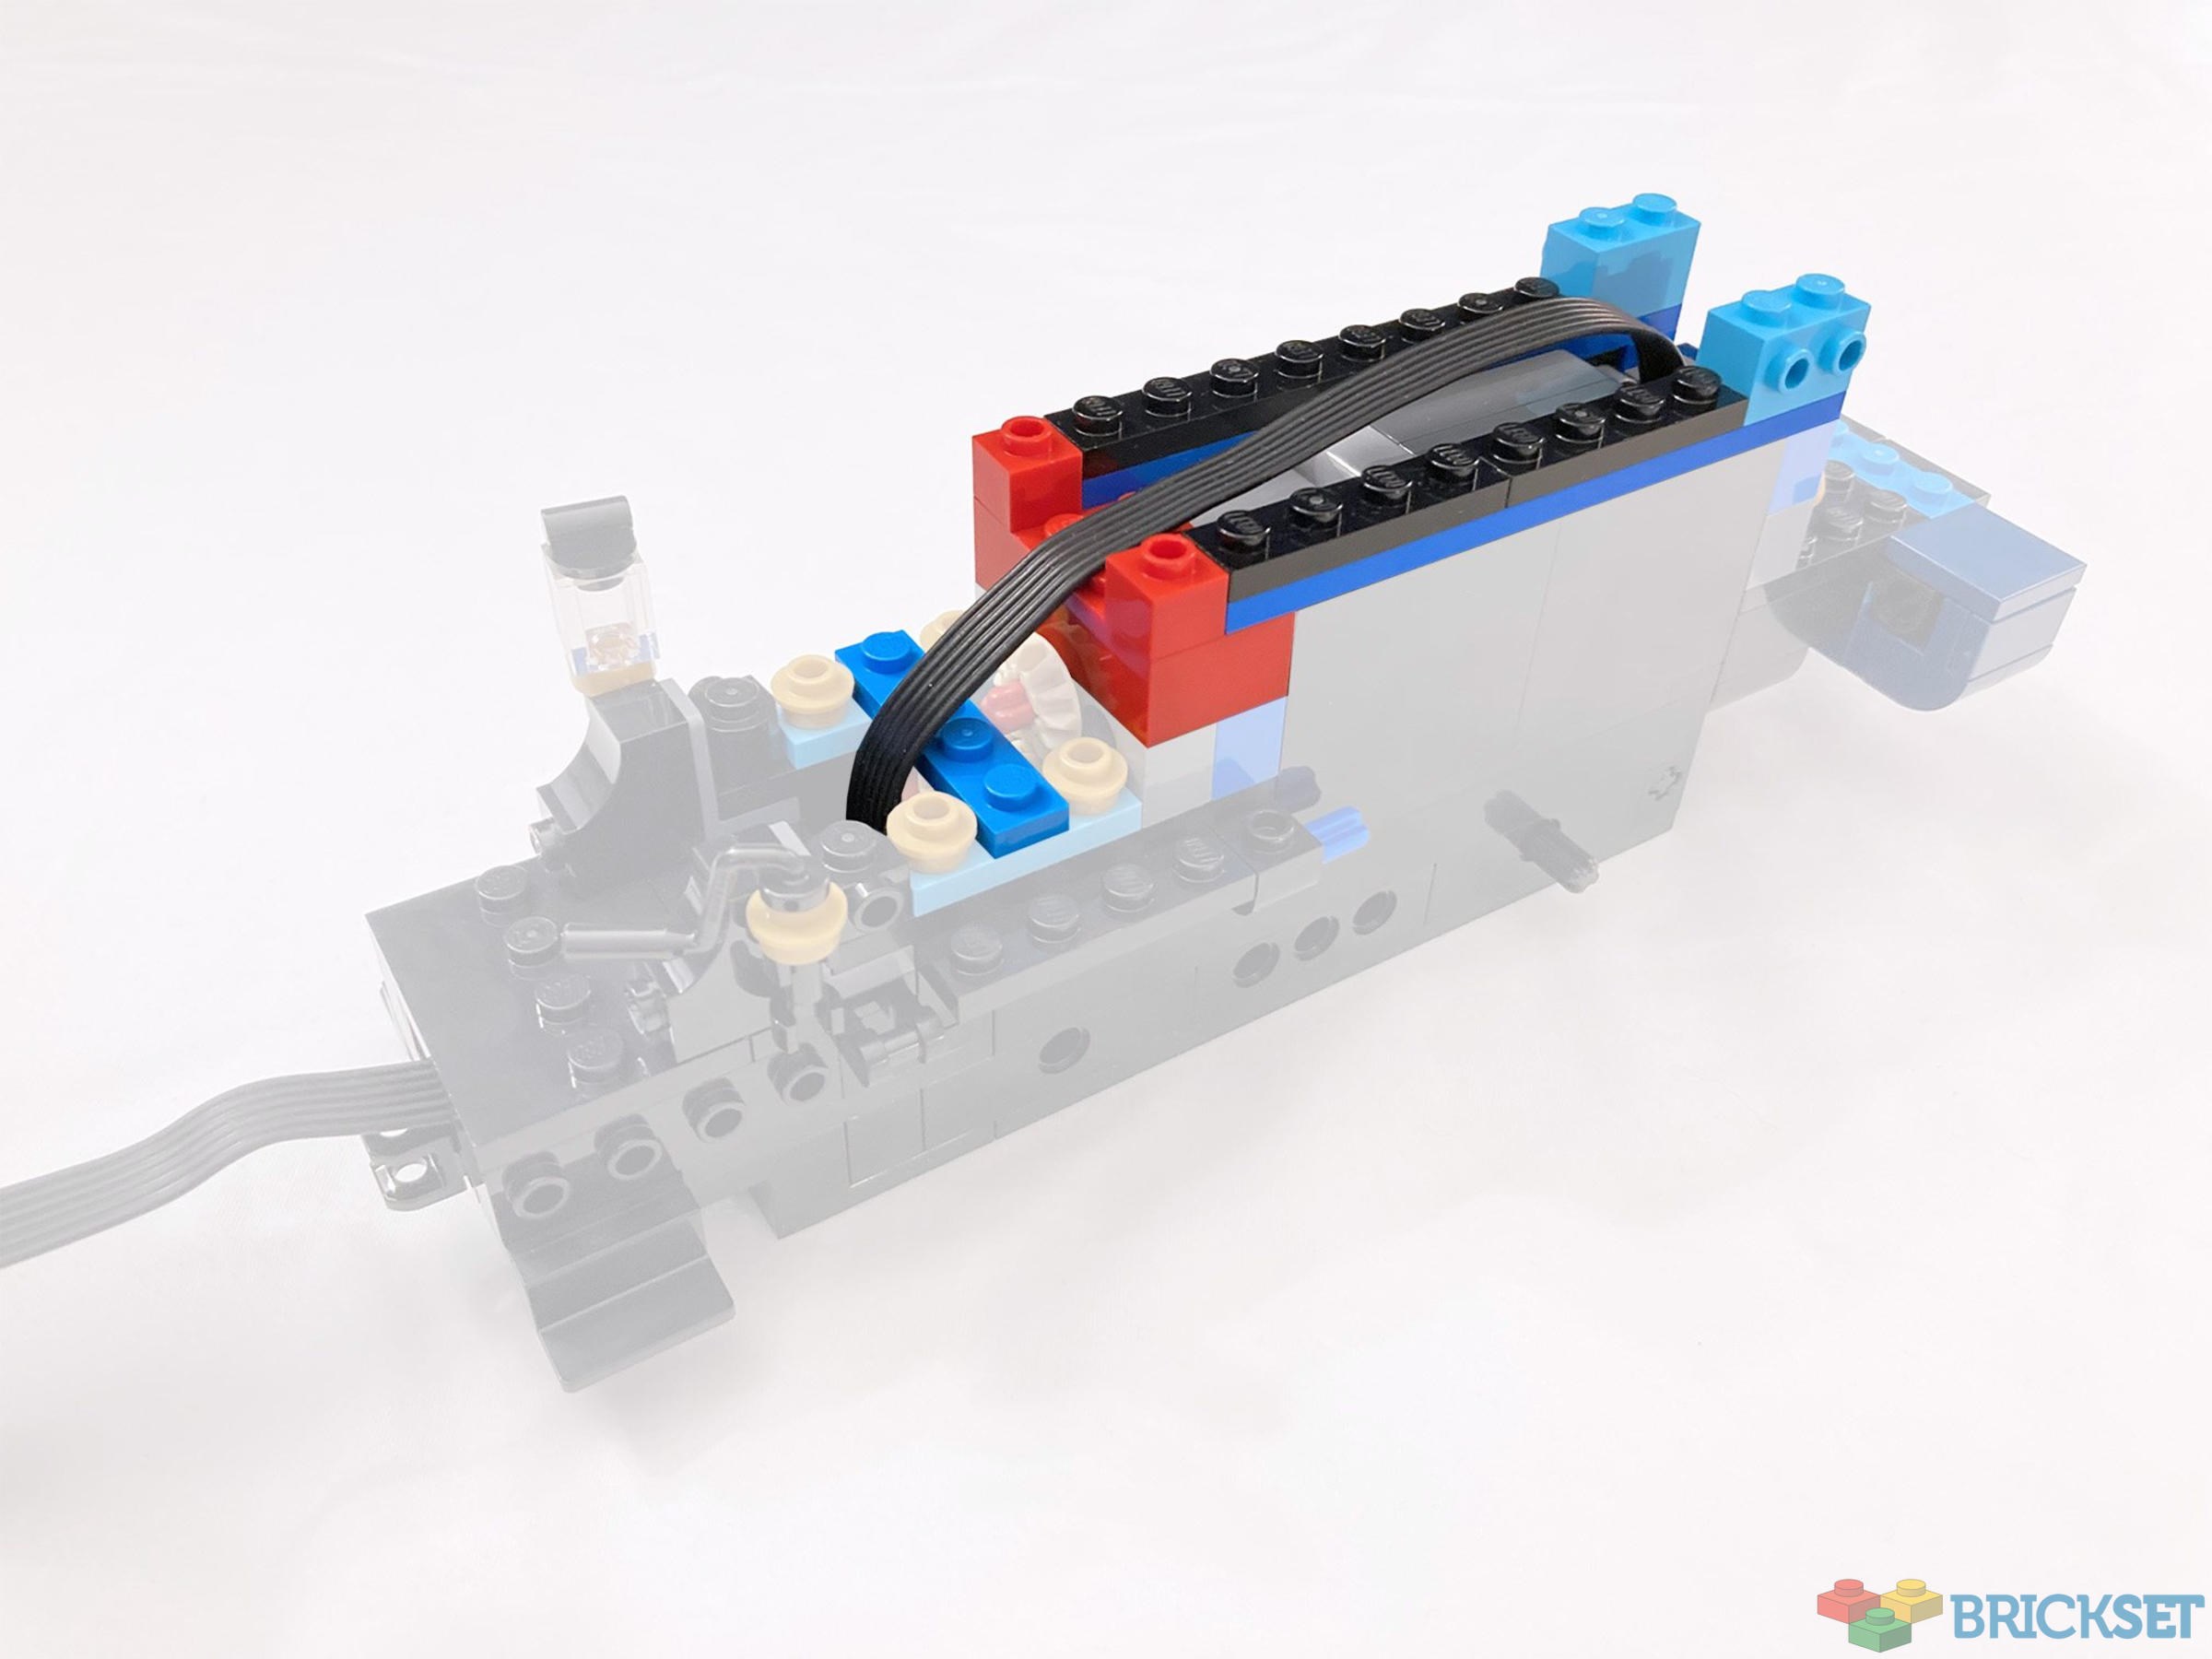
Ensure that the tan gear is placed on the right-hand (engineer’s) side of the locomotive. Otherwise, it will go backwards when you want to go full steam ahead!

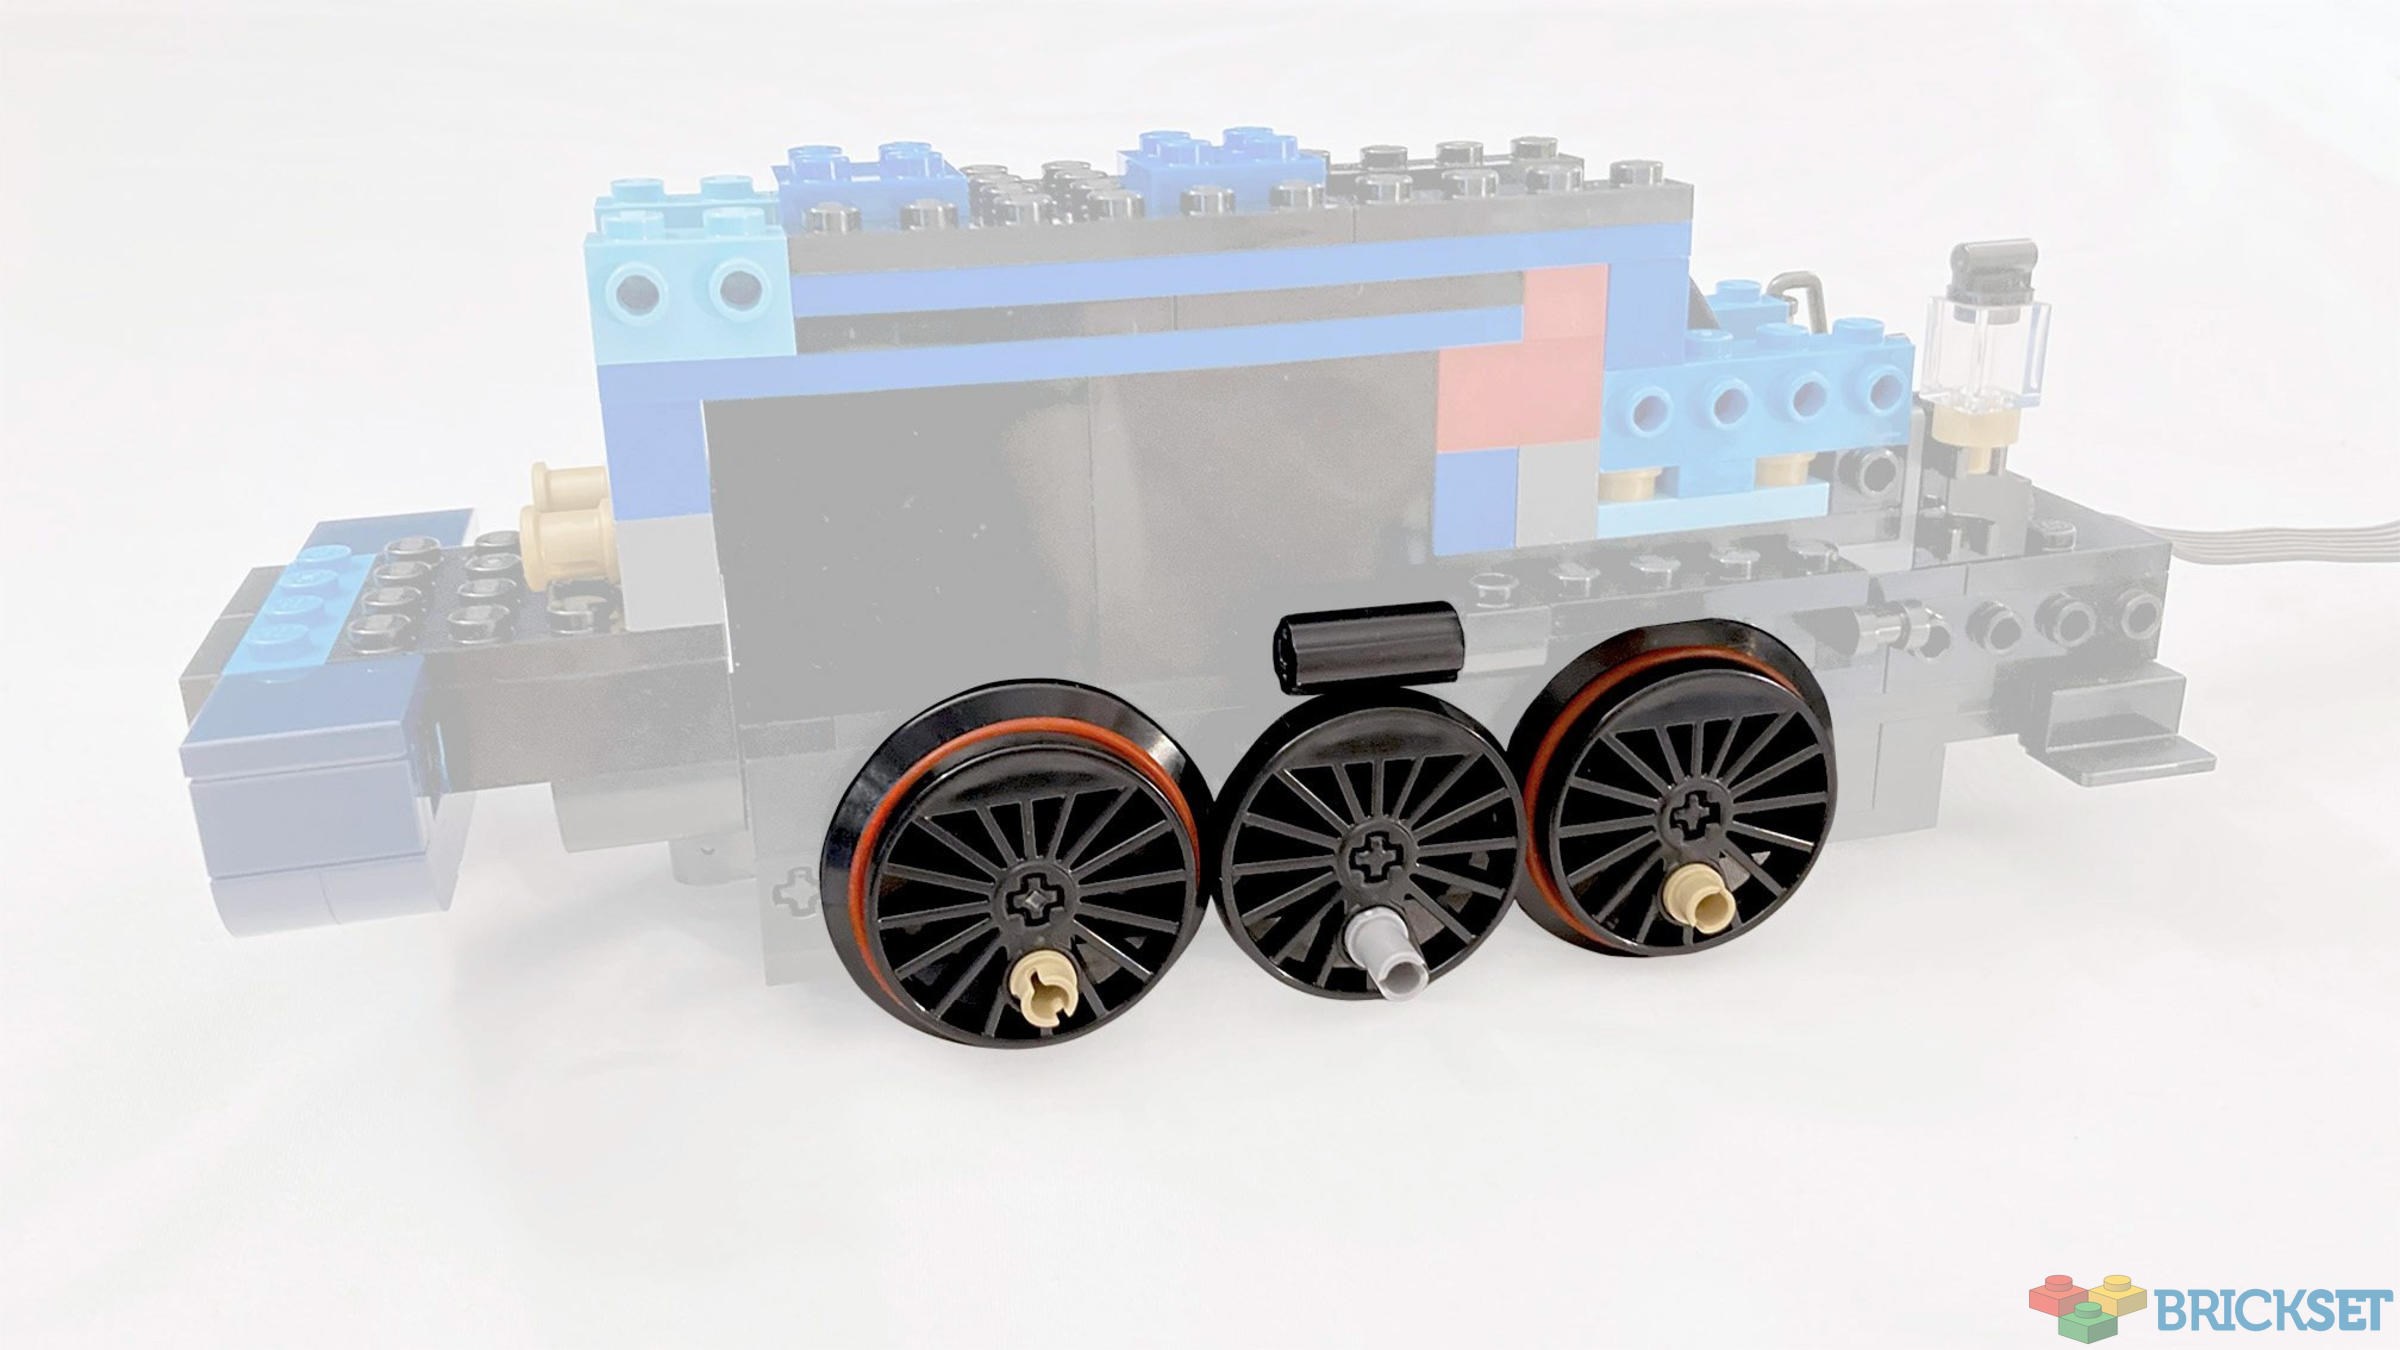
Note the position of the wheels. Make sure the pins are in the same position shown in the building instructions from the set for this side. Additionally, the red bands are key here. Make sure to add them to both wheels that have flanges. The flange is the extra extension around the rim of the wheel that acts as a guide to keep it on the tracks. Don’t skip over the black Technic connector as well!
Now just replace the connecting rod assembly.
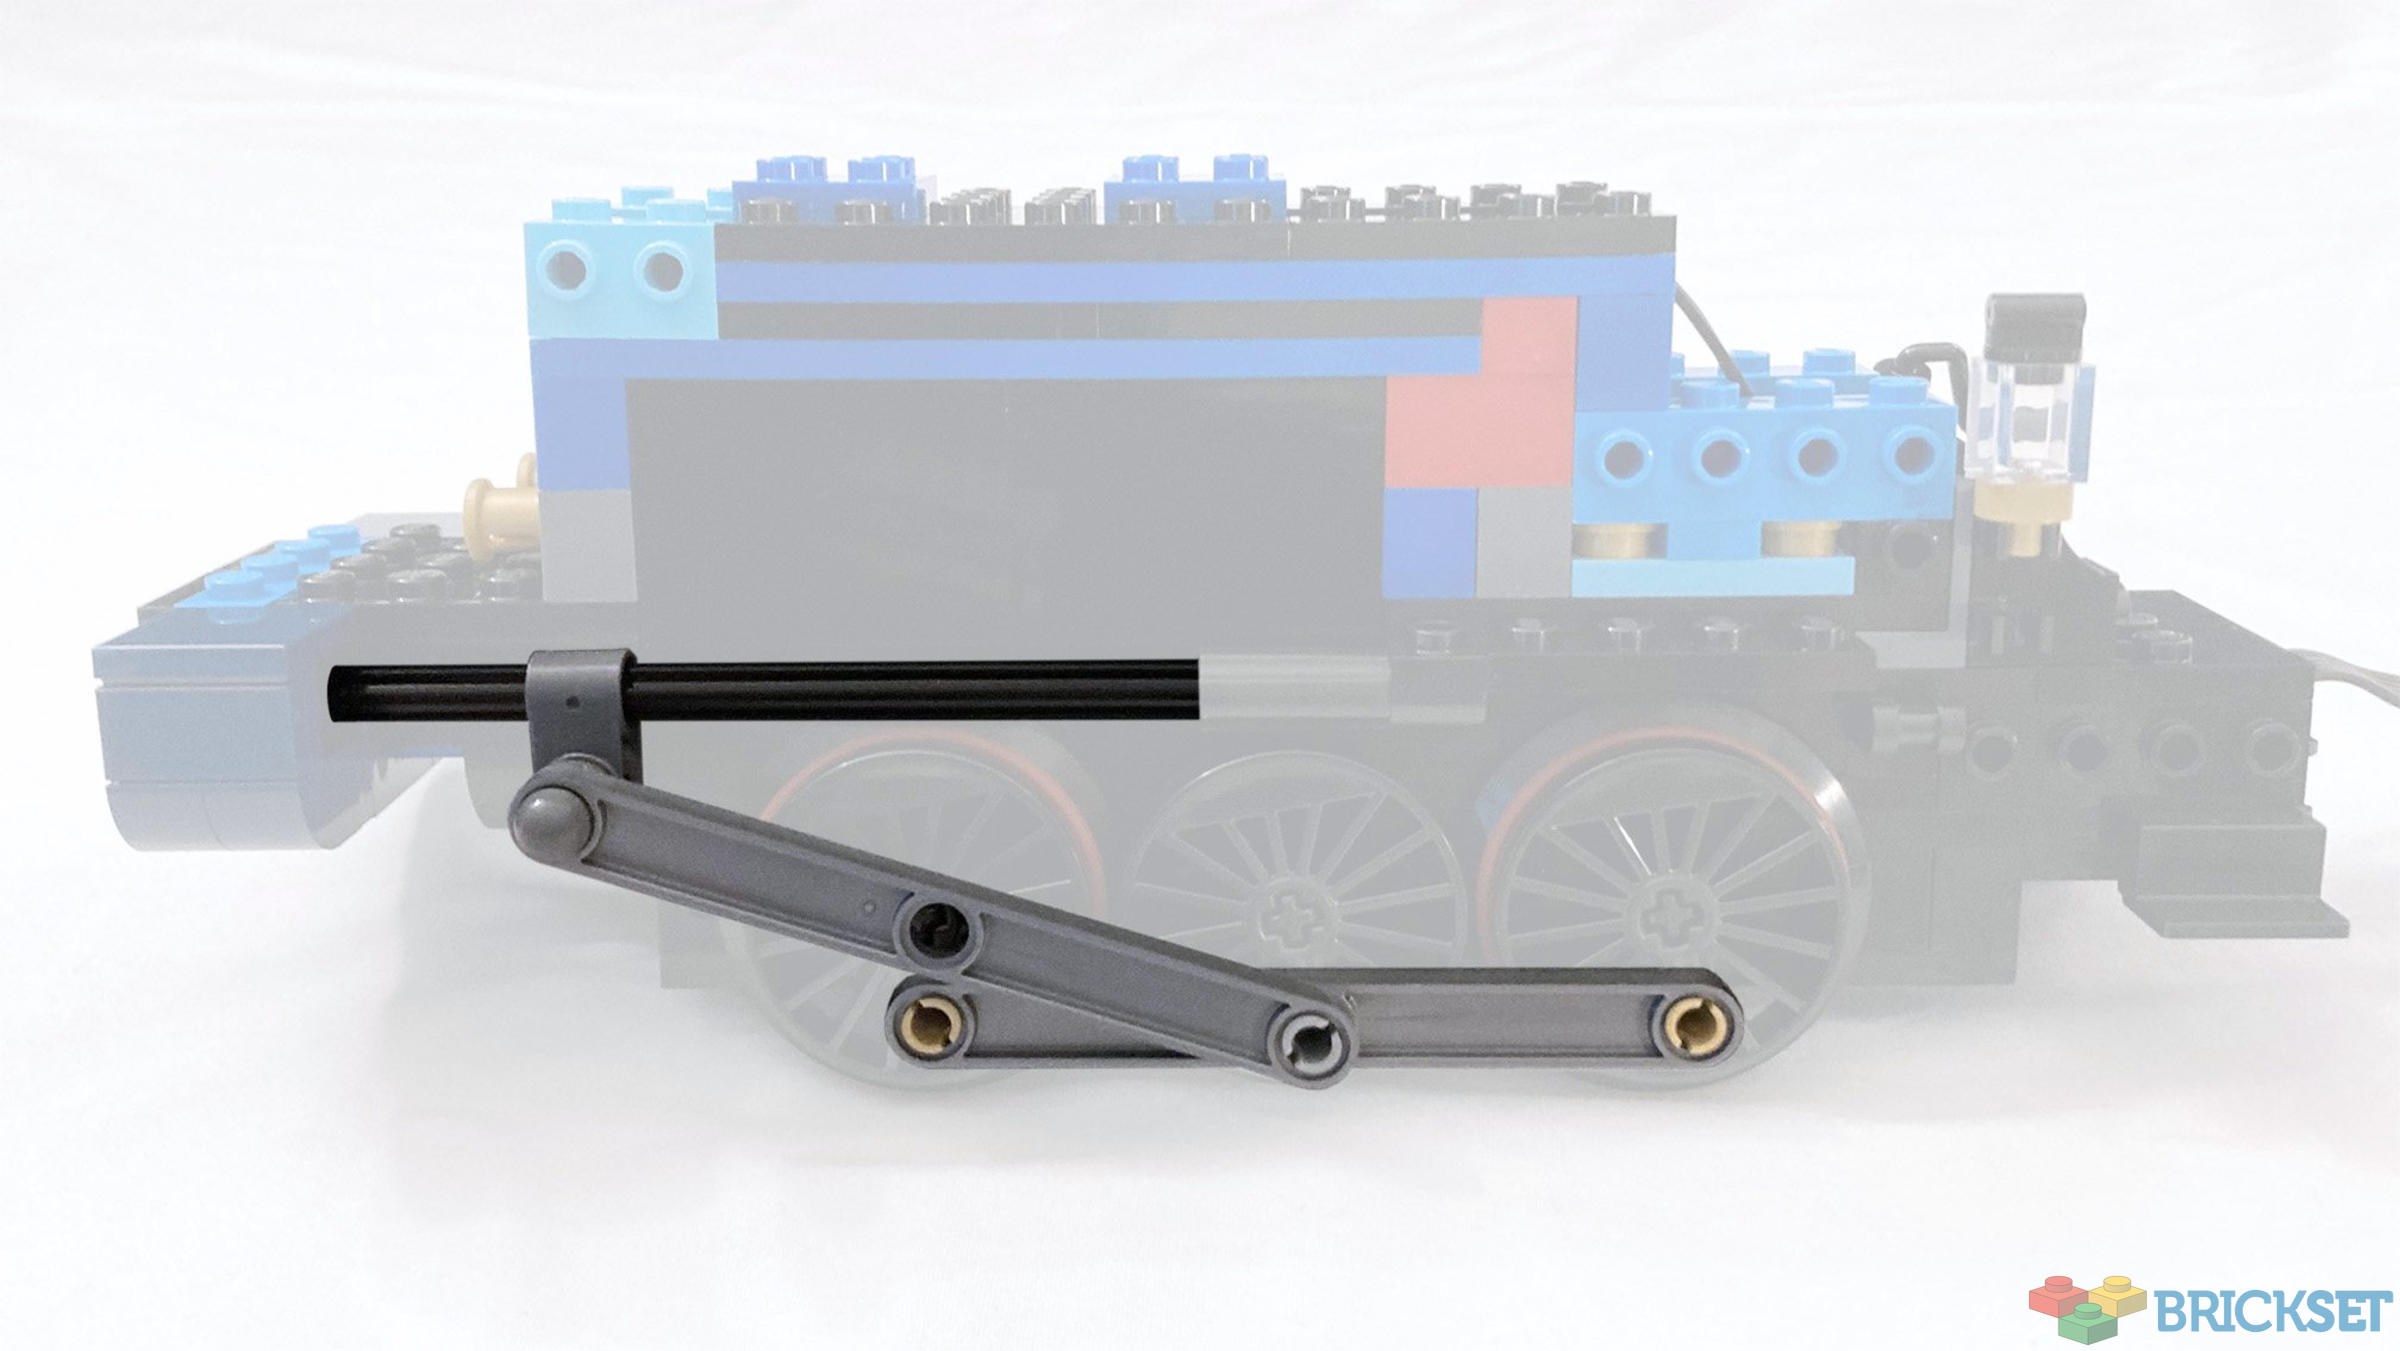
Repeat on the other side, with the exception of the 90-degree offset of the wheels. See the building instructions for the specifics of this alignment.
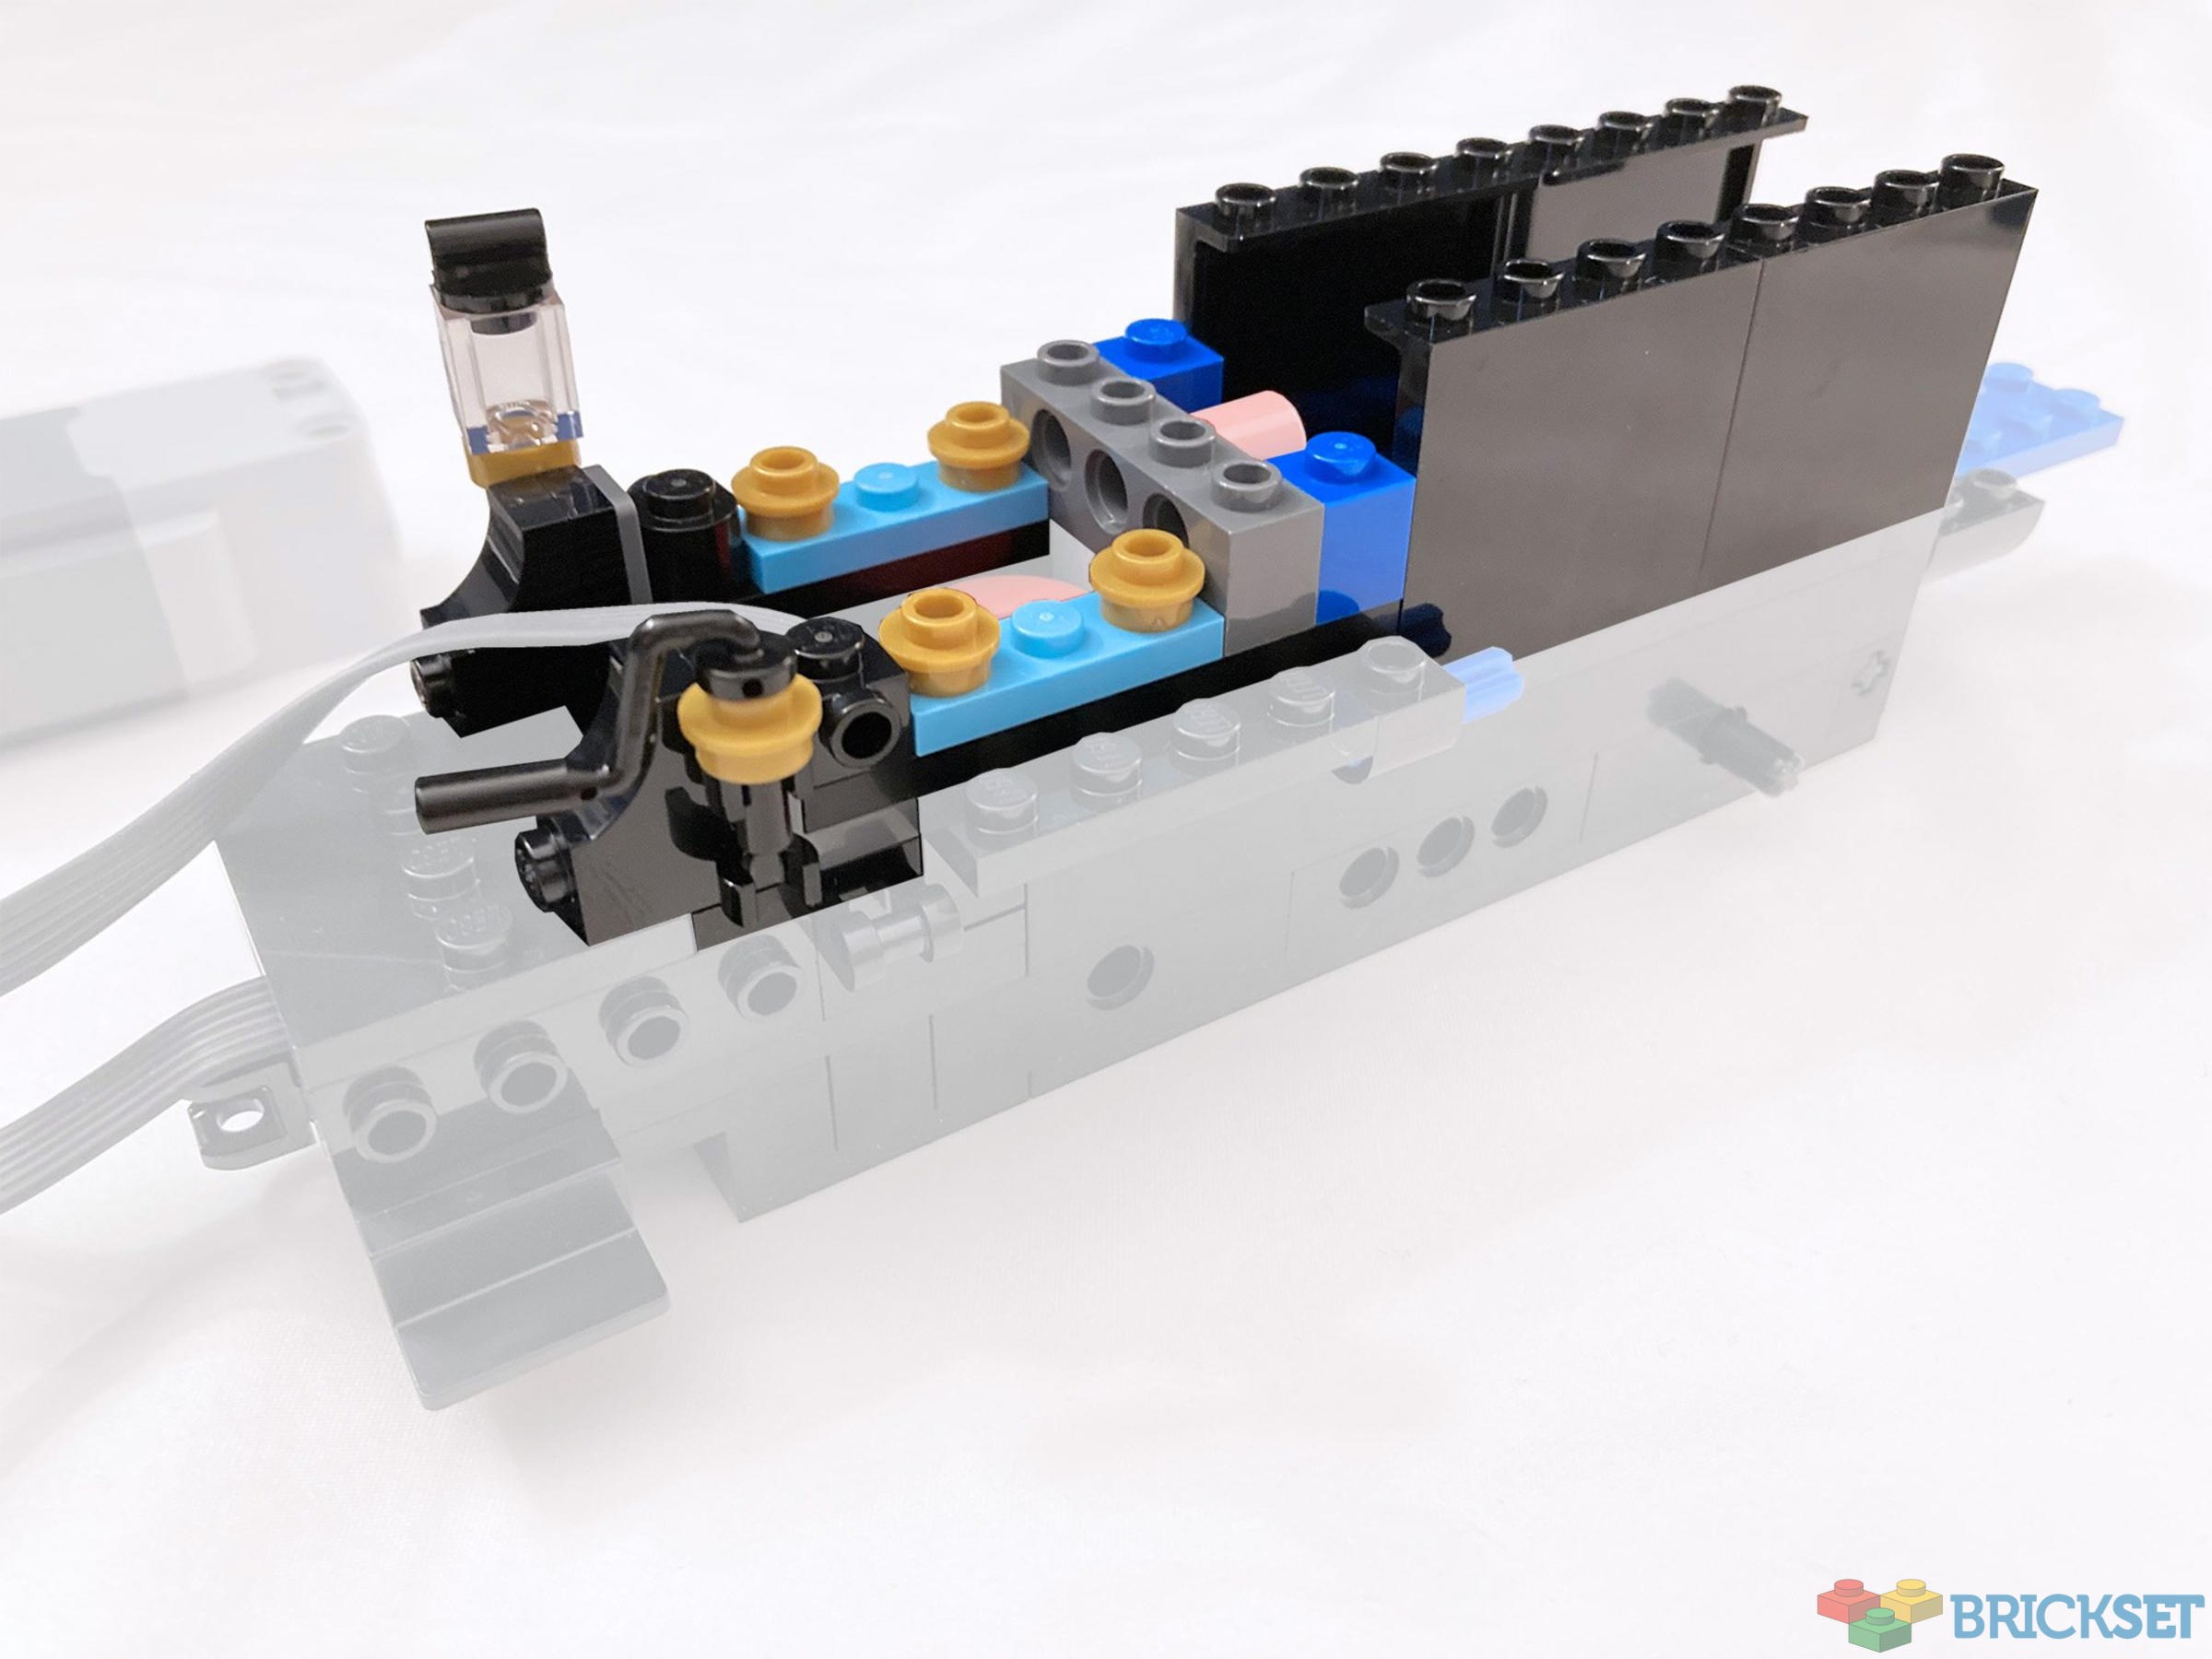
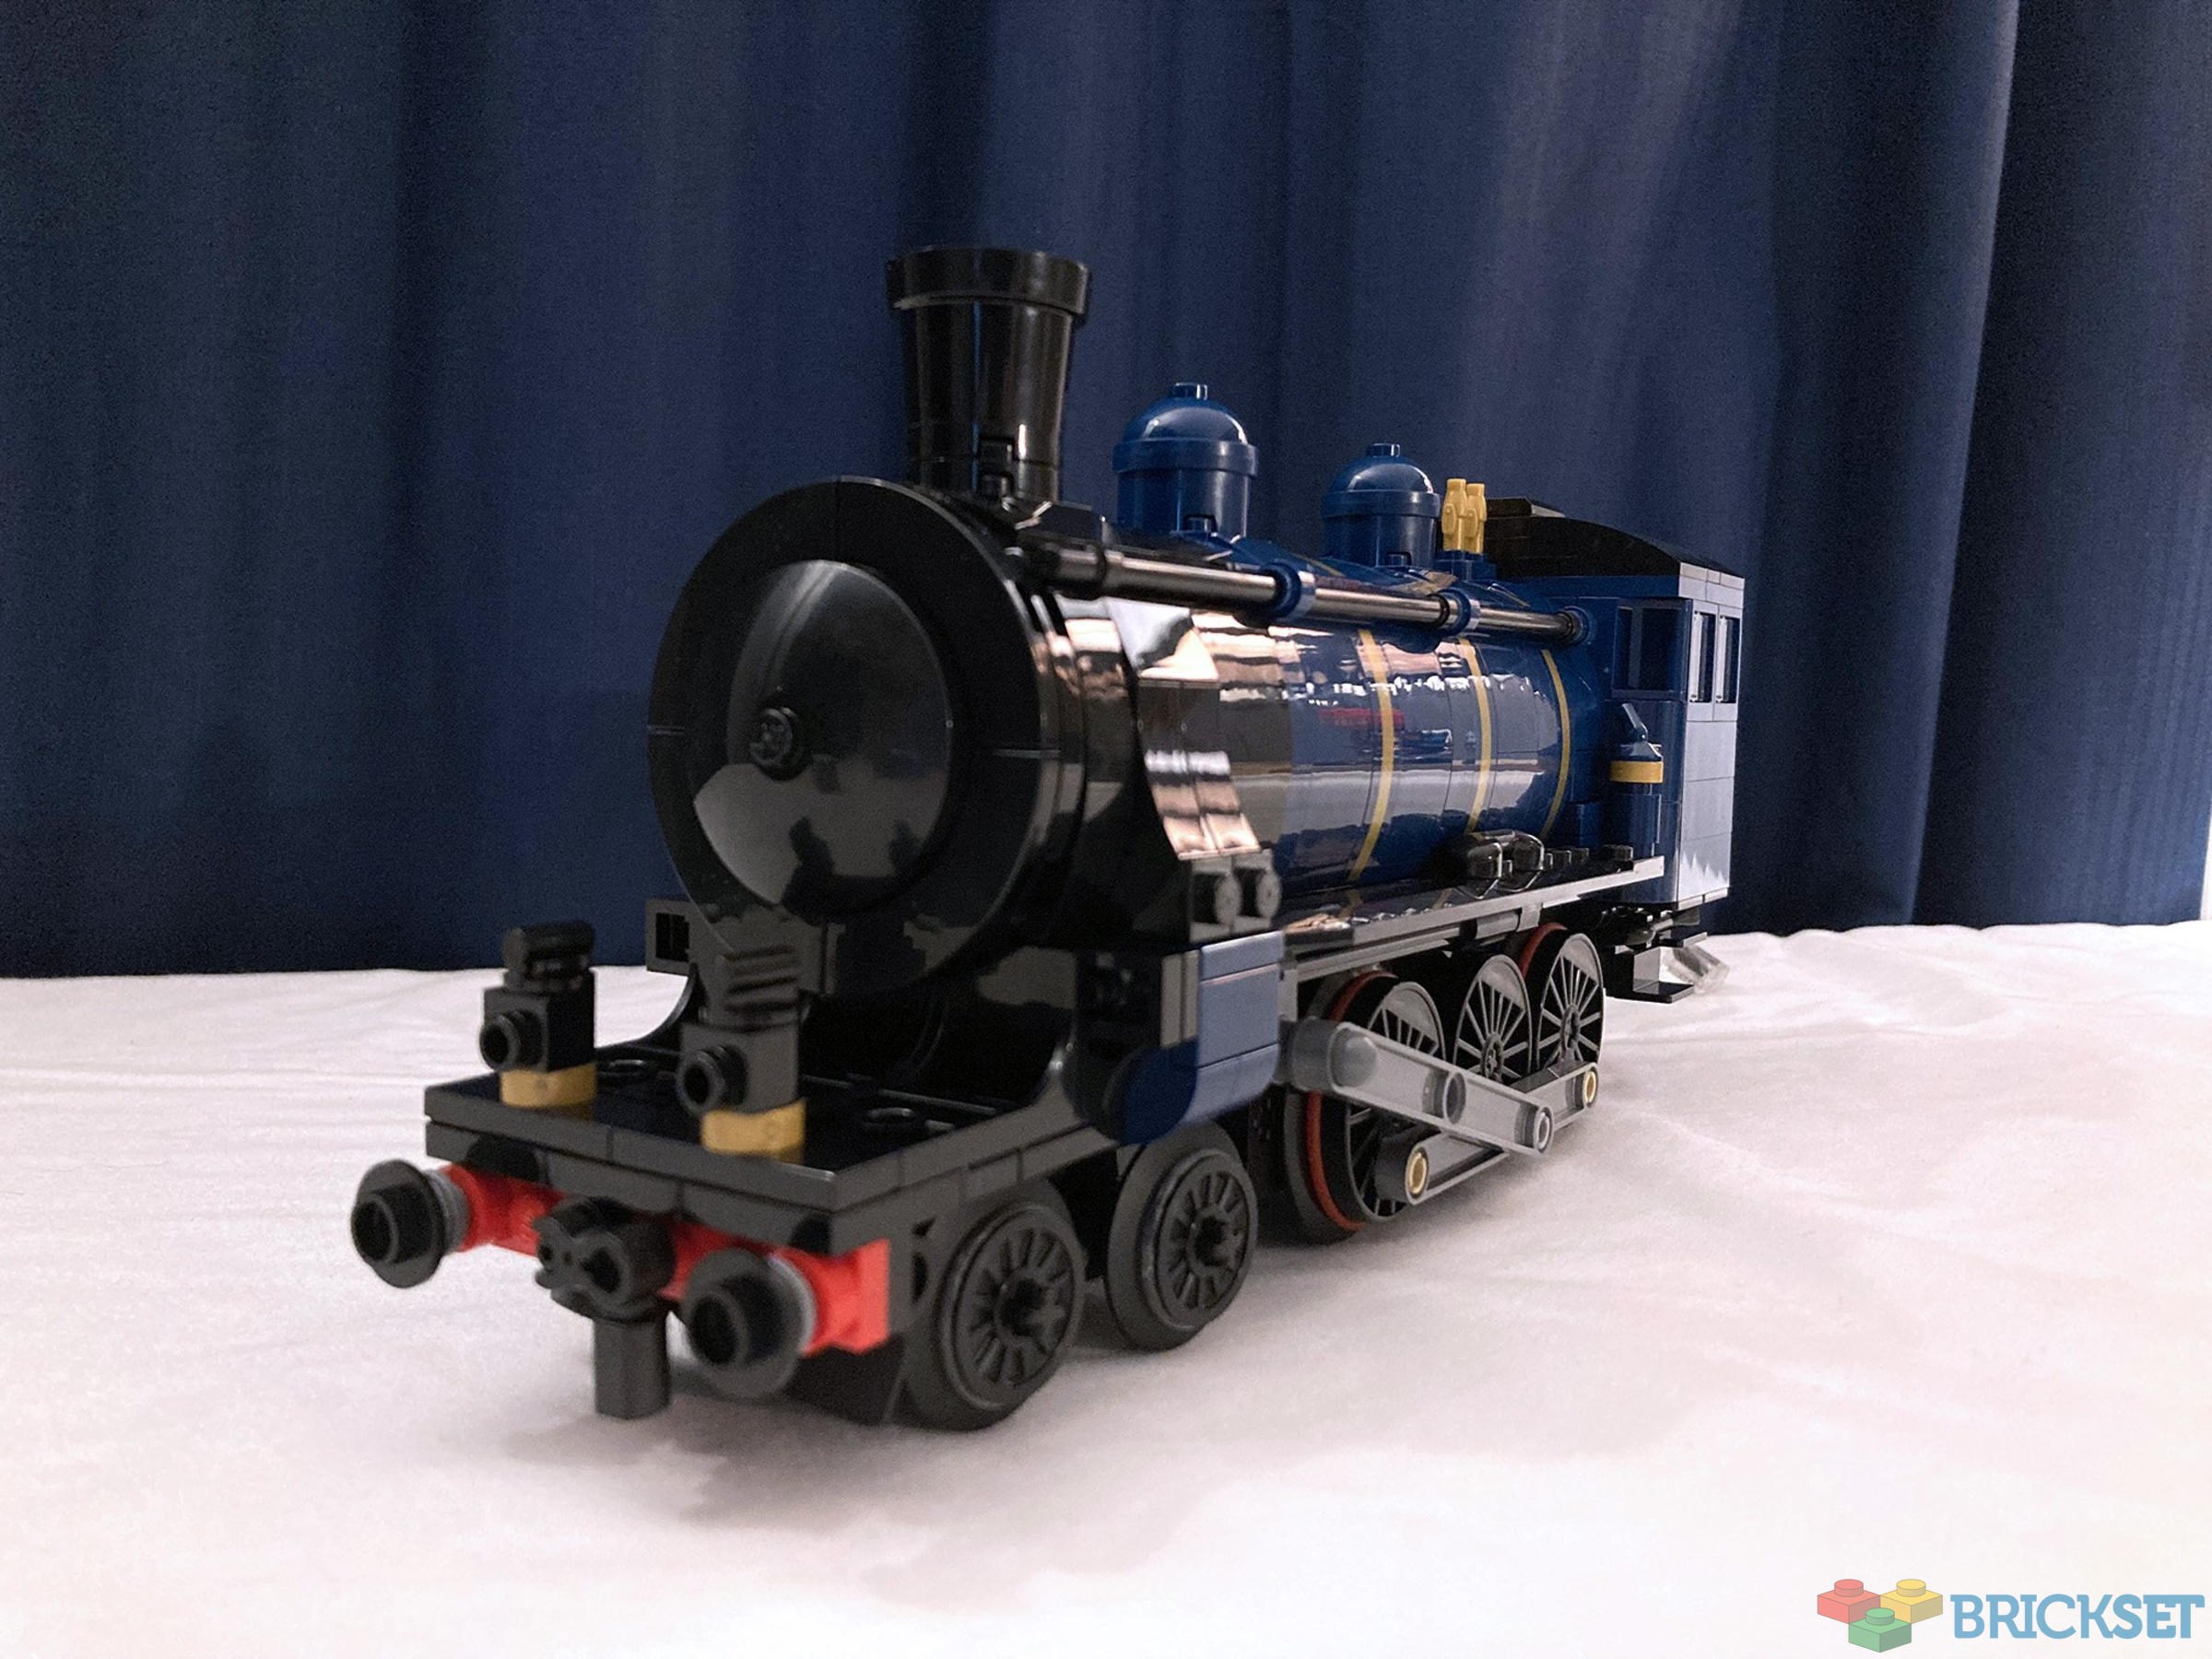
The modification to the locomotive’s internals is complete. Now simply replace all of the assemblies that you set aside at the start of this excursion. If you do, your locomotive should look like this!
We are currently taking a stop mid-trip to refill the fuel in the tender. Let me show you how we do it!
First, remove the top of the tender and the brown door as shown below.

Next, take the cable from the locomotive and pass it through the now-open doorway.
And lastly, plug the cable into socket A and place the hub all the way at the back of the tender. Ensure that the cable goes downward from the plug.
Just replace the top, and couple up to the locomotive!
You have now arrived at your destination. Please depart with your fully functioning locomotive. In order to operate it, please use the control profile for the Crocodile Locomotive in the LEGO Powered Up app.
We hope you had a fantastic experience, and that you will have many more with your fully operational Sapphire Star locomotive!
218 likes
76 comments on this article
Nothing is impossible with lego (Aside from creating life)
@beige2 said:
"Nothing is impossible with lego (Aside from creating life)"
You mean we can make functional time machines out of Lego?!? Time to upgrade my copy of the TARDIS set, then! ;-)
@Murdoch17 said:
" @beige2 said:
"Nothing is impossible with lego (Aside from creating life)"
You mean we can make functional time machines out of Lego?!? Time to upgrade my copy of the TARDIS set, then! ;-)"
Go for it! ;)
LEGO: Orient Express can't be motorized
This tutorial: X Doubt
Bravo Alex D!
Thank you for all your efforts to share this with the community.
Do you think that they will be phasing out motorization in Lego sets?
Can you make instructions for Power Functions?
I saw a lot of videos about this, and I don't know why Lego says that you can't fit a motor in that train...
@MZ_1 said:
"Can you make instructions for Power Functions?"
You would need room for the receiver unit, and from what I can see, it appears there is no room for that.
@person_that_uses_brickset said:
"Do you think that they will be phasing out motorization in Lego sets?"
I doubt it, but they’ll probably preserve it in sets that are relatively cheap. The Orient Express set is designed as a static model for adults and comes with a higher price tag as a consequence, which also made motorising it an unattractive prospect - or so I suspect. That said, reading this article does make that look like something of an oversight; it’s not as if Lego fans are shying away from high prices at the moment.
@Murdoch17 said:
"Time to upgrade my copy of the TARDIS set, then! ;-)"
I downgraded mine, reducing the footprint to 6x6 and shaving about an inch off the total height. Now it looks like a one-story version.
@BaconKing:
They never said it wouldn’t fit, or that it couldn’t work. They just said it was too heavy, referring to their specific restrictions. As I’ve said before, they may have to factor in the possibility that someone tries to run the full OE on a basic circle, at which point the second coach may indeed create too much drag.
Everyone: "How do you fit a motor in this train?"
Alex D.: "Hold my beer."
@Murdoch17 said:
" @beige2 said:
"Nothing is impossible with lego (Aside from creating life)"
You mean we can make functional time machines out of Lego?!? Time to upgrade my copy of the TARDIS set, then! ;-)"
After careful observation, I have discovered that the Lego TARDIS travels through time at a steady clip of one second per second. It works! It really works!!
Lego proclaiming that this set can't be motorized is just silly considering there have been a few MOC makers already who have done it and now here on Brickset.
@Ridgeheart said:
" @Murdoch17 said:
" @beige2 said:
"Nothing is impossible with lego (Aside from creating life)"
You mean we can make functional time machines out of Lego?!? Time to upgrade my copy of the TARDIS set, then! ;-)"
After careful observation, I have discovered that the Lego TARDIS travels through time at a steady clip of one second per second. It works! It really works!!"
Are you sure about that speed? I clocked it at 3600sec/hr...
@Thieraboss said:
"Lego proclaiming that this set can't be motorized is just silly considering there have been a few MOC makers already who have done it and now here on Brickset."
LEGO never claimed that the Orient Express could not be motorised, only that the model was too heavy for official motorisation. The requirements for anything to be motorised in a LEGO set will be extremely stringent, probably far more so than most would consider necessary.
@Ridgeheart said:
" @Murdoch17 said:
" @beige2 said:
"Nothing is impossible with lego (Aside from creating life)"
You mean we can make functional time machines out of Lego?!? Time to upgrade my copy of the TARDIS set, then! ;-)"
After careful observation, I have discovered that the Lego TARDIS travels through time at a steady clip of one second per second. It works! It really works!!"
If you want it to move faster through time, drop it out a window :)
Great tutorial, but where is the video of the train action?
Since even before it was available on retail there were dozens of these tutorials online , it's safe to say that it's a non-issue and complete BS. This train can not only be motorized but very easily so. There reason it's not motorized by Lego is not a functional reason, but another one.
Great walkthrough, I'm sure it'll help many train fans!
@ecleme11 said:
" @Ridgeheart said:
" @Murdoch17 said:
" @beige2 said:
"Nothing is impossible with lego (Aside from creating life)"
You mean we can make functional time machines out of Lego?!? Time to upgrade my copy of the TARDIS set, then! ;-)"
After careful observation, I have discovered that the Lego TARDIS travels through time at a steady clip of one second per second. It works! It really works!!"
If you want it to move faster through time, drop it out a window :)"
Or find a good catapult....
@AverageChimaEnjoyer - Your comment had me laughing!
@woosterlegos - thank you so much!
@labrat - I ought to make a meme out of this.
@CapnRex101 - That's my guess too.
@thor96 - I knew someone would ask for video! I'll upload one tonight and post a link in a new comment here.
@elangab - Yep. I've been here since the start. I was part of the thread RacingBrick mentioned in his video. That's why our solutions are so similar. He adapted his from mine with permission.
Also this whole unexpected TARDIS thread is delightfully silly and put a big ol' grin on my face! Keep it coming!
When it comes to motorization, these are some points to consider:
A brushed DC motor (most if not all LEGO motors) have internal winding (armature) resistance. The more current the motor draws, the more power is being dissipated in the winding.
Torque is proportional to current since the torque is produced by the interaction of two orthogonal magnetic fluxes in the air gap. The stator flux is produced by permanent magnets while the rotor flux is produced by the armature current. The rotor magnetic field is held orthogonal to the stator magnetic field with the use of brushes.
The higher the load (opposing torque), the more current is being drawn from the DC source, which is typically a set of batteries. If the current draw is too high, the voltage drop across the armature resistance is high, which results in a lower voltage allowance for back-electro-magnetomotive-force (bEMF). This means that the motor will not be able to run as fast as with a lower load, provided the same DC voltage.
This is why you will not see a lot of Orient Express train videos pulling both cars. The train is simply too heavy for a single motor. The current draw is high, which reduces maximum speed due to armature resistance. Furthermore, the power dissipation in the DC motor can be quite high, which results in increased winding temperature.
The typical approach in such cases is to use (in the real world) two or more locomotives to reduce the torque production requirement of each motor. In this case, I can see the Orient Express to be motorized using two motors.
Source: PhD in motor design and motor control :).
@tomthepirate said:
"When it comes to motorization, these are some points to consider:
A brushed DC motor (most if not all LEGO motors) have internal winding (armature) resistance. The more current the motor draws, the more power is being dissipated in the winding.
Torque is proportional to current since the torque is produced by the interaction of two orthogonal magnetic fluxes in the air gap. The stator flux is produced by permanent magnets while the rotor flux is produced by the armature current. The rotor magnetic field is held orthogonal to the stator magnetic field with the use of brushes.
The higher the load (opposing torque), the more current is being drawn from the DC source, which is typically a set of batteries. If the current draw is too high, the voltage drop across the armature resistance is high, which results in a lower voltage allowance for back-electro-magnetomotive-force (bEMF). This means that the motor will not be able to run as fast as with a lower load, provided the same DC voltage.
This is why you will not see a lot of Orient Express train videos pulling both cars. The train is simply too heavy for a single motor. The current draw is high, which reduces maximum speed due to armature resistance. Furthermore, the power dissipation in the DC motor can be quite high, which results in increased winding temperature.
The typical approach in such cases is to use (in the real world) two or more locomotives to reduce the torque production requirement of each motor. In this case, I can see the Orient Express to be motorized using two motors.
Source: PhD in motor design and motor control :)."
Counterpoint: I saw video on Flickr by Nick Jackson of the original OE set loco hauling four of the OE coaches: https://www.flickr.com/photos/94581721 @N06/53376934278/in/dateposted/
...and before anyone says otherwise, yes it's the original loco, but recolored to dark green. It's NOT the Chinese knockoff.
@Train_of_Thought_Creations said:
" @elangab - Yep. I've been here since the start. I was part of the thread RacingBrick mentioned in his video. That's why our solutions are so similar. He adapted his from mine with permission!"
It wasn't about who did it first or not, it was about the fact that many found all kind of ways to motorize this set very easily - and if users can do it, TLG could've.
@elangab said:
"It wasn't about who did it first or not, it was about the fact that many found all kind of ways to motorize this set very easily - and if users can do it, TLG could've."
My apologies. That's a miscommunication from my end that I did not intend to come across that way. It was my way of sharing that I see what your saying since I saw the multitude of solutions as they were rapidly coming out.
Do the red bands also come in black?
@Train_of_Thought_Creations said:
" @elangab said:
"It wasn't about who did it first or not, it was about the fact that many found all kind of ways to motorize this set very easily - and if users can do it, TLG could've."
My apologies. That's a miscommunication from my end that I did not intend to come across that way. It was my way of sharing that I see what your saying since I saw the multitude of solutions as they were rapidly coming out."
I find your solution to be the most elegant and seamless, and will be sure to implement that one once I get the set, so I do appreciate and thank you for sharing it with us! :)
@elangab said:
" @Train_of_Thought_Creations said:
" @elangab said:
"It wasn't about who did it first or not, it was about the fact that many found all kind of ways to motorize this set very easily - and if users can do it, TLG could've."
My apologies. That's a miscommunication from my end that I did not intend to come across that way. It was my way of sharing that I see what your saying since I saw the multitude of solutions as they were rapidly coming out."
I find your solution to be the most elegant and seamless, and will be sure to implement that one once I get the set, so I do appreciate and thank you for sharing it with us! :)"
You're welcome! If you need any help with it, or come up with any improvements/mixes with the others' designs, feel free to reach out!
Is it possible to add a second motor (powered up train motor) under the tender as well to add some speed / reduce load on the single motor?
I don't own the OE, but this guide looks well one! The fading of parts makes this seem very clear.
With all this talk of drag, how does the locomotive perform with this motor setup? Is there anything indicating it can't work, as per lego's suggestion?
@darthnorman said:
"Do the red bands also come in black?"
Technically yes, but you don't want them. They came in three sets, but the most recent are from the early 2000's era when rubber bands were disintegrating when you looked at them funny. Tire did the same thing too, or turn into goo.
@Binnekamp said:
"I don't own the OE, but this guide looks well one! The fading of parts makes this seem very clear.
With all this talk of drag, how does the locomotive perform with this motor setup? Is there anything indicating it can't work, as per lego's suggestion?"
This motor setup has worked fine for me since I built it on the 1st. It pulls the two coaches just fine, so it appears to be a case of the performance not being within the buffer zones of LEGO's own standards. I should have a video of it running out sometime tonight.
@AverageChimaEnjoyer said:
"LEGO: Orient Express can't be motorized
This tutorial: X Doubt"
More like
LEGO: "Orient Express can't be motorized [unless you are willing to make the investment in additional parts of which we will not do so as to avoid pricing this product to avoid lower sales/ridicule/negativity...and we are NOT responsible if you burn out your motors due to the added strain...those are all on you]
On the subject of the TARDIS, I’m curious if someone has motorized the TARDIS so when it’s on a track it is moving and spinning at same time.
@Murdoch17 said:
" @MZ_1 said:
"Can you make instructions for Power Functions?"
You would need room for the receiver unit, and from what I can see, it appears there is no room for that."
Not entirely true. If you have a PF Li-poly battery box, it has a built-in speed control. Nobody in my LUG does this, but one of the charter members who sorta split off to form WMLUG says they do this. If you connect a PF train motor directly to the rechargeable pack, you can set the speed with the built-in regulator, and then just hit the power button to get it started. Stopping it is a bit messier, and you’ll need to do that if you want to adjust the speed. You also need to be able to quickly replace any components that need to be removed to access the power switch, or just build in something you can hit on the exterior that will press down on the button for you. Turn it on, and without direct control, it’ll start moving at the preset speed right away.
@Mister_Jonny:
I’m guessing you don’t build a lot of MOCs? Even pulling a bunch of the 378pcs from my own collection, I still spent about $150 to build a 6-wide, minifig-scale Mater (a lot of that was spent on shipping). Home Alone has been two copies of the set, plus another $100 in parts, just to add the missing wings and garage, and I still need to include the circle drive in the front yard, and build a better van. Most of the people who are likely to motorize this set, especially those who aren’t seeking out how-to articles like this, already build far more complex and expensive train engines that don’t even include any rolling stock.
@darthnorman said:
"Do the red bands also come in black?"
Sure, eventually. Just don’t clean them when they get dirty.
@Murdoch17:
Different parts entirely. The steam drivers use injection-molded Technic drive belts, like the Bohrok used. You’re thinking of the extruded Aquazone-style rubber bands that are cut off a continuous tube of material. The former are much less stretchy than the latter, but they don’t degrade like the black rubber bands used in the Turaga sets. However, if you try to sub them in for sets that use the black ones, you might find that you’ll easily exceed their elastic limit, and they’ll become permanently stretched like the neck hole on a borrowed sweater.
@LuvsLEGO_Cool_J:
Sort of? I mean, I pointedly go out of my way to make sure I never place it on a track, so it’s really only motorized to produce the type of motion it exhibits when sitting stationary on a layout, but it’s a start, yes?
@Murdoch17 said:
" @beige2 said:
"Nothing is impossible with lego (Aside from creating life)"
You mean we can make functional time machines out of Lego?!? Time to upgrade my copy of the TARDIS set, then! ;-)"
Every time I start playing with LEGO for a quick five minutes, I find I am transported to about three hours in the future.
@tomthepirate said:
"When it comes to motorization, these are some points to consider:
A brushed DC motor (most if not all LEGO motors) have internal winding (armature) resistance. The more current the motor draws, the more power is being dissipated in the winding.
Torque is proportional to current since the torque is produced by the interaction of two orthogonal magnetic fluxes in the air gap. The stator flux is produced by permanent magnets while the rotor flux is produced by the armature current. The rotor magnetic field is held orthogonal to the stator magnetic field with the use of brushes.
The higher the load (opposing torque), the more current is being drawn from the DC source, which is typically a set of batteries. If the current draw is too high, the voltage drop across the armature resistance is high, which results in a lower voltage allowance for back-electro-magnetomotive-force (bEMF). This means that the motor will not be able to run as fast as with a lower load, provided the same DC voltage.
This is why you will not see a lot of Orient Express train videos pulling both cars. The train is simply too heavy for a single motor. The current draw is high, which reduces maximum speed due to armature resistance. Furthermore, the power dissipation in the DC motor can be quite high, which results in increased winding temperature.
The typical approach in such cases is to use (in the real world) two or more locomotives to reduce the torque production requirement of each motor. In this case, I can see the Orient Express to be motorized using two motors.
Source: PhD in motor design and motor control :)."
This some really interesting insight and I would love to see a full-fledged article here on Brickset on the physics of the OE debate!
I'm just going to redesign the tender to take a hub and motor and build two sensibly-sized carriages modelled on the old blue and white British Rail stock. Life is too short. Take the easier route to having fun.
EDIT: This is not intended as a criticism of Alex D.
Applause! Take a bow.
@CCC said:
" @Murdoch17 said:
" @beige2 said:
"Nothing is impossible with lego (Aside from creating life)"
You mean we can make functional time machines out of Lego?!? Time to upgrade my copy of the TARDIS set, then! ;-)"
Every time I start playing with LEGO for a quick five minutes, I find I am transported to about three hours in the future.
"
Same!
@AdamSenna said:
"I'm just going to redesign the tender to take a hub and motor and build two sensibly-sized carriages modelled on the old blue and white British Rail stock. Life is too short. Take the easier route to having fun.
EDIT: This is not intended as a criticism of Alex D."
No worries! I like that there's a simpler solution out there. it gives folks like yourself a quicker way to having fun!
@Ridgeheart said:
" @Murdoch17 said:
" @beige2 said:
"Nothing is impossible with lego (Aside from creating life)"
You mean we can make functional time machines out of Lego?!? Time to upgrade my copy of the TARDIS set, then! ;-)"
After careful observation, I have discovered that the Lego TARDIS travels through time at a steady clip of one second per second. It works! It really works!!"
Forwards AND backwards?
Besides all this talk of tolerances/burnout/torque etc, people also need to remember that motorizing a set officially needs to be a quick process with minimal changes. The process for the Emerald Night was a relatively quick swap out.
People also need to remember how janky the Emerald Night was when motorized, it didn't work smoothly and they copped a bit of flack for it at the time.
How far have we come? In the 1980s we had to add weights to the trains to generate traction. Would love to see a 12v OE. I tried with the EN and the train motor ran OK motorising the tender. Results though with the 12v technic motor powering the loco wheel sets weren’t quite so good. Gearing meant a top speed of about 2cm an hour could be achieved ;-)
Great work, Alex, and thank you so much for sharing.
Thank you Alex D for this great article! Much appreciated!
I would like to second those that have requested a video of this working with both carriages though. Not that I doubt Alex, but I do want to see how it runs.
Furthermore, I wasn't 100% clear from the photos: Does the interior detail of the cab remain when the cable is installed? Like the gauges and control levers?
I would also like to know: Would painting the red rubber bands black affect their effectiveness in any way?
@tomthepirate--you lost me after "consider"
@darthnorman said:
"Do the red bands also come in black?"
@Brickchap said:
"I would also like to know: Would painting the red rubber bands black affect their effectiveness in any way? "
I've used appropriately sized black plumbing o-rings/washers/gaskets from a hardware store on other trains.
Y'all want video? No problem!
https://youtu.be/bVuQRM__s5s?si=TXXi2GJyUGIOJnJz
@Brickchap said:
"Thank you Alex D for this great article! Much appreciated!
I would like to second those that have requested a video of this working with both carriages though. Not that I doubt Alex, but I do want to see how it runs."
Not a problem! I just posted a link above!
"Furthermore, I wasn't 100% clear from the photos: Does the interior detail of the cab remain when the cable is installed? Like the gauges and control levers?"
Yes! That is part of the assemblies that you set aside at the beginning that get replaced at the end. Everything in that pair of photos get put back on in the same place it was taken from.
And about the bands and paint, I have no idea, but I'd caution against it unless you have bands that you are willing to sacrifice, if the experiment doesn't pan out that is.
@Train_of_Thought_Creations said:
"Y'all want video? No problem!
https://youtu.be/bVuQRM__s5s?si=TXXi2GJyUGIOJnJz"
Wow, look at those rails bow under the weight as it drives over them...
@CapnRex101 said:
" @Thieraboss said:
"Lego proclaiming that this set can't be motorized is just silly considering there have been a few MOC makers already who have done it and now here on Brickset."
LEGO never claimed that the Orient Express could not be motorised, only that the model was too heavy for official motorisation. The requirements for anything to be motorised in a LEGO set will be extremely stringent, probably far more so than most would consider necessary."
I stand Corrected
I prefer the 9v metal track era so I will place a 9v bogie under the tender. I did this on the Emerald Night with success.
So call me ignorant, but other than greater power why couldn't you use a PU train motor and save room on having to build the gearing?
@PurpleDave said:
" @Train_of_Thought_Creations said:
"Y'all want video? No problem!
https://youtu.be/bVuQRM__s5s?si=TXXi2GJyUGIOJnJz"
Wow, look at those rails bow under the weight as it drives over them..."
That tree skirt has a lot of give, so it's probably a bit exaggerated, but yeah, it's a heavy train!
It feels like LEGO is obviously daring people to motorise this train with the empty battery-box-size space in the tender and easily removable window through which to feed the cable.
@Darth_Dee said:
"So call me ignorant, but other than greater power why couldn't you use a PU train motor and save room on having to build the gearing?"
The engine has three drive wheels per side, and the RC/PF/PU train motors only enable the use of two drive wheels. There's nowhere to attach the blind drivers, and there's not enough room between the flanged drivers to accommodate them anyways.
This is likely my favorite Brickset article of 2023. So much detail and good work put into this. And I love how it doesn't drastically change the external appearance of the locomotive like the LEGO-issued changes required to power the Emerald Night (granted, that was Power Functions, but still. It looked sad).
I won't be getting an Orient Express until the printing and sticker issues are fully corrected and phased into production (likely middle of next year), but I will definitely bookmark this page for when that day comes!
@Train_of_Thought_Creations said:
"Y'all want video? No problem!
https://youtu.be/bVuQRM__s5s?si=TXXi2GJyUGIOJnJz"
Does the use of 12v rails improve the traction compared with the smooth modern track?
Bravo Alex D!
More of these kind of articles please!
@jsutton said:
" @Train_of_Thought_Creations said:
"Y'all want video? No problem!
https://youtu.be/bVuQRM__s5s?si=TXXi2GJyUGIOJnJz"
Does the use of 12v rails improve the traction compared with the smooth modern track?
"
I'm not sure, I just use it for the looks under the tree, but I tested it on regular modern smooth track as well and it runs well on that too.
@C_O_Patra said:
"It feels like LEGO is obviously daring people to motorise this train with the empty battery-box-size space in the tender and easily removable window through which to feed the cable."
Agreed. I had a very similar thought when I got to that part on the tender; that window didn't have to be there but is perfect to run the cable through.
I have a hunch that the LEGO designers designed the model with motorization in mind even if they weren't allowed to do it officially. The tender is pretty obvious, but the fact that a PU motor fits inside the locomotive without changing the visual appearance is also rather telling.
A big thanks to the author of this article, and everyone that had a hand in designing this solution.
Did you consider using the Medium motor at all, since it is smaller?
I'm waiting in a few more parts, but going to attempt a Medium motor conversion I found on Eurobricks.
Apparently the torque of the medium motor is greater than the regular train wheels motor and should suffice with the right gear ratio.
However having said all that, it's amazing to have a detailed plan laid out to motorize this train. I'm just hoping my approach works!
I suspect the main reason for it not being
'officially' motorised is that the extra weight drops the battery runtime a lot, rather than any difficulty in actually doing it. They would have got lots of complaints if it only ran for half the time of a City train!
Now, double points tomorrow... getting tempted... but do I really need more baubles and another cart-horse?
@Jason_LEGO said:
"Did you consider using the Medium motor at all, since it is smaller?
I'm waiting in a few more parts, but going to attempt a Medium motor conversion I found on Eurobricks.
Apparently the torque of the medium motor is greater than the regular train wheels motor and should suffice with the right gear ratio.
However having said all that, it's amazing to have a detailed plan laid out to motorize this train. I'm just hoping my approach works!"
Hello! I do not have a medium motor, and I wanted to use all the power that the L motor has to offer, so I have not tested a design with one. However, I know of the one that you're taking about, and it's a really efficient design. If you've already got a medium motor on hand, it can't hurt to try it!
@sjr60 - I was thinking it may have to do with battery life too. I use rechargeables, so the shorter life causes me no trouble, but I can see how it would be infuriating for a casual consumer who is just using their disposable batteries only to have them run dry after an hour or so of use.
I tried this solution this evening and the motor kept making a clicking/crunching noise and started to smell like it was burning out, even without the carriages attached. I followed the instructions exactly and used the same parts. Also noticed wear on the red axel piece where the cog was when I removed the motor.
@Legodad899 said:
"I tried this solution this evening and the motor kept making a clicking/crunching noise and started to smell like it was burning out, even without the carriages attached. I followed the instructions exactly and used the same parts. Also noticed wear on the red axel piece where the cog was when I removed the motor. "
Yikes! That's trouble. Mine has not done that in testing, so there is some minor variance between our units that may not have been covered in the article.
If you would like assistance, please send me a message on Eurobricks, to Train of Thought Creations, and I will send you a message back with my email address. From there I can request photos and help you get back on track.
This guide is awesome! Got it motorized but running into an issue where the rods on the wheels keep popping out of the bit that glides along the technic rod. Anyone else had this issue?/Got a fix? The wheels/rods are staggered 90 degrees as they should be
@BlockyM said:
"This guide is awesome! Got it motorized but running into an issue where the rods on the wheels keep popping out of the bit that glides along the technic rod. Anyone else had this issue?/Got a fix? The wheels/rods are staggered 90 degrees as they should be"
Thanks! Is part 67692 popping out of part 40146 specifically?
@Legodad899 and @BlockyM
Seeing multiple posts such as yours has made me realize that I ought to open a temporary support email for these sorts of issues, so that I can see photographs and such. If either of you would like to follow up, please email:
sapphirestarinquiries(at symbol)gmail.com
@Train_of_Thought_Creations said:
" @Legodad899 and @BlockyM
Seeing multiple posts such as yours has made me realize that I ought to open a temporary support email for these sorts of issues, so that I can see photographs and such. If either of you would like to follow up, please email:
sapphirestarinquiries(at symbol)gmail.com"
Thanks, sent!
@Legodad899 said:
"I tried this solution this evening and the motor kept making a clicking/crunching noise and started to smell like it was burning out, even without the carriages attached. I followed the instructions exactly and used the same parts. Also noticed wear on the red axel piece where the cog was when I removed the motor. "
I have now developed a new solution that fixes the gear crunching issue. Until the article itself is updated, here is a Google Doc detailing the changes:
https://docs.google.com/document/d/1C__sIMK5q0f9HydMhKIdL28V558edhDAefVvtXwMEuk/edit?usp=sharing
I just built the updated version, works flawlessly. Had to buy 42147 as a source for the new gear ;)
Thanks for the guide.
Daniel
@Heuwin said:
"I just built the updated version, works flawlessly. Had to buy 42147 as a source for the new gear ;)
Thanks for the guide.
Daniel"
You're welcome! I'm glad that people like yourself are finding the fix buried down here in the comments, and I'm thrilled that it is working for you :D
42147 has so many cool parts, seems like you picked a winner to use as a parts pack.
For those curious, the article is now up to date with the corrected mechanism!
Hi, First, great solution for motorising this train. I have a problem at the end of the build. When I connect the wheels with the rods, like from the instructions. the are getting stuck. I test the setup only in the Air and it got stuck somehow after a few turns. Pins are not in the way. Sometimes they turn ok, but after a few turns everything get stuck and stres the part 6453350 to the point that it is really bent.
@tomyboy said:
"Hi, First, great solution for motorising this train. I have a problem at the end of the build. When I connect the wheels with the rods, like from the instructions. the are getting stuck. I test the setup only in the Air and it got stuck somehow after a few turns. Pins are not in the way. Sometimes they turn ok, but after a few turns everything get stuck and stres the part 6453350 to the point that it is really bent. "
Hello! This often happens when the wheels are not at a 90 degree offset from once side to the other. Check very closely with the alignment shown in the orient express instruction manual to ensure this.
Additionally, make sure to give all of the wheels a bit of wiggle room on their axles. It will run more smoothly that way.
If you still have trouble, please send pictures of the left and right side of the locomotive, without moving the wheels, to
sapphirestarinquiries(at symbol)gmail.com